Raspberry Crumb Bars

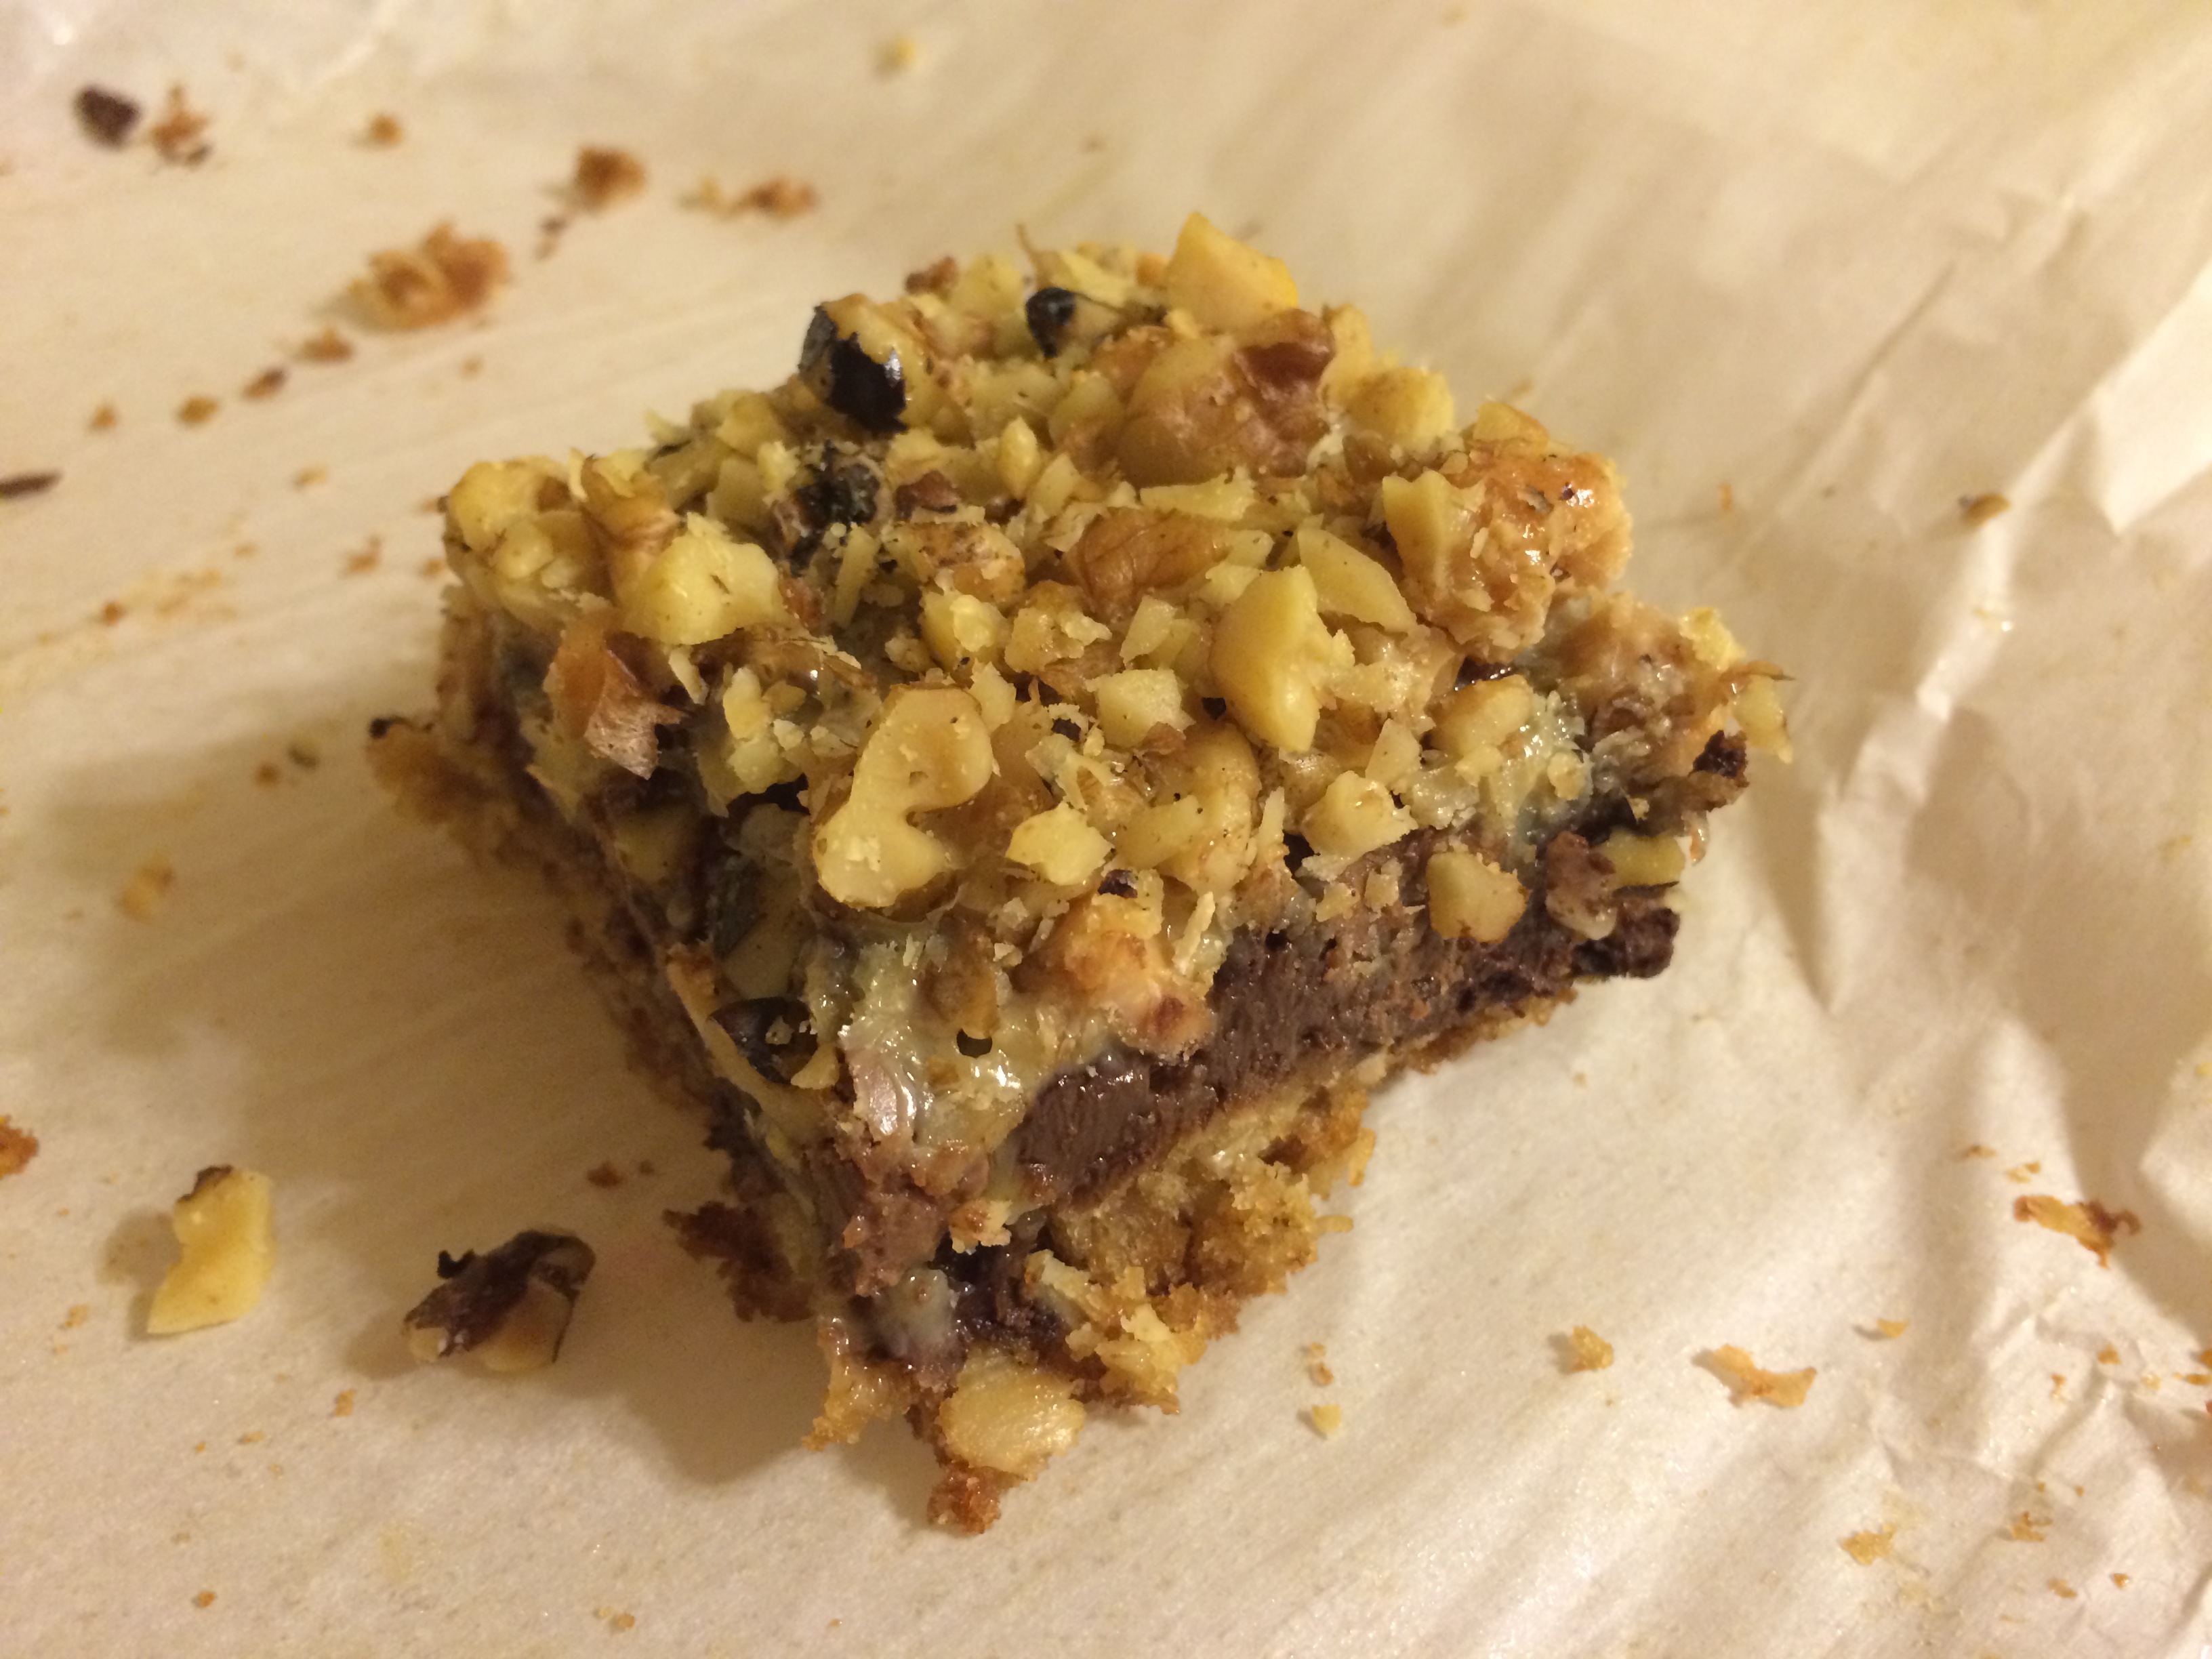
A while back I made these amazing chocolate raspberry walnut bars, and ever since I’ve wanted to make a non-chocolate version. These bars, which I found at Cooking Classy, are a delicious treat for those of us who live chocolate-free lives.

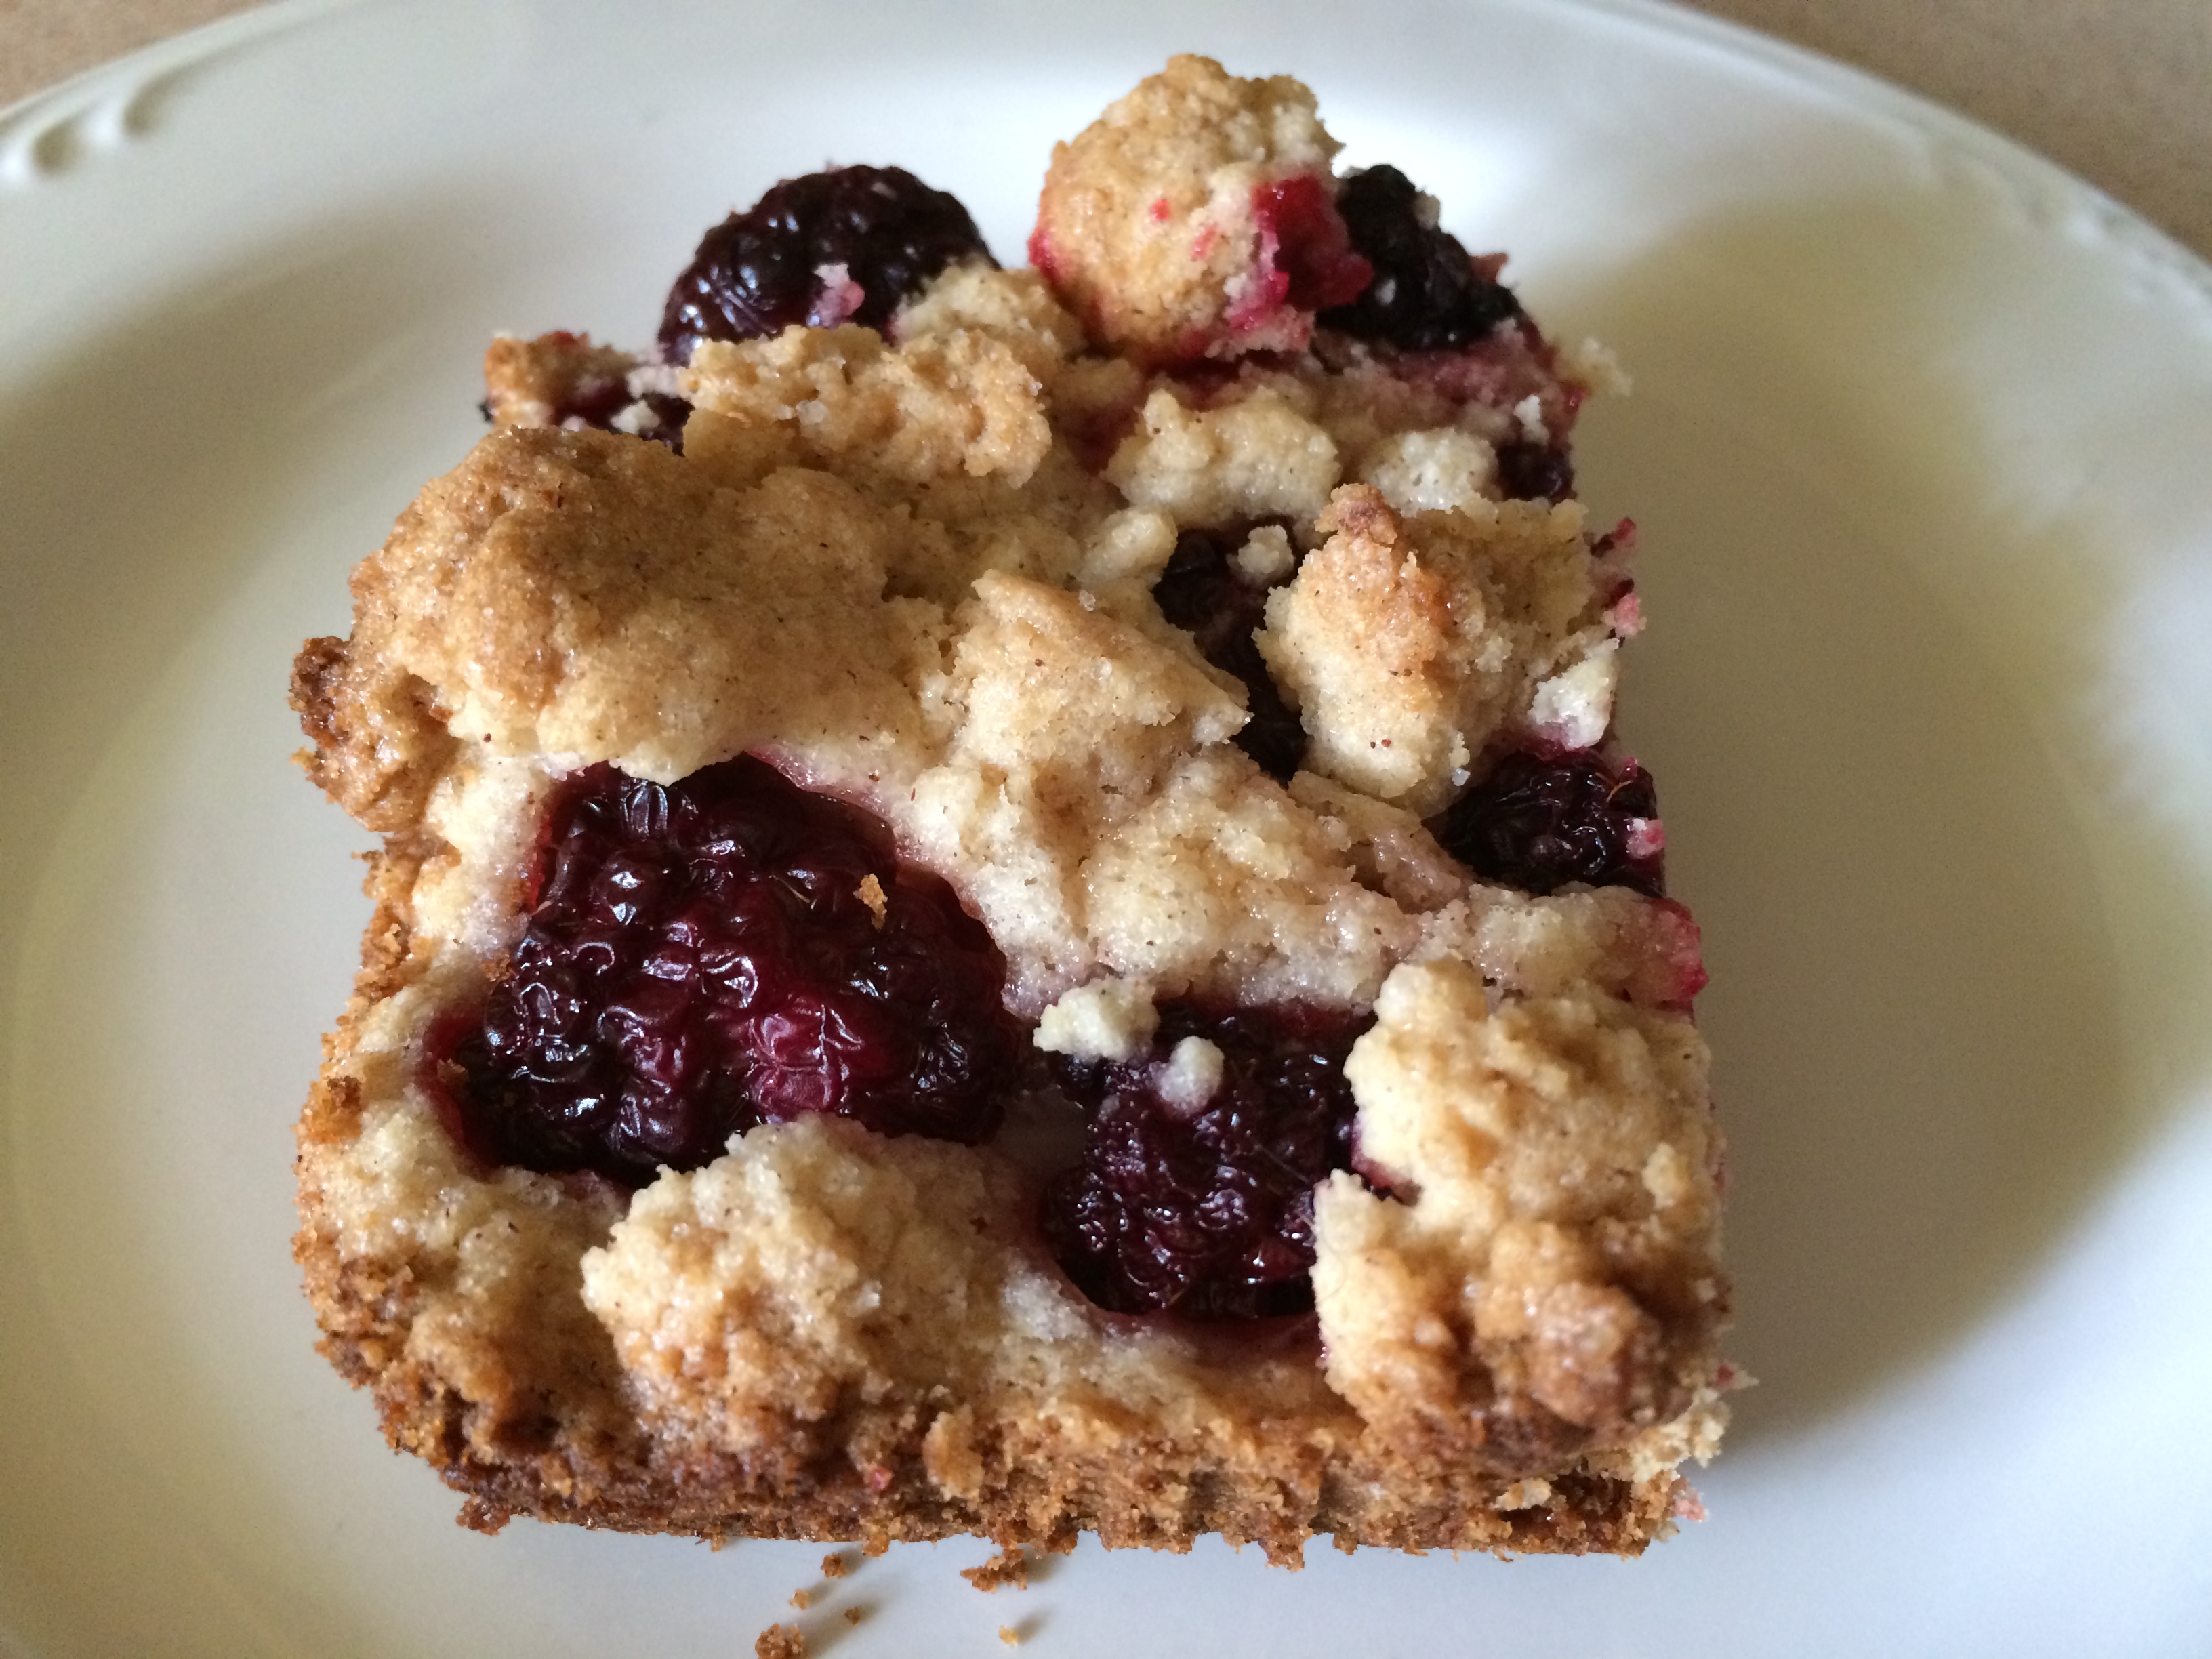
What I really like about these bars is that you use raspberry jam, rather than fresh raspberries, for the filling, making these a year-round possibility. I suspect they’d be delicious with blackberry or apricot jam as well; I’ll have to give those a try sometime. I might also incorporate some chopped walnuts into the crumb mixture next time.

Ingredients

  • 1 cup flour
  • 1/4 teaspoon baking soda
  • 1/4 teaspoon salt
  • 1 cup rolled oats
  • 1/2 cup packed light brown sugar
  • 8 tablespoons butter, cut into cubes and softened
  • 3/4 cup seedless raspberry jam

Preparation

Preheat oven to 350 degrees. Line an 8 x 8 baking pan with foil, extending foil over the sides. Lightly grease foil or spray with baking spray.

In a medium bowl, combine flour, baking soda, salt, oats, and light brown sugar. Mix with a fork until completely combined.

Add butter and toss to coat the cubes, which will make it easier to rub into the dry ingredients. Rub the butter into the dry mixture with your hands to incorporate it very well; you’ll have a crumby texture, but it should stick together if you press it between your hands when it’s ready.

Place 2 cups of the crumb mixture into the bottom of the prepared pan, pressing into an even layer. Spread jam on top, leaving about 1/4 inch border around the edges. Top with remaining crumb mixture and press it into the jam layer just slightly.

Bake for 34 minutes, until top is light golden brown. Remove from oven and cool completely in the pan; lift bars out of the pan by the foil, then cut into squares.

Store in an airtight container at room temperature for 2-3 days. Makes 16.


Peanut Butter Cookie Bars

Peanut butter cookies are among my favorites. But what if you don’t want to go through the process of making the dough, rolling it into balls, dipping them in sugar, then making that crisscross pattern in the tops? You make peanut butter cookie bars.

The original recipe for these bars came from the Nestle Very Best Baking blog and included chocolate chunks, but I substituted peanut butter chips instead for an extra kick of peanut butter flavor. Next time, I might also add some melted peanut butter chips in a drizzle on the top. You could very easily substitute my peanut butter chips for chocolate chips or chunks if you like; I’m sure it would be delicious!

Ingredients

  • 1 1/2 cups flour
  • 1/2 teaspoon baking soda
  • 3/4 cup packed light brown sugar
  • 1/2 cup sugar
  • 8 tablespoons butter, softened
  • 3/4 cup peanut butter
  • 1 egg
  • 1 teaspoon vanilla extract
  • 10-ounce package peanut butter chips

Preparation

Preheat oven to 350 degrees.

In a small bowl, combine flour and baking soda; set aside.

In a mixing bowl, combine light brown sugar, sugar, butter, and peanut butter; cream together on medium speed until smooth. Add egg and vanilla, beating again until smooth.

Add flour mixture and beat to combine, then stir in peanut butter chips.

Press dough into the bottom of an ungreased 9 x 13 baking pan and bake for 18-22 minutes, until edges are light brown and a cake tester comes out with just a few moist crumbs when inserted in the center.

Cool completely in pan; cut into 24 bars. Store in an airtight container at room temperature for up to 4 days.

Chocolate Raspberry Walnut Bars

Chocolate and raspberry are great flavor friends, so I have no doubt that these chocolate raspberry walnut bars are delicious. This recipe is a slight adaptation on Marlita’s Chocolate Raspberry Bars from the King Arthur Flour Cookie Companion, using Dutch process cocoa and adding 1/4 cup of chopped walnuts to the top of the bars.

The next time I make these, I might line the pan with parchment instead of greasing it; the bars on the edges were difficult to remove, so I had to cut a very thin sliver of outer edge from each edge piece in order to pop them out of the pan. The first bar out crumbled into several pieces, so it ended up as a sacrifice to the baking gods!

Ingredients

  • 1 cup unsalted butter
  • 1/4 cup shortening
  • 1 2/3 cups sugar
  • 1 teaspoon salt
  • 1 teaspoon baking powder
  • 1/2 cup Dutch process cocoa powder
  • 2 3/4 cups flour
  • 1 1/4 cups finely chopped walnuts, divided
  • 1 cup seedless raspberry jam

Preparation

Preheat oven to 350 degrees. Grease a 9 x 13 baking pan, or line the pan with parchment paper, extending the parchment over the sides.

In a mixing bowl, cream together butter, shortening, sugar, salt, and baking powder until light and fluffy. Add cocoa and mix until well-combined.

Add flour and 1 cup walnuts, mixing until well-combined and thick, about 3-4 minutes. Press 2/3 of the dough into the bottom of the baking pan.

Place jam in a small saucepan over low heat, stirring constantly until the jam becomes thinner and easy to spread. Pour jam over bottom crust, spreading to each edge. Crumble remaining dough over jam, then sprinkle with remaining 1/4 cup walnuts.

Bake for 35 minutes, until the jam bubbles at the edges of the pan; the top layer may look slightly underdone, but that’s fine; it will set up as the bars cool.

Remove from oven and cool bars completely in the pan; cut into 24 squares.

Store in an airtight container at room temperature for up to 3 days.

Coconut Dream Bars

coconut-dream-barsIn the King Arthur Flour Cookie Companion (also known as my bible), there is a recipe called Build-a-Bars. It begins with a basic crust, then the rest is up to you…whether you add coconut, nuts, caramel, various types of chips, dried fruit, mini marshmallows, crushed cereal pieces, or whatever your heart desires, the bars become whatever you want them to be.

I love recipes like this, those make-it-your-own versions that can be tweaked time and again to create various new treats based on what you have handy in your pantry. I fully intend to make a version of this with pecans, butterscotch chips, and toffee bits, but I didn’t have enough pecans in my pantry this weekend. I did have plenty of coconut, plus bittersweet chocolate chips and almonds. According to Mike and my coworkers, they’re absolutely delicious.

Ingredients

For the crust

  • 2 cups flour
  • 1/2 cup walnuts
  • 3/4 cup powdered sugar
  • 1 teaspoon baking powder
  • 1/2 teaspoon salt
  • 8 tablespoons unsalted butter
  • 2 tablespoons honey
  • 2 tablespoons milk

For the filling

  • 3 cups shredded coconut
  • 1 cup bittersweet chocolate chips
  • 1 cup whole blanched almonds, chopped*

For the topping

  • 4 ounces cream cheese, at room temperature
  • 2 tablespoons sugar
  • 1/4 teaspoon salt
  • 1 egg
  • 5 ounces evaporated milk

*Next time, I’ll toast and cool the almonds before adding them to the filling. 

Preparation

Preheat oven to 350 degrees. Line a 9 x 13 baking pan with parchment paper, extending the paper to cover the edges of the pan.

Make the crust: place 1/2 cup flour and walnuts in a food processor and pulse until nuts are finely ground. Transfer to the bowl of a stand mixer and whisk in remaining flour, sugar, baking powder, and salt.

Cut butter into pea-sized pieces and add to flour mixture. Beat on low speed until the mixture looks crumbly.

Whisk the honey and milk together, then pour over the dry mixture and continue to mix until evenly moistened.

Pour crust mixture into the baking pan and press down to cover the surface in an even layer.

Bake for 15-18 minutes, until set. The edges will be just golden brown.

Allow the crust to cool completely before adding filling and topping; I put my crust in the fridge for just a few minutes to speed the cooling process.

Make the filling: in a large mixing bowl, combine coconut, bittersweet chocolate chips, and almonds. Pour in an even layer over crust.

Make the topping: in a mixing bowl, beat cream cheese, sugar, salt, and egg until no lumps remain; this will take a few minutes, and you’ll need to scrape the sides and bottom of your bowl several times to make sure all of the ingredients blend evenly. Add evaporated milk and beat until the mixture is smooth. Pour evenly over filling.

Bake for 20-25 minutes, until the edges are just bubbly and the center is set.

Remove from oven and cool bars in pan completely before cutting.

Cut into 24 bars and store in an airtight container between layers of waxed paper.


Walnut Bars

walnut-barsDon’t have a mixer? Don’t worry. You can still make may types of tasty treats. Like these walnut bars, for example.

The recipe below is adapted from a King Arthur Flour recipe called vintage butterscotch bars; I substituted one cup each of white and dark brown sugar for the two cups of light brown sugar in the original and omitted the scant 1/8 teaspoon butter rum flavor. The end result is a gooey and almost fudgy treat, if one can use the word fudgy for a recipe that has no chocolate. All you need is a saucepan or microwave to melt your butter, then a large bowl for the mixing of the rest of the ingredients. The bars get puffy when baking, then fall once they’ve cooled – don’t worry, this is supposed to happen.

Ingredients

  • 8 tablespoons unsalted butter
  • 1 cup sugar
  • 1 cup dark brown sugar
  • 2 eggs
  • 1 teaspoon vanilla extract
  • 1 teaspoon salt
  • 1 teaspoon baking powder
  • 1 1/2 cups flour
  • 1 1/2 cups chopped walnuts

Preparation

Preheat oven to 350 degrees. Lightly grease a 9 x 13 baking pan.

Melt butter in a saucepan or in your microwave. Place white and dark brown sugars in a large mixing bowl and pour the butter over top, then stir to combine. Let cool to lukewarm.

Stir in eggs and vanilla extract, then add salt, baking powder, and flour. Fold in nuts.

Scoop batter into pan; it will be very thick, but spread it out as evenly as you can.

Bake for 22-24 minutes, until top looks shiny and edges have pulled away from the pan. Be careful not to over-bake these bars, as they’ll get dry if they’re overdone.

Cool completely in pan, then cut into bars. Store in an airtight container for up to 3 days.

Makes 24.

Granola Bars

granola barsPeople sometimes ask me if I ever have disasters in the kitchen, or at least, if I ever make recipes that don’t turn out well. Of course I do! Today’s granola bars are a great example; if they weren’t burnt on the bottom, they’d be delicious.

Here’s the thing about baking: you can’t be afraid of failing. If you over-bake your granola bars by a few minutes, the next time, you reduce your baking time and everything turns out fine. Failure is all part of the process, whether you’re Thomas Edison inventing the light bulb or a baker trying your first granola bar recipe. Next time I make these – and of course, there will be a next time, because these bars have a delicious flavor profile – I’ll simply bake them for about 18 minutes instead of 22.

The recipe below is adapted from the Pioneer Woman.

Ingredients

  • 3 cups old-fashioned oats
  • 2 tablespoons butter, melted
  • 2 tablespoons vegetable oil
  • 1/2 teaspoon salt
  • 1/2 cup brown sugar
  • 1/4 cup tablespoons honey
  • 2 tablespoons apple juice
  • 2 tablespoons molasses
  • 1 1/2 teaspoons vanilla extract
  • 3/4 cup Rice Krispies
  • 1/2 cup wheat germ*
  • 1/2 cup finely chopped pecans

*You can find wheat germ in the cereal aisle of your grocery store; it comes in a glass jar. 

Preparation

Preheat oven to 350 degrees.

Place oats in a large bowl. Combine butter and vegetable oil, then drizzle over oats, stirring while you drizzle. Add salt and stir.

Place oat mixture on an ungreased 11 x 17 rimmed baking sheet and bake for 15-20 minutes, stirring frequently, to toast the oats. Oats will become light golden brown; remove from oven and set aside to cool for just a few minutes, then pour them back into your large bowl (it’s fine if they’re still a bit warm). Add Rice Krispies, wheat germ, and chopped pecans, stirring to combine.

Reduce your oven temperature to 325 degrees. Line an 11 x 17 rimmed baking sheet with foil and spray the foil with baking spray.

In a medium saucepan, combine brown sugar, honey, apple juice, and molasses. Cook, stirring very frequently, over medium heat until mixture just begins to bubble. Remove from heat and stir in vanilla.

Drizzle the brown sugar mixture over the dry mixture, stirring well until completely coated. Pour onto your prepared baking sheet, then spray your hands with baking spray and flatten the mixture into an even layer.

Bake for 18-20 minutes; I baked mine for 22 minutes and they were over-done, so be careful!

Remove from oven and allow to cool, then cut into bars or squares.

Peanut Butter Bars

peanut butter barsThis week’s chocolate/peanut butter baking continues with these delicious, old-fashioned peanut butter bars. I found this recipe in a Good Housekeeping magazine, and they remind me of something you’d see at a bake sale or church picnic. You can leave them plain, but I chose to spread some melted milk chocolate chips on top for a peanut butter cup-type treat.

My only improvement would be to use chocolate frosting, rather than melted chocolate on the top, as the chocolate layer does separate from the peanut butter layer a bit when you bite into them. Next time, I’ll probably use this fudge frosting for my chocolate layer.

Ingredients

  • 2 1/4 cups flour
  • 1 teaspoon baking powder
  • 1/8 teaspoon salt
  • 1 cup peanut butter
  • 8 tablespoons butter, softened
  • 1 cup packed dark brown sugar
  • 1/2 cup sugar
  • 1 teaspoon vanilla extract
  • 1/2 teaspoon almond extract
  • 2 eggs
  • 8 ounces milk chocolate chips

Preparation

Preheat oven to 350 degrees. Line a 9 x 13 pan with foil and lightly spray with baking spray.

In a medium bowl, combine flour, baking powder, and salt; set aside.

In a mixing bowl, beat peanut butter, butter, dark brown sugar, and sugar until light and fluffy. Add extracts, beating well, then add eggs, one at a time, beating until completely combined.

With the mixer running on low, add flour mixture and beat well, until completely combined; dough will become thick.

Press dough into prepared pan, flattening as best as you can with your hands.

Bake for 30 minutes, or until a cake tester inserted in the center comes out clean.

Cool completely in pan; once cool, lift out and remove foil.

In a small saucepan, melt chocolate chips, stirring until completely smooth. Pour over cooled bars and spread; allow to set completely before cutting.

Pumpkin Bars with Browned Butter Frosting

pumpkin barsI refuse to skip right over Thanksgiving to Christmas, regardless of how much society pressures us all to do so. Now, before we have a Starbucks-cup-level riot about Christmas on this blog, let me be clear: I’m Catholic, and I love Christmas and the joyous preparations that go along with it. I’m just not ready to skip straight from carving a pumpkin to decking the halls.

Seriously, folks, why do we want to rush through the wonderful month of November? November has plenty to offer; the last of the season’s leaves hanging brilliantly on trees, warm afternoons and cold evenings, Election Day, Veterans Day, and the tradition of gratitude (and pie) on Thanksgiving. We skip right over this month, rushing toward “the holidays” without really taking a chance to enjoy that last bit of fall. And so, please consider these pumpkin bars, which are sort of like cake and come from my Better Homes & Garden Baking book, my rebellion against the steamrolling of pumpkin season by peppermint season. Live on, pumpkin season! For a few more weeks, at least.

Ingredients

Pumpkin Bars

  • 2 cups flour
  • 1 1/2 cups sugar
  • 2 teaspoons baking powder
  • 2 teaspoons cinnamon
  • 1 teaspoon baking soda
  • 1/2 teaspoon salt
  • 1/4 teaspoon cloves
  • 4 eggs, lightly beaten
  • 15 ounces pumpkin puree
  • 1 cup vegetable oil

Browned Butter Frosting

  • 1/3 cup butter
  • 3 cups powdered sugar
  • 2 1/2 tablespoons milk
  • 1 teaspoon vanilla extract

Preparation

Preheat oven to 350 degrees.

In a large bowl, whisk together flour, sugar, baking powder, cinnamon, baking soda, salt, and cloves until completely combined.

Add eggs, pumpkin puree, and vegetable oil, stirring well to completely combine, with no dry streaks or lumps remaining.

Pour batter into an ungreased 15 x 10 x 1 pan and spread evenly.

Bake for 25-30 minutes, until a cake tester comes out clean. Cool for 2 hours before frosting.

To make the frosting, melt butter in a small saucepan until light golden brown; this will take a few minutes, and you’ll want to swish the butter in the pan every so often, then use a whisk to get the browning bits off of the sides and bottom. Remove from heat.

In a mixing bowl, combine powdered sugar, 2 tablespoons milk, vanilla, and browned butter. Beat on medium speed for 1-2 minutes, then check your consistency; if necessary, add more milk, about 1/2 teaspoon at a time, to reach a spreadable consistency.

Pour frosting over pumpkin bars and spread using an offset spatula. Store in an airtight container in the refrigerator for 2-3 days.

Seven Layer Bars

sevenlayerbarsTo say that I’m a picky eater is beyond an understatement. I have both flavor and texture issues, and one might imagine that a seven layer bar would send me running for the hills. On the contrary, I think that the seven layers of unbelievable goodness contained in these bars – oatmeal (rather than graham cracker crust), shredded coconut, semisweet chocolate chips, milk chocolate chips, butterscotch chips, sweetened condensed milk, and chopped walnuts – form a divine flavor and texture profile.

The recipe below is adapted from Half Baked Harvest, and as you can imagine from the list of ingredients, beyond rich. At first I cut them into two-by-two squares, but after I took a bite, I cut each bar into quarters for bite-sized pieces. If you’re serving these at a party, I’d recommend placing each bite into a miniature cupcake liner for easy handling; in addition to being rich, they’re also quite sticky, but completely worth it!

Ingredients

For the oatmeal crust

  • 1 1/4 cups rolled oats
  • 1 cup flour
  • 1/4 cup sugar
  • 1/4 cup packed light brown sugar
  • 1/2 teaspoon baking soda
  • 1/2 teaspoon salt
  • 1/2 cup vegetable oil
  • 1 egg
  • 2 teaspoons vanilla extract
  • 1/2 cup semisweet chocolate chips

For the layers

  • 1 1/3 cups shredded coconut
  • 1/2 cup semisweet chocolate chips
  • 1/2 cup milk chocolate chips
  • 1 cup butterscotch chips
  • 1 14-ounce can sweetened condensed milk
  • 1 cup chopped walnuts

Preparation

Preheat oven to 350 degrees. Line a 9 x 13 Pyrex dish with parchment paper.

In a large bowl, combine oats, flour, brown sugar, sugar, baking soda, and salt, mixing until combined.

Add vegetable oil, egg, and vanilla and mix until dough is completely combined. Stir in chocolate chips.

Press dough into the bottom of the baking dish, making sure that chocolate chips are distributed evenly throughout the dough.

Bake for 5 minutes, then remove from the oven. Sprinkle with shredded coconut, semisweet chocolate chips, milk chocolate chips, and butterscotch chips. Pour sweetened condensed milk evenly over the top, then sprinkle with chopped walnuts.

Bake for 25-28 minutes, until top is golden brown. Remove from oven and cool completely before cutting into bites.

Blackberry Pie Bars

blackberry pie barsA few years ago, Mike and I saw two spindly, seemingly forgotten blackberry plants for $15 (total, not each) at our local nursery.  We brought them home, gave them prime real estate in some of the best soil our rocky Pittsburgh property has to offer, and hoped for the best.

From these two blackberry plants, about 10 more have grown. We cut them back each fall, because berries will only grow on new canes. This summer’s crop has yielded about 5 cups of berries so far, with tons more ripening as I write this. We pick new berries daily; those not fit to eat get pulled and tossed into the thicket, or left for the birds.

Because fresh berries have a limited shelf life, sometimes it’s best to bake with them – hence these blackberry pie bars, which I found over at The Novice Chef. I suspect that a lemon drizzle might make a good addition to these bars, or perhaps a scoop of vanilla ice cream. Mike declared them delicious without any additional accouterments, though.

Ingredients

For the crust

  • 3 cups flour
  • 1 cup sugar
  • 1 teaspoon baking powder
  • 1 teaspoon cinnamon
  • zest of 1 medium lemon
  • 1 cup butter, cold and cut into 1-inch pats
  • 1 egg
  • 1 teaspoon vanilla extract

For the blackberries

  • 1/2 cup sugar
  • 4 teaspoons cornstarch
  • juice from 1 medium lemon
  • 4 cups fresh blackberries

Preparation

Preheat oven to 375 degrees. Grease a 9 x 13 baking pan; set aside.

In a food processor, combine flour, sugar, baking powder, cinnamon, and lemon zest and pulse several times to combine. Add butter, egg, and vanilla and pulse until the mixture forms coarse crumbs. If using a smaller food processor (like I did), break up the mixture with a fork a bit every few pulses.

Press half of the mixture into the bottom of the baking pan; reserve remaining crust to crumble over the top.

In a large bowl, combine sugar, cornstarch, and lemon juice, mixing until smooth. Add berries and gently stir to coat; spoon berries over crust. Crumble the remaining crust mixture over the berries.

Bake for 40-45 minutes, until the top is lightly browned, being careful not to burn the bottom. Remove from oven and cool completely before serving, or spoon out while warm and serve like a cobbler.