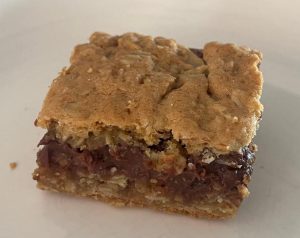
Mojito Bars

mojitobarsMike and I traveled to Puerto Rico for our tenth wedding anniversary back in 2010 and he drank mojitos with pretty much every meal except breakfast. He might have even had one for breakfast, now that I think about it. In any case, Puerto Rico is as close as we’ve ever gotten to Cuba, home of the mojito, though I still hope to visit Havana someday.

Anyway…these bars are inspired by that cocktail, though I have to say they’re really just more like a lime bar with a little bit of mint and a hint of rum than the real thing. They’re delicious regardless, though. Enjoy!

Ingredients

For the crust

  • 12 tablespoons butter
  • 1/2 cup powdered sugar
  • 1 3/4 cups flour

For the filling

  • 3 tablespoons light rum
  • 16 mint leaves, chopped
  • 1 1/2 cups sugar
  • 4 eggs, at room temperature
  • 2/3 cup fresh lime juice (from about 6-7 limes)
  • zest from 1 lime
  • 1/4 teaspoon salt
  • 1/4 cup flour
  • 2 tablespoons milk
  • Powdered sugar, for dusting

Preparation

Preheat oven to 350 degrees. Spray a 9 x 13 baking tin with baking spray. Place chopped mint and rum in a bowl and let steep while you prepare the crust and filling.

To make the crust, beat butter and powdered sugar with the paddle attachment of your mixer on low speed to combine. Add flour and beat on low to a sandy consistency; you’ll want to scrape the bowl a few times. Pour into the baking tin and press into an even layer, then bake for 22-25 minutes, until crust is just starting to turn golden brown.

While crust is baking, place sugar and eggs in a large bowl and whisk to combine. Add lime juice, zest, salt, flour, and milk and whisk to combine. Pour the rum/mint mixture through a strainer and stir into the lime mixture. Pour over crust and bake for another 23 – 26 minutes, until center is set. Remove from oven and allow to cool for about 1 hour, then cool completely in the fridge.

Cut into squares and dust with powdered sugar; store in a single layer in the fridge for 1-2 days. Makes 24.

Advertisement

Salted Caramel Chocolate Cookie Bars

saltedcaramelchocolatecookiebarsToday’s baking theme seems to be “looks good, tastes…just okay.” Granted, I have very high standards when it comes to flavor profiles, but I feel like there’s something missing from these salted caramel chocolate cookie bars, which I found over at Inside Bru Crew Life and adapted just slightly based on what I had on hand. The frosting is absolutely delicious, but the bars themselves need something more. The original recipe called for caramel-flavored coffee creamer in the dough and I just used milk, so perhaps that’s what’s missing?

In any case, this recipe makes a ton of frosting and you’ll have at least a cup or so left over. I suspect I’ll whip up some brownies and use the leftovers on them because I think that would be quite tasty. I’m also considering whether pecans or walnuts – toasted, of course, to really bring out their flavor – would make a nice addition. Stay tuned!

Ingredients

For the cookie base

  • 2 cups flour
  • 1/2 cup dark cocoa powder
  • 1 teaspoon baking powder
  • 1/2 teaspoon salt
  • 8 tablespoons butter, at room temperature
  • 1/2 cup brown sugar
  • 1/2 cup white sugar
  • 1 egg
  • 1 tablespoon vanilla extract
  • 2 tablespoons milk

For the frosting

  • 1 cup butter, at room temperature
  • 1/2 teaspoon vanilla extract
  • 1/2 cup caramel ice cream topping
  • 1 teaspoon kosher salt, plus more for sprinkling
  • 4 cups powdered sugar

Preparation

Preheat oven to 375 degrees. Line a 9 x 13 baking tin with foil and spray with baking spray. In a medium bowl, combine flour, cocoa powder, baking powder, and salt; set aside.

In a mixer fitted with the paddle attachment, cream butter and sugars until light and fluffy. Add egg, vanilla, and milk and beat to combine. Add flour mixture in two batches, beating well between each.

Press dough into the bottom of the baking tin to create an even layer; bake for 14 minutes. Remove from oven and let cool completely before frosting.

To make frosting, beat butter on medium speed for about 1 minute. Add vanilla, caramel sauce, and salt and continue to beat until combined. Add powdered sugar and beat on low, then medium speed, to fully incorporate the sugar into the butter mixture.

Spread frosting over bars and sprinkle lightly with additional kosher salt (if desired). Cut into 24 bars and store in an airtight container for 1-2 days.

Pumpkin Cheesecake Bars

pumpkincheesecakebarsSometimes you find a recipe online or in a cookbook that totally fails, even though you followed it to the letter. It happens to most bakers at some point or another, and we just chalk it up to a learning experience. But other times you hit the jackpot, as was my experience with these amazing treats. Billed as pumpkin streusel bars by Sally at Sally’s Baking Addiction, and incredibly reliable baker and blogger, I chose to call my version pumpkin cheesecake bars because they remind me so much of cheesecake. 

My version uses sour cream instead of Greek yogurt, and I added more nutmeg to the batter and also tossed some nutmeg into the streusel – but otherwise the recipe is the same, so Sally deserves the credit rather than me. I’ll definitely make these again and might mix some toasted pecans into the streusel next time. 

Ingredients

For the crust

  • 1 1/4 cups gingersnap cookies
  • 2 tablespoons sugar
  • 4 tablespoons butter, melted

For the filling

  • 8 ounces cream cheese, at room temperature
  • 1/2 cup sugar
  • 3 eggs
  • 2 teaspoons vanilla extract
  • 1 1/4 cups pumpkin puree
  • 1/3 cup sour cream
  • 1 1/2 teaspoons cinnamon
  • 1/4 teaspoon ginger
  • 1/4 teaspoon cloves
  • heaping 1/4 teaspoon nutmeg

For the streusel and icing

  • 1/2 cup old-fashioned oats
  • 1/3 cup packed light brown sugar
  • 1/4 cup flour 
  • 1/4 teaspoon cinnamon
  • Dash of nutmeg
  • 4 tablespoons butter, cut into small cubes
  • 1 1/2 cups powdered sugar
  • 2 – 3 teaspoons water

Preparation

Preheat oven to 325. Line an 8-inch square pan with foil, extending foil over the sides.

Make your streusel and keep in the fridge while you prepare the crust and filling: combine oats, brown sugar, flour, and spices in a small bowl. Rub (or cut) in butter until the mixture looks like coarse crumbs. Set aside in the fridge until ready to use. 

Mix the gingersnap cookie crumbs, sugar, and butter together and press into the bottom of the pan. Bake for 10 minutes; turn oven temperature up to 350 degrees. 

While crust is baking, prepare the filling. Beat cream cheese and sugar until fluffy, then add eggs, one at a time, beating after each. Beat in pumpkin, sour cream, and spices until mixture is creamy. Pour onto crust and top with streusel.

Bake for 40-45 minutes, covering the top with foil around 30-35 minutes to prevent over-browning. Bars are done when very lightly browned and the center is set; I used a cake tester to make sure they were done in the middle. Remove from oven and cool on a wire rack for about 1 hour, then chill for 3 hours in the fridge. Before serving, mix powdered sugar and water together to form a drizzly icing and drizzle over bars. 

Makes 12 or 16 bars, depending on how large you make them – mine made 16. Store in the fridge for 2-3 days – these bars become sticky after a day or so, but they are still absolutely delicious. 

Lemon Poppy Seed Bars

lemon poppy bars
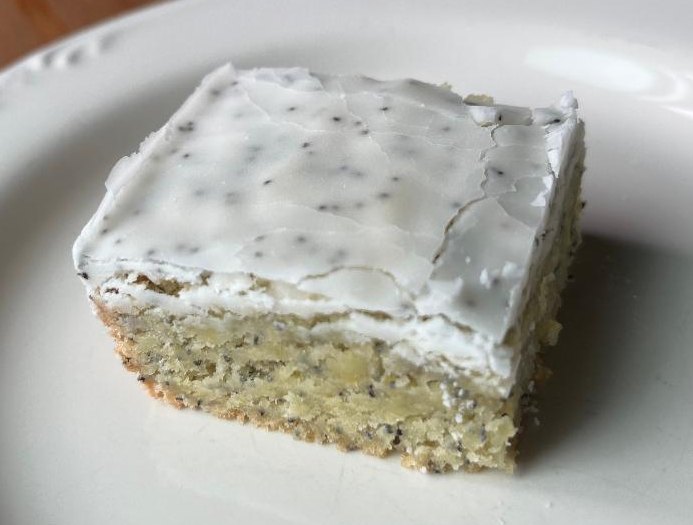
A while back I found a great recipe called Scandinavian blondies in my King Arthur Baking cookie companion, a great combination of lemon and almond flavors (or just almond, if you prefer). I’ve adapted that recipe multiple times to adjust the flavors, most recently using a classic lemon poppy seed combination. They turned out really well, and I’ll definitely make them again.

My first attempt at these used just one tablespoon of poppy seeds in the bars, which wasn’t enough. While it might sound like a lot, you definitely need two tablespoons to get a good poppy flavor against the lemon.

Ingredients

For the bars

  • 2 eggs
  • 1 cup sugar
  • 1/2 teaspoon salt
  • 1 teaspoon vanilla extract
  • zest of 1 medium lemon
  • 8 tablespoons butter, melted
  • 1 cup flour
  • 2 tablespoons poppy seeds

For the glaze

  • 1 3/4 cups powdered sugar
  • 1 tablespoon poppy seeds
  • 3 – 4 teaspoons water

Preparation

Preheat oven to 325 degrees. Lightly grease an 8 x 8 square baking pan.

In a mixer fitted with the paddle attachment, beat eggs until light colored and thick. Add sugar and salt, continuing to beat until shiny and pale yellow.

Add extract, zest, melted butter, and 1/2 cup of the flour, folding in gently. Fold in remaining 1/2 cup of flour and poppy seeds.

Pour batter into prepared pan and bake for 30-35 minutes, until the edges begin to pull away from the sides of the pan and are a very light golden color.

Remove from oven and cool completely before icing. To make icing, combine powdered sugar and poppy seeds; add water, 1 teaspoon at a time, to make a pourable glaze. Pour over bars and spread evenly with an offset spatula; allow to set before cutting. Makes 16.

Peanut Butter Bars with M&Ms

pbbarswithmms
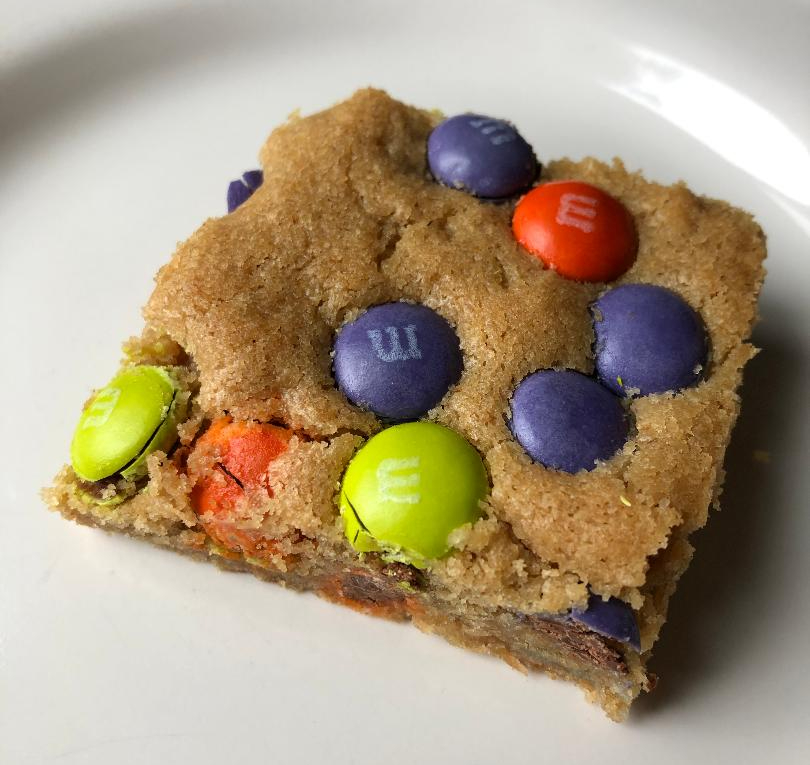
Halloween season means baking for my nieces and nephews, and these peanut butter bars with M&Ms Ghoul Mix candies traveled to North Carolina for my nephew Roman, who is 14. I remember when he was a tiny little person, dressed up as a lion for his day care Halloween parade. Last year (at least I think it was last year), he went as a legionnaire…or a Roman, if you will. Ha! This kid seems to have my sense of humor.

This recipe is incredibly easy to make, and the end result is beyond delicious. The first time I made this, with Reese’s Pieces instead of M&Ms, Mike and I ate the entire pan ourselves. Granted, that wasn’t the smartest decision, but they were just so tasty we couldn’t resist.

Ingredients

  • 12 tablespoons butter, melted and cooled for 3 minutes
  • 2 cups packed light brown sugar
  • 3/4 cup creamy peanut butter
  • 2 eggs plus 1 egg yolk
  • 1 tablespoon vanilla extract
  • 2 cups flour
  • 1 teaspoon baking powder
  • 1 teaspoon salt
  • 10-ounce bag M&Ms Ghoul Mix, divided

Preparation

Preheat oven to 350 degrees. Line a 9 x 13 pan with parchment paper.

In a large bowl, whisk melted butter and brown sugar together until smooth. Whisk in peanut butter, then eggs, egg yolk, and vanilla until well-combined.

Add flour, baking powder, and salt and stir together using a rubber spatula; batter will be very thick. Stir in about 1 cup M&Ms, then spread batter into the baking pan, flattening as best you can to create an even layer. Sprinkle remaining M&Ms on top.

Bake for 30 minutes, then insert a cake tester in the center; blondies are done if the cake tester comes out clean or with just a few moist crumbs. Be careful not to over-bake these; peanut butter treats tend to dry out if they’re baked too long.

Remove from oven and cool completely in the pan; lift out using parchment paper and cut into 24 squares. Store in an airtight container at room temperature for several days; if shipping, back well in an airtight container with layers of waxed paper to prevent breakage.

Oatmeal Bars with M&Ms

oatmeal mm barsOur kitchen remodel begins in 15 days. This weekend, in an effort to clear out our cabinets, I baked zucchini bread, chocolate chip pumpkin bread, brownies, and these oatmeal bars with miniature M&Ms.

Fun fact about this recipe: it was originally written for cookies, as a “make it mine” recipe from the Better Homes & Gardens Baking book. Wanting to save a bit of time, I decided to bake my adapted recipe, which uses peanut butter as part of the fat content and miniature M&Ms as the stir-in ingredient, as bars. Some cookies convert easily, but if you’re not experienced with this, check out this very useful post from King Arthur Baking for tips on how to figure out the right size pan and baking time.

Ingredients

  • 8 tablespoons butter, softened
  • 1/2 cup peanut butter
  • 1 1/2 cups packed light brown sugar
  • 1 teaspoon baking soda
  • 1 teaspoon cinnamon
  • 1/2 teaspoon salt
  • 2 eggs
  • 1 teaspoon vanilla
  • 1 1/2 cups flour
  • 3 cups old-fashioned oats
  • 1 1/2 cups M&Ms miniature baking pieces

Preparation

Preheat oven to 350 degrees. Line a 9 x 13 baking pan with foil and spray lightly with baking spray. Note: next time, I might not spray the foil and see what happens; the bottom of the bars were softer than I expected and I suspect the baking spray is the reason why.

In a mixer fitted with the paddle attachment, beat butter and peanut butter until smooth. Add brown sugar, baking soda, cinnamon, and salt and beat until fluffy. Add eggs and vanilla and beat, then beat in flour and oats. Stir in miniature M&Ms.

Press dough into prepared baking pan and bake for 25-28 minutes, until top is light golden brown and a cake tester inserted in the center  comes out clean. Remove from oven and cool in the pan for about 30 minutes, then lift the foil out and cool completely on a wire rack. Cut into bars; store in an airtight container at room temperature. Makes 24.

Nut Bars

Read any article about healthy eating habits and it’ll tell you to keep healthy snacks like almonds not just in your pantry, but with you when you’re on the go or at your desk at work. I aspire to be a healthy snacker, but truth be told most of the nuts I buy for snacks end up in baked goods.

These nut bars, adapted from a recipe I found at Taste of Home, are definitely not in the healthy snack category. I adapted mine to include pecans instead of pistachios, but I suspect any nutty combination would work for these treats. The bar base is far more crumbly than I expected it to be, so I think I need to mix my dough better next time. In any case, they’re delicious. Next time, I might sneak a bit of maple flavoring into the honey/sugar mixture.

Ingredients

For the crust

  • 12 tablespoons butter, cut into cubes
  • 2 1/3 cups flour
  • 1/2 cup sugar
  • 1/2 teaspoon baking powder
  • 1/2 teaspoon salt
  • 1 egg, at room temperature, lightly beaten

For the topping

  • 1 cup toasted hazelnuts, cooled and chopped
  • 1 cup lightly salted cashews
  • 1 cup lightly salted almonds
  • 1 cup pecans, chopped
  • 2/3 cup honey
  • 1/2 cup light brown sugar
  • 1/4 teaspoon salt
  • 6 tablespoons butter, cut into cubes
  • 2 tablespoons heavy cream

Preparation

Preheat oven to 375 degrees. Line a 9 x 13 baking tin with foil and grease it with butter.

In a large bowl, stir together flour, sugar, baking powder, and salt. Cut in the butter until the mixture resembles coarse crumbs, then stir in egg. Press into the bottom of the baking tin and bake for 18-20 minutes, until light golden brown. Cool crust completely.

In a medium saucepan, combine honey, brown sugar, and salt over medium heat, stirring to dissolve the sugar. Bring the mixture to a boil and boil without stirring for 2 minutes; remove from heat and stir in butter and heavy cream, then return to the heat for about 1 minute, stirring constantly, until the mixture becomes smooth. Stir in nuts.

Pour over cooled crust and bake for 15-18 minutes, until topping bubbles at the edges. Remove from oven and cool on a wire rack completely; lift out of pan and cut into squares; I made small, approximately 1 x 1 squares for more bite-sized treats, but you could cut larger squares if you like. My batch yielded 48 squares.

Rocky Road Bars

Rocky road ice cream has been around since 1929, when enterprising ice cream maker William Dreyer decided to toss some walnuts and marshmallows into chocolate ice cream. His partner, candy maker Joseph Edy, had done something similar with a chocolate candy bar and Mr. Dreyer thought the idea would be a good one for ice cream as well.

The original recipe was one of the first ice cream flavors to mix these types of ingredients together, and as always, I’m amazed at how people once looked at various component parts and put them together into something absolutely delicious. The recipe below is adapted from one I found at King Arthur Baking Company; I decided to add some chopped almonds and drizzled chocolate to the top of the bars because they looked a bit plain at first. It helps to chill the bars just after drizzling them with the melted chocolate so it sets, making the bars much easier to cut.

Ingredients

  • 1 cup butter
  • 1/2 cup brown sugar
  • 1/2 cup white sugar
  • 2 teaspoons baking powder
  • 1/2 teaspoon salt
  • 1 teaspoon vanilla extract
  • 2 eggs
  • 1 2/3 cups flour
  • 1/3 cup Dutch process cocoa powder
  • 3 1/2 cups chocolate chips, divided
  • 1 cup plus 2 tablespoons roasted salted whole almonds, chopped
  • 1 1/2 cups miniature marshmallows

Preparation

Preheat oven to 350 degrees. Lightly grease a 9 x 13 baking tin.

Cream together butter, sugars, baking powder, salt, and vanilla until light and fluffy. Add eggs, one at a time, beating until combined. Add flour and cocoa powder and beat on low speed to incorporate; stir in 2 cups chocolate chips and 1 cup almonds.

Spread batter in the pan; I used an offset spatula to create an even layer. Bake for 15 minutes, until sides are set and middle is still soft. Sprinkle with miniature marshmallows and 1 cup of the chocolate chips. Bake for another 4 minutes, until marshmallows are just beginning to brown.

Cool completely, then melt remaining 1/2 cup chocolate chips. Drizzle over bars, then sprinkle remaining almonds over the top. Chill briefly to set chocolate, then cut into squares; store at room temperature.

Makes 24.

Cappuccino Bars

We’re going to file these in the “looks ridiculous, tastes amazing” category of Amy Bakes in the ‘Burgh. Because holy cow, they look ridiculous. I mean, total amateur, what-was-she-thinking ridiculous. Fortunately they taste absolutely amazing. Almost like a tiramisu and a cappuccino got together and decided to make a whole new dessert.

Here’s what happened with this recipe, adapted from the King Arthur Flour Cookie Companion: my first layer wasn’t exactly even. So my second layer turned out wonky, and instead of covering it with glaze as recommended, I covered it with a thicker icing and tried to make a sort of fancy feathering thing happen, kind of like those patterns you see on actual cappuccinos. Oh, boy, what a disaster. I was almost too embarrassed to have Mike take them to work, but I figured something that tasted this delicious should absolutely get its chance to be enjoyed. I already have several ideas for next time, because you can bet I’ll make these again…and they won’t look like a train wreck.

Ingredients

First Layer

  • 1 3/4 cups flour
  • 1/2 teaspoon salt
  • 1 teaspoon baking powder
  • 8 tablespoons unsalted butter, slightly softened
  • 3/4 cup sugar
  • 2 eggs
  • 1/2 teaspoon vanilla extract
  • 1/3 cup instant coffee crystals

Second Layer

  • 3/4 cup sugar
  • 1/2 cup flour
  • 3 eggs
  • 1 cup heavy cream
  • 1 1/2 teaspoons vanilla extract

Icing Layers

  • 3 cups powdered sugar, divided into one 2-cup portion and one 1-cup portion
  • 2 teaspoons cinnamon
  • 1/2 teaspoon salt
  • 1/3 to 1/2 cup heavy cream

Preparation

Preheat oven to 350 degrees. Lightly spray a 9 x 13 baking tin with baking spray.

In a small bowl, combine flour, salt, and baking powder; set aside.

In a mixer fitted with the paddle attachment, cream butter and sugar until fluffy, then add eggs, one at a time, scraping the bowl well after each. Beat in the vanilla and coffee crystals, then add flour mixture and stir to completely combine.

Drop dollops of batter into the prepared baking tin and use a small offset spatula to spread it into an even layer; batter will be fairly thick. Bake for 15 minutes, until top is set; this means the sides have just started to pull away from the pan, and if you touch the center gently, your fingerprint will remain but will not break the surface of the crust.

Cool for 15 minutes while you prepare the filling. In a large measuring cup, combine sugar and flour; in a separate measuring cup, combine eggs, heavy cream, and vanilla. Add heavy cream mixture to sugar mixture and stir to combine completely, until smooth. Pour over crust and bake for 20-25 minutes, until the center is set.

Remove from oven and cool on a rack for 1 hour, then chill until completely set. Once set, make your first layer of icing; in a medium bowl, combine 2 cups powdered sugar, 2 teaspoons cinnamon, and 1/2 teaspoon salt. Add heavy cream 1 tablespoon at a time, until you reach a spreadable consistency that’s still slightly firm. Spread on bars, smoothing as much as possible.

In another bowl, place remaining 1 cup powdered sugar and add heavy cream, 1 teaspoon at a time, to reach a firm pipable consistency (mine needed about 2 1/2 teaspoons). Place in a piping bag and pipe lines across the bars; gently drag a toothpick through the lines to create feathering. Allow feathered icing to set before cutting, then cut into 30 squares.

Note: these bars cut easily, but my icing layer pulled away from my second layer a bit (contributing to the “looks ridiculous” situation). Next time, I might chill them for just a short time before cutting.

Store in an airtight container at room temperature for 1-2 days or in the fridge for 2-3 days.

S’more Bars

As a child, I was kind of afraid of the woods. Blame it on the fairy tales, maybe? But as an adult, I cannot get enough of nature. While Swallow Falls State Park is my favorite place on Earth, the coronavirus pandemic has prevented us from crossing state lines into Maryland. We’re lucky to live near North Park in Pittsburgh, and also to have our own backyard, complete with a fire pit.

I recently caught the scent of a backyard fire on the breeze, and this made me think of s’mores, which then made me wonder how I could bake something s’more-like for Mike and his coworkers. The King Arthur Flour Cookie Companion includes a recipe called “Build-a-Bars” that can be adapted to whatever flavor profile you like, and it seemed a good option for a s’more bar. You could make a pastry crust for these, but I chose to go with a graham cracker crust for extra s’more-ness.

Ingredients

For the crust

  • 1 1/2 cups graham cracker crumbs (from about 13 1/2 sheets of crackers)
  • 8 tablespoons butter, melted
  • 1/4 cup flour
  • 1/4 cup packed light brown sugar

For the filling

  • 2 1/2 cups miniature marshmallows
  • 4 full-sized Hershey bars, broken into pieces
  • 1 cup broken graham crackers

For the topping

  • 4 ounces cream cheese, at room temperature
  • 2 tablespoons sugar
  • 1/4 teaspoon salt
  • 1 egg
  • 5 ounces evaporated milk

Preparation

Preheat oven to 350 degrees. Lightly grease a 9 x 13 baking tin.

Combine graham cracker crumbs, melted butter, flour, and brown sugar and press into the bottom of the pan. Bake for 10 minutes, then remove from oven and cool completely on a wire rack.

In a medium bowl, stir together miniature marshmallows, Hershey bar pieces, and graham cracker pieces; set aside while you make the topping.

For the topping, beat cream cheese, sugar, and salt until blended. Add egg and beat well to combine completely, scraping your bowl as necessary, until no lumps remain. Add evaporated milk and beat to combine completely.

Pour the filling evenly over the crust, then pour topping evenly over filling.

Bake for 20-25 minutes, until edges bubble a bit and the center is set. Cool on a wire rack completely before cutting; cut into 24 bars.

Store in an airtight container at room temperature for about 2-3 days.