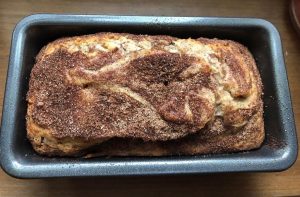
Little French Loaf

frenchloaf
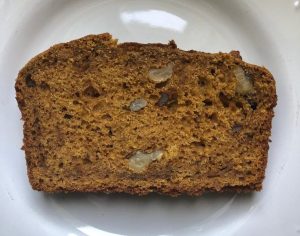
I’m not much of a bread baker, and as I work to build my skills, I have many challenges. One of those challenges is that a lot of bread recipes make one or two loaves, and Mike and I simply aren’t going to eat that much bread. Enter One Dish Kitchen, a collection of small-batch recipes perfect for two. I found this recipe for a small loaf of French bread there, and am very pleased with how it turned out.

Flavor-wise it was perfect, but texture-wise it was denser than I’d have liked. I’m not sure if I kneaded it too much or too little, didn’t give it enough time to rise, or some other mysterious bread-related factor that I’ve yet to learn…but I am determined to learn. Small loaves are perfect for practice, so I intend to make this one again many times until I’ve mastered it. And as a woman who spent literal years perfecting her buttercream, I’m up to the challenge.

Ingredients

  • 2 1/4 cups (10 ounces) bread flour
  • 1 1/2 teaspoons kosher salt, divided
  • 1 1/2 tablespoons olive oil, divided
  • 1 tablespoon honey
  • 6 ounces warm water (between 105 and 115 degrees)
  • 1/2 teaspoon active dry yeast

Preparation

In a mixing bowl, combine flour, 1 teaspoon kosher salt, 1/2 tablespoon olive oil, honey, and water. Sprinkle yeast over water and allow it to dissolve, then mix with your paddle attachment on medium speed until the dough comes together. You can either knead your dough using the dough hook on your mixer, or by hand – I kneaded by hand for the practice.

Knead until the dough is smooth and elastic, about 10 minutes. Place back in your mixing bowl, cover the top with plastic wrap, and allow the dough to rise for about 1 hour or until nearly doubled in size.

Turn the dough onto a lightly floured surface and knead it 4-5 times to deflate it slightly. Cover it with a kitchen towel and allow it to rest for about 10 minutes. Shape the dough as desired – I went with a general oval loaf shape – place it on a baking sheet, and cover it with a kitchen towel. Allow the dough to rise a second time for about 1 hour.

Preheat oven to 400 degrees. Using a very sharp knife, make slashes in the top of your dough, then brush the whole loaf with remaining olive oil. Sprinkle with remaining kosher salt; bake for 18-20 minutes.

Remove loaf from oven and allow it to cool on your baking sheet for about 5 minutes, then place it on a wire rack and allow it to cool completely before serving. Makes about 8 slices, depending on how generously you cut each slice. Store in a large zip-top bag at room temperature for 2-3 days.

Advertisement

Banana Nut Muffins

banananutmuffinYou’d think a girl like me who bakes all the time would have made banana nut muffins before. Not until this week, my friends. I guess I always make banana bread with our sketchy-looking bananas, but Mike requested banana nut muffins this time. In they went to his office, providing his coworkers with a classic breakfast treat.

I found this recipe at Celebrating Sweets and adapted it just a bit, using pecans and adding nutmeg. You could also use walnuts or chocolate chips as an alternative if you like, or a combination of the two. The interesting thing about this recipe is that it uses melted butter, rather than oil, giving a richer flavor.

Ingredients

  • 1 3/4 cups flour
  • 1 teaspoon baking soda
  • 1/4 teaspoon salt
  • 1/2 teaspoon cinnamon
  • 1/4 teaspoon nutmeg
  • 8 tablespoons butter, melted and slightly cooled
  • 2 cups mashed banana (about 4 medium bananas)
  • 2 teaspoons vanilla extract
  • 2 eggs
  • 1/2 cup chopped pecans

For topping:

  • 1/4 cup brown sugar
  • 1/4 teaspoon cinnamon
  • Dash of nutmeg

Preparation

Preheat oven to 350 degrees. Line muffin tins with paper liners; my batch yielded 20 muffins.

In a medium bowl, combine flour, baking soda, salt, cinnamon, and nutmeg. In a separate bowl, whisk together melted butter and brown sugar, then add mashed bananas, vanilla, and eggs. Add dry ingredients to wet ingredients and stir to slightly combine, then mix in pecans, stirring just until no dry streaks remain.

Using a two-inch cookie scoop, scoop batter into muffin tins. Sprinkle with topping.

Bake for 14-17 minutes, until a cake tester comes out clean. Remove from oven, remove muffins from tins, and cool on a wire rack (or serve warm). Once muffins are cool, store in an airtight container at room temperature for up to 2 days.

Makes about 20 muffins.

Focaccia

Bread baking requires a whole different set of skills than I currently possess. But I’m determined to become a bread baker, so here I am, learning to make focaccia.

Why focaccia? It’s a fairly simple dough, and thus seemed like a good place to begin. I made a different version a few weeks back but didn’t get a chance to blog it; the recipe itself is adapted from one I found at Gimme Some Oven. I used a good cup or so more flour than in the original, kneaded it for a slightly longer time, and sprinkled the top with regular Italian seasoning instead of fresh rosemary. I’m happy to say that it turned out very well, and it’s something I’ll definitely make again. Maybe next time, I’ll top it with a bit of parmesan cheese.

Ingredients

  • 1 1/3 cup warm water (about 110 degrees)
  • 2 teaspoons sugar
  • 2 1/4 teaspoons active dry yeast (one 7-gram package)
  • 3 1/2 to 4 1/2 cups flour
  • 1 teaspoon kosher salt
  • 1/4 cup extra virgin olive oil, plus more for drizzling
  • Italian seasoning, for sprinkling

Preparation

In a mixing bowl, combine warm water and sugar. Add yeast and stir, then allow to sit for 5-10 minutes until the yeast appears foamy.

Using your dough hook, mix the dough on low speed and gradually add about 3 1/2 cups flour, the salt, and the olive oil. Increase the speed to medium-low and mix for 5 minutes, adding an additional 1/4 to 1/2 cup flour. The dough will be fairly sticky.

Turn dough onto a lightly floured surface and knead for a few more minutes, adding the remaining flour (up to about 4 1/2 cups). The dough will still be a bit sticky, but you’ll be able to shape it into a ball. Place the dough in an oiled bowl and cover it with a damp towel; allow the dough to rise for about 1 hour, until double in size.

Gently deflate the dough and transfer it to a 9 x 13 baking pan; stretch the dough so it fills the pan, and cover it with the damp towel again. Allow the dough to rise a second time for about 30 minutes. Meanwhile, preheat your oven to 400 degrees.

Before placing your dough in the oven, poke deep indentations in the top, then drizzle with additional olive oil and sprinkle with Italian seasoning. Bake for 23-25 minutes, until dough is golden on top. Remove from oven and allow to cool for just a few minutes before serving, or cool to room temperature.

Makes one 9 x 13 rectangle of focaccia, enough for about 12-15 servings.

Rum Raisin Sweet Rolls

As someone who doesn’t like raisins, I’ve never had rum raisin ice cream. Apparently it originated in Sicily, with wine-soaked raisins in vanilla gelato, and became a huge hit in the U.S. in the 1980s. Why raisins? Who knows. This is one of life’s culinary mysteries, along with bizarre (and yet beloved) treats like fruitcake.

Mike likes both raisins and rum, so I made these rum raisin rolls for him with a “make-it-mine” recipe from the Better Homes & Gardens Baking book. I’m trying to gain more experience with yeast doughs, and today’s batch turned out really well. You could omit the rum in the icing if you like and just go with vanilla extract or water, but I highly recommend using the rum.

Dough

  • 4 1/4 to 4 3/4 cups flour
  • 2 1/4 teaspoons (or 1 package) active dry yeast
  • 1 3/4 cups milk
  • 1/2 cup instant mashed potato flakes
  • 5 1/3 tablespoons butter, cut into pieces
  • 1/3 cup sugar
  • 1 teaspoon salt
  • 2 eggs

Filling

  • 1/2 cup golden raisins
  • About 1/8 cup dark rum
  • 1/4 cup butter, softened
  • 1/2 cup packed light brown sugar
  • 1/8 teaspoon cinnamon

Icing

  • 2 1/2 cups powdered sugar
  • 3 teaspoons dark rum
  • About 2 tablespoon water

Preparation

Place raisins and rum in a bowl and stir together; you can let this sit overnight, or just for a few hours while you prepare your dough.

In a stand mixer fitted with the paddle attachment, combine 1 and 1/2 cups flour and active dry yeast.

In a medium saucepan, combine milk, masked potato flakes, butter, sugar, and salt; heat on medium in just warm, between 120 and 130 degrees. Pour into flour/yeast mixture, then add eggs, and beat on low speed for 30 seconds. Scrape down your bowl and beat for 3 minutes on medium.

Switch to your dough hook, and add another 3 cups flour. Mix on low speed until flour incorporates as much as possible, then set your timer and allow the dough to mix for another 2-3 minutes; it will pull away from the sides and wrap itself around the hook. You can also knead this dough by hand, but I used my mixer to do all the work today, and it turned out really well. Remove from the bowl, knead by hand just 2-3 times, then place it back in your mixing bowl and cover it with plastic wrap. Allow to rise in a warm place until about doubled in size, 45-60 minutes.

Once dough has risen, punch it down gently and turn it onto a lightly floured surface to rest for 10 minutes. While the dough rests, stir together the light brown sugar and cinnamon; set aside. Lightly grease a 13 x 9 baking tin.

Shape dough into an 18 x 12 rectangle and spread with softened butter; I just used my fingers for this. Sprinkle filling leaving 1 inch unfilled along the top and bottom of the rectangle. Roll up the rectangle, starting from the long side, and pinch the dough to seal the seams. Slice into 12 equal portions and place cut-sides down in the baking tin. Cover and allow to rise in a warm place for about 30 minutes.

Preheat oven to 375 degrees. Uncover rolls and bake for 25-30 minutes, until tops are golden. Remove from oven and allow to cool in the pan for 10 minutes.

While rolls are cooling, make the icing by combining the powdered sugar, rum, and 1 tablespoon water in a small bowl. Stir in enough remaining water to make a drizzly consistency. Spread over warm rolls; serve warm or at room temperature. Keep in an airtight container at room temperature for 1-2 days. Makes 12.

Spiced Pecan Rolls

I’m a bread amateur, and most of the bread I’ve baked has been of the sweet, filled-with-something variety. Poppy seed and nut rolls, babkas, cinnamon rolls…these are my breads of choice. Someday I plan to bake “normal” breads – you know, the kind that you can make a sandwich with – but for now, I’ll stick with the sweet variety.

My Better Homes & Gardens Baking book has a great recipe for “make it mine” cinnamon rolls, and I chose to go with apple pie spice, chopped pecans, and cinnamon chips for this recipe. The end result is an incredibly tasty creation that had an excellent texture when they first came out of the oven. Today, they were quite dry; I’m not sure if this means I over-baked them, but they still tasted pretty good. I also think the cinnamon chips got a bit lost in the filling, but hey – we bake, we learn. I look forward to making more versions of this in the future.

Ingredients

Dough

  • 4 1/4 to 4 3/4 cups flour
  • 1 package active dry yeast
  • 1 3/4 cups milk
  • 1/2 cup instant mashed potato flakes
  • 5 1/3 tablespoons butter, cut into pieces
  • 1/3 cup sugar
  • 1 teaspoon salt
  • 2 eggs

Filling

  • 1/4 cup butter, softened
  • 1/2 cup packed light brown sugar
  • 1 tablespoon apple pie spice
  • 1/2 cup chopped pecans
  • 1/2 cup cinnamon chips

Icing

  • 1 1/2 cups powdered sugar
  • 1 teaspoon vanilla extract
  • About 2 1/2 tablespoons milk

Preparation

In a stand mixer fitted with the paddle attachment, combine 1 and 1/2 cups flour and active dry yeast.

In a medium saucepan, combine milk, masked potato flakes, butter, sugar, and salt; heat on medium in just warm, between 120 and 130 degrees. Pour into flour/yeast mixture, then add eggs, and beat on low speed for 30 seconds. Scrape down your bowl and beat for 3 minutes on medium.

Switch to your dough hook, and add another 2 1/2 cups flour. Mix on low speed until flour incorporates as much as possible, then turn dough onto a lightly floured surface. Dough will be very sticky; I used a bench knife to scrape it from the countertop during kneading. Knead in enough remaining flour to make a moderately soft though that is smooth and elastic; this can take between 3 and 5 minutes. Shape dough into a ball.

Place dough in a large, lightly greased bowl and allow to rise in a warm place until about doubled in size, 45-60 minutes. I place my dough bowl on a heating pad set to low, as my house tends to be on the cooler side. Once dough has risen, punch it down gently and turn it onto a lightly floured surface to rest for 10 minutes.

While the dough rests, make the filling by combining brown sugar, apple pie spice, pecans, and cinnamon chips in a medium bowl. Set aside. Lightly grease a 13 x 9 baking tin.

Shape dough into an 18 x 12 rectangle and spread with softened butter; I just used my fingers for this. Sprinkle filling leaving 1 inch unfilled along the sides. Roll up the rectangle, starting from the long side, and pinch the dough to seal the seams. Slice into 12 equal portions and place cut-sides down in the baking tin. Cover and allow to rise in a warm place for about 30 minutes.

Preheat oven to 375 degrees. Uncover rolls and bake for 25-30 minutes, until tops are golden. Remove from oven and allow to cool in the pan for 10 minutes.

While rolls are cooling, make the icing by combining the powdered sugar, vanilla, and 1 tablespoon milk in a small bowl. Stir in enough remaining milk to make a drizzly consistency. Remove rolls from the pan and drizzle with icing; allow icing to set before storing. Serve warm or at room temperature; keep in an airtight container at room temperature for 1-2 days. Makes 12.

Pumpkin Sourdough Loaf

My cousin Barb inspired me to take the plunge into the word of sourdough. I’ve not baked much bread, let alone sourdough bread, but last week I stirred together some flour and water and began my sourdough starter. I’m using the King Arthur Flour sourdough starter recipe, and as Barb said, it’s sort of like having a pet. I’ve decided to call him Horatio, which means timekeeper, and I feed him more flour and water twice a day.

Part of sourdough starter maintenance involves discarding a portion of your starter and adding more flour and water to keep the friendly bacteria and wild yeast in your mixture working together to help the starter rise. At a certain point in development, you can start to bake with your “discard,” so I decided to give it a try with this loaf, adapted from King Arthur Flour’s Pumpkin Spice Bread simply by the omission of raisins. The end result, while not as high-rising as the one in the KAF blog post photo, has a lovely spiced pumpkin flavor and nice texture.

Ingredients

  • 2 cups flour
  • 3/4 teaspoon salt
  • 1/2 teaspoon cinnamon
  • 1/2 teaspoon ginger
  • 1/2 teaspoon cloves
  • 1/4 teaspoon nutmeg
  • 1/2 teaspoon baking powder
  • 1/2 teaspoon baking soda
  • 1/3 cup vegetable oil
  • 1/2 cup sugar
  • 1/4 cup molasses
  • 2 large eggs
  • 1 cup pumpkin purée
  • 3/4 cup sourdough starter discard
  • 1 teaspoon vanilla extract
  • 1/2 cup chopped walnuts

Preparation 

Preheat oven to 350 degrees. Lightly grease a 9 x 5 loaf tin.

In a large bowl, stir together flour, salt, cinnamon, ginger, cloves, nutmeg, baking powder, and baking soda; set aside.

In a medium bowl, stir together vegetable oil, sugar, molasses, eggs, pumpkin, sourdough starter discard, and vanilla. Pour into flour mixture and stir until combined, then stir in walnuts.

Pour batter into prepared tin and bake for 50-60 minutes, until a cake tester inserted in the center comes out clean. Cool in the tin for 10 minutes, then turn onto a wire rack to cool completely.

Store at room temperature, wrapped tightly in plastic wrap, for several days. Makes 16 slices.

Applesauce Bread

Baking in the Time of Coronavirus will make you ask yourself interesting questions, like can I bake quick bread with whole wheat flour because I want to ration my white flour because a bunch of people who have probably never even made chocolate chip cookies before are hoarding all the white flour and my local grocery store is sold out? The answer to this question is yes.

My trusty Better Homes & Gardens Baking book has a wonderful recipe for “Make-it-Mine” muffins, which convert easily into quick bread. Make-it-mine recipes give you quantities of ingredients, then you pick the type of flour, sugar, liquid, and spices you want to use. I decided to go with an applesauce bread using apple pie spice and a combination of whole wheat flour and white flour. The flavor is delicious, but the texture is definitely drier than I’d like. This could be because of the wheat flour, but it could also be because I baked it a few minutes too long. Next time, I’ll give it a slightly shorter baking time and see what happens; I’ll also add some pecans into the batter.

Ingredients

  •  1/2 cup white flour
  • 1 1/2 cups whole wheat flour
  • 1/4 cup packed light brown sugar
  • 1 1/2 teaspoons baking powder
  • 1/2 teaspoon baking soda
  • 1/4 teaspoon salt
  • 2 eggs
  • 3/4 cup unsweetened applesauce
  • 3/4 cup milk
  • 2 tablespoons vegetable oil
  • 1-2 teaspoons apple pie spice, to taste
  • Streusel topping:
    • 3 tablespoons flour
    • 3 tablespoons light brown sugar
    • 1/4 teaspoon apple pie spice
    • 2 tablespoons butter, cut into small cubes
  • Drizzle icing:
    • 1 cup powdered sugar
    • About 2-3 teaspoons water

Preparation

Preheat oven to 375 degrees. Lightly grease a 9 x 5 loaf tin.

In a medium bowl, stir together flours, brown sugar, baking powder, baking soda, salt, and apple pie spice. In another medium bowl (or large measuring cup), combine eggs, applesauce, milk, and vegetable oil. Add all at once to flour mixture and stir until just moistened, with no dry streaks of flour remaining.

Pour batter into loaf tin and allow to rest for a few minutes while you make the streusel; in a medium bowl combine flour, brown sugar, and apple pie spice. Rub in the butter until the mixture looks like coarse crumbs, then sprinkle over batter.

Bake for about 35 minutes, then tent with foil and continue baking another 10 minutes or so, or until a cake tester comes out clean. Remove from oven and cool in tin for about 10 minutes, then turn out onto a wire rack to cool either partially or completely; you can glaze this loaf when it’s still warm (not hot) without the drizzling dripping off.

To make the drizzle, place powdered sugar in a small bowl and add water, one teaspoon at a time, until you reach a thicker drizzling consistency. Using a spoon, drizzle over the loaf. Allow to set before serving.

Store well-wrapped at room temperature for 2-3 days.


Orange Honey Sweet Rolls

Well, these are absolutely delicious. Not that I’m surprised; the recipe comes from my Better Homes & Gardens Baking book. And BH&G recipes have never – I repeat, never – let me down. Other sources are not so reliable, but I suspect that BH&G has the best test kitchen in the entire world. Which would make sense, when you think about it. They’ve been in business quite a long time.

My orange and honey sweet rolls are adapted just slightly from the original version, which included golden raisins in the filling and slightly less orange icing for the top. The dough is very easy to work with, which is good for amateur bread bakers like me. Next time, I might add a bit of cinnamon or nutmeg to the filling for a more aromatic treat, but these are wonderful with just the flavors of the orange and honey.

Ingredients

For the dough

  • 2 packages active dry yeast
  • 1 1/4 cup warm water (about 105-110 degrees)
  • 1/2 cup nonfat dry milk powder*
  • 1/3 cup butter, softened
  • 1/3 cup honey
  • 2 eggs, lightly beaten, at room temperature
  • 2 tablespoons toasted wheat germ
  • 1 teaspoon salt
  • 3 cups plain flour
  • 2 cups bread flour

*I bought mine at King Arthur Flour

For the filling

  • 1/4 cup butter, softened
  • 1/4 cup honey
  • zest of 1/2 medium orange

For the icing

  • 1 1/2 cups powdered sugar
  • zest of 1/2 medium orange
  • 2 tablespoons fresh orange juice

Preparation

Place yeast and warm water in a mixing bowl and let stand for five minutes. Add dry milk powder, butter, honey, eggs, wheat germ, and salt and mix on low speed for 30 seconds. Scrape down the bowl, add 2 cups plain flour, and beat on low for 30 seconds, then on high for 3 minutes. Scrape the bowl a few times during mixing.

Stir in remaining 1 cup plain flour with a wooden spoon, then stir in 1 cup bread flour. Turn dough onto a lightly floured surface and knead in as much as the remaining bread flour as you can to make a moderately soft dough that is smooth and elastic, about 6 minutes total. Shape into a ball and place in a lightly greased bowl, turning once to coat. Let rise in a warm place for about 1 hour.

Turn dough out onto a lightly floured surface and gently deflate; cover and let rest for 10 minutes. While the dough is resting, make the filling; stir together butter, honey, and orange zest until smooth; set aside. Lightly grease a 9 x 13 baking tin and set aside.

Roll dough into an 18 x 15 rectangle and spread with filling, leaving a gap of about 1/2 inch around all four sides. Starting from a long side, roll the rectangle into a log and pinch the seam to seal. Cut into 15 slices and place cut-side down in the prepared baking tin. Cover and allow to rise for about 30 minutes.

Preheat oven to 350 degrees. Bake rolls for 25-30 minutes, until lightly browned. Remove from oven and cool in tin for 1 minute, then carefully invert on a cooling rack. Allow to cool for about 5 minutes, then flip onto your serving platter (or a rectangular cake caddy, which is what I used) and drizzle with orange icing. Serve warm or cool.

Store in an airtight container at room temperature for 2-3 days. Makes 15 (though mine only made 13 because I’m terrible at math).

Mini Snickerdoodle Loaves

My friend Kanika and I met at Catholic Charities Foundation many years ago in DC. Our team had two back-to-back unsuccessful hires for the events assistant position, so we asked our priest to bless the desk and exorcise the bad luck. A few weeks later Kanika joined us (thanks, Father Mario!), bringing amazing professional skills, a great sense of humor, and a picky appetite to our crew. As a fellow picky eater, I fully supported this. We had some very funny times on that team, many thanks to her.

Kanika sends me recipe ideas sometimes, and when these mini snickerdoodle loaves came across Facebook Messenger, I knew I needed to bake them. The end result is absolutely delicious, with a tender crumb and great cinnamon flavor. I can see this recipe as a base for other flavor combinations; the original came from Health Printable Recipes, and I tweaked it just slightly based on only having 6 ounces miniature cinnamon chips in my pantry. My recipe yielded five loaves, rather than four; two of those loaves are on their way to Kanika right now. Thanks for the recipe, Marbles!

Ingredients

  • 2 1/2 cups of flour
  • 2 teaspoons baking powder
  • 1/2 teaspoon salt
  • 2 teaspoons cinnamon
  • 1  cup butter, softened
  • 2 cups sugar
  • 3 eggs, at room temperature
  • 1 teaspoon vanilla
  • 3/4 cup sour cream
  • 6 ounces miniature cinnamon chips
  • About 2 tablespoons sugar, for topping
  • About 2 teaspoons cinnamon, for topping

Preparation

Preheat oven to 350 degrees. Lightly grease five miniature loaf tins (about 5 x 3 size).

In a medium bowl, combine flour and baking powder; set aside.

In a mixer fitted with the paddle attachment, cream butter, sugar, salt, and cinnamon until fluffy, about 3 minutes. Add eggs, one at a time, beating between each addition. Stir in vanilla and sour cream, then stir in flour mixture until no dry streaks remain. Stir in cinnamon chips and incorporate evenly, being careful not to over-mix your batter, which will be fairly thick.

Divide batter between loaf tins, filling about 2/3 full; mine had about 10 ounces of batter in each. Combine 2 tablespoons sugar and 2 teaspoons cinnamon, then sprinkle on top of each loaf.

Bake for 35 – 40 minutes, until a cake tester comes out clean. Remove from oven and serve warm, or cool completely and store, tightly wrapped, at room temperature.

Make 5 miniature loaves.

Skillet Cornbread

For some reason, people object to the word “moist.” But any baker will tell you that moistness is a crucial component of good cakes and quick breads, particularly cornbread. Having made an unfortunately dry cornbread before, I took to the internet to find a recipe for a (sorry, word haters) moist version.

Baking a Moment offered the recipe below, which I chose to bake in a cast-iron skillet. You can also use a 9 x 13 pan, but since I had the skillet, I figured, why not? Skillet baking lends a lovely, crunchy brown edge to the bread. I stored mine in my round cake caddy, and we cut slices as we wanted them, rather than cutting the whole round, for freshness. Cornbread can be reheated in the microwave for about 15-20 seconds if you’d like your butter to melt on it; I usually also serve mine with honey.

Ingredients

  • 1 1/3 cup flour
  • 2/3 cup yellow cornmeal
  • 2/3 cup sugar
  • 1 tablespoon baking powder
  • 1/2 teaspoon kosher salt
  • 6 tablespoons butter, divided into one 4-tablespoon portion and one 2-tablespoon portion
  • 1 1/4 cup milk
  • 1/4 cup vegetable oil
  • 2 eggs

Preparation

Place 2 tablespoons butter in the bottom of your cast-iron skillet. Place the skillet in the oven and preheat to 350, allowing the butter to melt during preheating.

In a large bowl, stir together flour, cornmeal, sugar, baking powder, and kosher salt.

Melt remaining 4 tablespoons butter and combine with milk, vegetable oil, and eggs, stirring to combine. Pour wet ingredients into dry ingredients and stir to combine.

Once your oven has preheated, check your skillet and carefully swirl the butter around to coat the bottom, then use a pastry brush to brush butter about halfway up the sides. Pour mixture into the skillet and bake for 35 minutes or until edges are golden brown and a cake tester inserted in the center comes out clean or with just a few moist (sorry, I had to) crumbs.

Cool for 20 minutes before cutting and serving; store in an airtight container at room temperature for about 3 days. Cornbread will last longer if stored, well-wrapped, in the refrigerator. Makes about 12-15 servings, depending on how big you slice it.