Orange Curd

I’ve had more than one friend turn up their nose at the word “curd.” Is it like curds and whey, they ask,  or like cheese curds? Oh no, I say – it is a delicious creation that’s kind of a cross between preserves and pudding. I’ve made lemon curd, lime curd, and blood orange curd in the past, sometimes using whole eggs and other times just egg yolks. I find that yolk-only curds tend to be tangier, while whole-egg curds have a lighter flavor and texture.

Fruit curds are a great way to use leftover egg yolks from meringues and macarons, and are actually a wonderful complement to such treats. This orange curd, made with Valencia oranges and just a hint of lemon juice, tastes a bit like an orange cream popsicle. I suspect it will get added to a cake for our Easter dessert tomorrow, but we’ll see.

Ingredients

  • 6 egg yolks
  • 1 cup sugar
  • 6 teaspoons cornstarch
  • zest from 3 Valencia oranges
  • 3/4 cup Valencia orange juice
  • 2 tablespoons lemon juice
  • 12 tablespoons butter

Preparation

Lightly beat egg yolks and pass them through a fine sieve to remove the albumin. Set aside in a medium bowl close to the stove for easy access; thoroughly wash your sieve and place it nearby for a second straining once the curd has cooked.

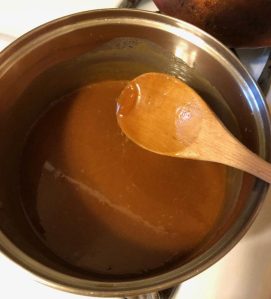
In a medium saucepan, whisk together cornstarch, sugar, orange juice, lemon juice, and orange zest until completely combined. Add butter and cook on medium heat until thickened and bubbly.

Working quickly, pour about half of the hot lemon mixture into the egg yolks, whisking constantly to temper. Pour egg mixture back into the pan and cook and stir for 2 minutes more.

Pour mixture through your sieve to remove the zest; press waxed paper (or plastic wrap) onto the surface to prevent a skin from forming. Once curd is completely cooled, place in an airtight container. According to various food safety websites and other food blogs, fruit curd made with egg yolks only (not whole eggs) should last in the refrigerator for a few weeks.

Advertisement

Blood Orange Curd

I went completely overboard in the supermarket citrus section yesterday and came home with mandarins, lemons, limes, and blood oranges. I’ve wanted to bake with blood oranges for a while now, and since yesterday afternoon I’ve made blood orange curd, citrus cake, and blood orange muffins. I still have at least half the bag left, so blood orange poppy seed drizzle cake is coming next.

This curd is an absolutely delicious creation, featuring some lemon juice and zest to balance the sweetness that comes from the oranges. Curd-making really does require a good amount of intuition, and I suspect I pulled this off the heat just a moment too early; while it tastes fantastic, it was a bit thinner than I wanted it to be, so next time I’ll give it at least another minute.

Ingredients

  • 1 cup sugar
  • 6 teaspoons cornstarch
  • 4 teaspoons blood orange zest
  • 2 teaspoons lemon zest
  • 4 ounces (1/2 cup) blood orange juice (about 2 1/2 oranges)
  • 2 ounces (1/4 cup) lemon juice (about 2 1/2 small lemons)
  • 12 tablespoons butter
  • 6 eggs

Preparation

Place a medium bowl and sieve next to your stove. Place eggs in a medium bowl and beat, then set that bowl next to your stove for easy access.

In a medium saucepan, combine sugar, cornstarch, zests, juices, and butter. Cook over medium heat, stirring almost constantly, until the mixture thickens and begins to bubble; the mixture will start to look cloudy, then foamy, just before you start to see bubbles form from the very bottom edge of your pan.

Remove from heat and slowly pour into eggs, whisking the eggs constantly as you pour. Pour the mixture back into the pan and cook for at least 2 minutes more, stirring constantly, until the mixture thickens; it may start to look curdled a bit, but just keep stirring to smooth it out (and of course be careful that you haven’t taken it so far as to scramble your eggs or split your mixture).

Pour through the sieve and use a spatula to force the mixture through to strain out the zest. Press waxed paper directly onto the surface of the curd and cool completely before using. Store in an airtight container in the refrigerator for up to 5 days.

Makes about 3 cups.

Caramel Sauce

Caramel is one of my favorite flavors, and making your own caramel sauce is probably easier than you think. The keys to caramel are attention, timing, and fearlessness. Read through the recipe a few times, then have all your ingredients ready to add. Keep an eye on your mixture, and don’t worry if the mixture seizes a bit when you add the heavy cream – just keep stirring, and it will become smooth. Most of all, don’t be afraid – the worst thing that happens is you have to start over.

I don’t usually include the step-by-step photos in my blog posts, but since caramel-making instructions can be vague, I wanted to give you a visual – pictures are below. Good luck!

Ingredients

  • 1 cup sugar
  • 1/3 cup water
  • 3/4 cups heavy cream
  • 2 tablespoons butter, cut into 1-tablespoon pats

Preparation

Place sugar in a medium saucepan; shake gently to form an even layer. Add water, but don’t stir; allow the water to completely moisten the sugar, then place over medium heat.

Allow mixture to cook to dissolve the sugar; it will look cloudy (step 1). Once the sugar dissolves completely, allow the mixture to cook on medium-high until it turns an amber color, which can take 5-10 minutes; mine began to turn amber around 6 minutes into cooking and I gently shifted my pan a bit to keep the heat even as the mixture began to darken (step 2). When the mixture is almost evenly browned (step 3 – I pulled mine when all but the very center of my mixture had turned amber), remove from heat. Very carefully add heavy cream, stirring well, then add butter and continue to stir until completely smooth (step 4). The mixture will bubble up when the cold cream hits the hot sugar mixture, so watch out for splashes and be careful not to get burned.

Allow mixture to cool to room temperature, then store in an airtight container in the refrigerator. Caramel will last in the fridge for about 1 month.

Step 1


Step 2


Step 3


Step 4

Glossy Chocolate Icing

If I could still eat chocolate, I’d make a batch of this and eat it with a spoon. Made with cocoa powder, this glossy chocolate icing is easy to prepare and makes a wonderful companion for a variety of treats. Today’s batch went onto these chocolate cupcakes with vanilla cream filling, pictured at left.

I’ve made this icing once before and it turned out a bit more drizzly then than it did today, but today’s consistency was much better for my cupcakes. Just be careful to work quickly, as it sets pretty fast. If you’re not able to spread it, add just a bit more milk to thin it slightly, about a half-teaspoon at a time. You can always add more if you need to, but remember that you can never take the liquid back out of an icing once it’s there.

Ingredients

  • 3 tablespoons butter
  • 2 tablespoons unsweetened cocoa powder, sifted
  • 1 1/2 cups powdered sugar
  • 1 teaspoon vanilla
  • 2 tablespoons milk

Preparation

In a medium saucepan, melt butter over low heat. Stir in cocoa powder, then remove from heat.

Add powdered sugar, vanilla, and milk and stir well until you reach a very smooth consistency; it will become glossy once it’s done. Use immediately, as it sets very fast! Makes enough for about 16 cupcakes.

Vanilla Cream Filling

What can you do with vanilla cream filling? A ton of stuff, actually. This filling is great for various types of sandwich cookies and filled cupcakes…even as its own frosting, if you like.

This recipe makes about 2 1/2 to 3 cups, I’d guess – honestly, I didn’t measure the end result. I need to figure out smaller batches, because I always end up making two different treats with it; today’s batch went into both snickerdoodle sandwich cookies and chocolate cupcakes with vanilla cream filling. It’s not as fluffy as the filling you’d get in a Hostess cupcake, but not as dry or dense as the filling in an Oreo cookie – a wonderful balance of both, I’d say!

Ingredients

  • 8 tablespoons butter, softened
  • 1/2 cup shortening
  • 3 1/2 cups powdered sugar
  • 1 tablespoon vanilla extract

Preparation

In a mixing bowl, beat together butter and shortening.

Add powdered sugar in small batches, beating until combined.  Once all sugar is incorporated, beat on medium speed for two minutes

Add vanilla and beat to combine.

If you need to store it before using, do so in an airtight container at room temperature. Makes about 2 1/2 to 3 cups, plenty for two dozen filled cupcakes or about 48 sandwich cookies.


Blackberry Filling

lemon blackberry sliceThis summer I made a delicious lemon blackberry cake to test both my piping and filling-making skills. I used frozen blackberries from last year’s crop – our blackberry plants bloom very late in the season – and it turned out very well. If you’re using frozen berries, just let them thaw first.

As with raspberry filling, blackberry filling requires some serious sieving time to remove the seeds. Blackberry seeds are larger than raspberry seeds, so you’ll want to clean out your sieve a few times during the straining process. I also recommend working in small batches, rather than trying to press your entire mixture through the sieve at once.

While my original recipe made about 1/3 cup, the recipe below would yield around 1 cup.

Ingredients

  • 18 ounces blackberries, mashed
  • 2 1/4 cups powdered sugar
  • 6 teaspoons cornstarch
  • 3 teaspoon lemon juice

Preparation

In a medium saucepan, stir together blackberries, powdered sugar, cornstarch, and lemon juice. Cook over medium-high heat until mixture boils, then allow to boil for 1 minute, stirring well, until the mixture thickens.

Remove from heat and press through a fine sieve to filter out the seeds. Allow to cool before using.

Raspberry Filling

lemon raspberry cupcakes 2Raspberry is a classic cupcake and cake filling, and I always wonder who came up with this idea. Whoever they were, they’re a genius.

Homemade filling does take some time, and the bulk of the work comes in straining your berry mixture through a sieve to remove the seeds. You could leave the seeds in if you want to save time; I’ve certainly done so, but for some treats – like the more delicate lemon raspberry cupcakes pictured in this photo, I think straining is worth it.

If you want to make raspberry filling at a time of year when fresh raspberries aren’t readily available at your local market, you can always use frozen berries. I recommend letting them thaw out first, but you can also pulse them in a food processor to break them down a bit before cooking them.

Ingredients

  • 12 ounces raspberries, mashed
  • 1 1/2 cups powdered sugar
  • 4 teaspoons cornstarch
  • 2 teaspoons lemon juice

Preparation

In a medium saucepan, stir together raspberries, powdered sugar, cornstarch, and lemon juice. Cook over medium heat until the mixture boils, then allow it to boil for 1 minute, stirring well, until the mixture thickens.

Remove from heat and press through a fine sieve to filter out the seeds. Allow to cool before using; makes about 1 cup.

Cherry Frosting

cherry limeade cupcakesThis frosting, which I first used on cherry limeade cupcakes, could work very well on vanilla, lemon, or chocolate cupcakes. Because it uses the juice from maraschino cherries, it’s a good option for year-round baking, and you can always add the cherries themselves to top your cupcakes or cake if you like.

This recipe yields enough for at least 18 cupcakes, but I believe it could frost about 2 dozen if you use more modest portions on each cupcake than I used on my cherry limeade cupcakes. The recipe can be easily doubled to cover two-layer cakes or sheet cakes.


Ingredients

  • 8 tablespoons unsalted butter, at room temperature
  • 4 cups powdered sugar
  • 1/2 teaspoon almond extract
  • 1/4 cup plus 3 tablespoons maraschino cherry juice

Preparation

Beat butter in a mixing bowl for 1-2 minutes. Add 3 cups powdered sugar and allow the sugar to fully incorporate into the butter; this will take several minutes.

Add almond extract and 1/4 cup cherry juice; beat on medium speed for 2-3 minutes, then add another cup of powdered sugar and additional juice. Beat on medium speed for another 2-3 minutes.

Lime Curd

vanilla lime cupcakesWe have lemon curd, so why not lime? I used Martha Stewart’s key lime curd recipe and adapted it using regular limes. I was also surprised to see that this recipe doesn’t require tempering some of the lime mixture into the eggs, then returning the tempered mixture back into the pan for further cooking, like you do with lemon curd.

It does take a while for this mixture to reach the right consistency, so prepare to stand at your stove for about 12-15 minutes. The end result is absolutely worth it, though. You can use this curd in vanilla lime cupcakes, coconut cupcakes, or whatever else your heart desires.

Ingredients

  • 1/2 cup sugar
  • 2 large eggs
  • zest of 1 lime
  • 1/4 cup lime juice (about 2 medium limes)
  • 4 tablespoons butter, cut into small pieces

Preparation

Place a bowl and sieve next to your stove for easy access once your curd is cooked.

In a medium saucepan, whisk together sugar, eggs, lime zest, and lime juice. Cook over medium-low heat, whisking constantly, until the mixture holds the shape of the whisk – this will take about 12-15 minutes.

Remove from heat and whisk in butter a few pieces at a time until butter completely melts.

Strain the curd through your sieve and press a piece of plastic wrap directly onto the surface to prevent a skin from forming.

Chill for about 3 hours before using; I chilled mine overnight.

Butterscotch Sauce

butterscotch sauceHomemade butterscotch is very easy to make. I admit that my first batch, which went into butterscotch cupcakes, turned out better than my second batch; I suspect I cooked this batch on higher heat than I should have, which resulted in a much thicker confection once it cooled.

This sauce turns out best when simmered, rather than actually boiled; use medium-low heat, and look for small to medium-sized bubbles – if you see large bubbles on the surface, turn your heat down slightly to keep the sauce at more of a simmer.

The sauce will thicken as it cools, but should still be easy to drizzle. If you happen to cook your sauce at a higher heat than you should and it turns out too thick to drizzle, simply thin it out using a few tablespoons of heavy cream to get it back to drizzling consistency. It will still taste delicious…believe me.

Ingredients

  • 4 tablespoons unsalted butter
  • 3/4 cup packed light brown sugar
  • 3/4 cup heavy cream
  • 2 teaspoons vanilla extract
  • 1/2 teaspoon salt

Preparation

In a medium saucepan, melt butter over medium-low heat. Whisk in brown sugar, then heavy cream.

Bring mixture to a simmer/gentle boil and cook for 5 minutes without stirring. Remove from heat and whisk in vanilla extract and salt.

Allow to cool completely before serving. Sauce can be stored in the refrigerator for 1 week.