Few foods are as polarizing as coconut. People love it, people hate it. Toasted is fine, raw is not. The question of do you like Samoas during Girl Scout Cookie season can start riots. Well, maybe not riots. But people have very strong opinions about these things.
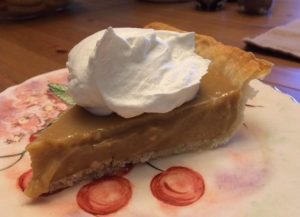
I love coconut, but only under certain circumstances: if it’s toasted and sprinkled onto something, or baked into a treat like in seven-layer bars or Samoas, or just coconut flavored…these are all acceptable things to me. I definitely sampled the custard portion of this coconut cream pie before I stirred in the raw coconut, and it tasted absolutely delicious. Maybe someday I’ll make this without the raw coconut in the filling and see what happens – for now, credit for this recipe goes mostly to Sally’s Baking, one of my favorite recipe sources – but I consulted several different sites for ingredient lists and preparation processes before going with the one below.
Ingredients
For the crust
- 1 1/4 cups flour
- 1/2 teaspoon salt
- 3 tablespoons butter, chilled and cut into cubes
- 1/3 cup vegetable shortening, chilled and cut into cubes
- 1/4 cup ice cold water
For the filling
- 4 egg yolks
- 1/4 cup cornstarch
- 14-ounce can full-fat coconut milk (find this in the Asian or Latin American aisle at the grocery store)
- 1 cup half-and-half
- 2/3 cup sugar
- 1/4 teaspoon salt
- 1 cup sweetened shredded coconut
- 2 tablespoons butter, softened
- 1 teaspoon vanilla extract
- 1/2 teaspoon coconut extract (optional)
For the topping and garnish
- 1 1/2 cups heavy cream
- 3 tablespoons powdered sugar
- 3/4 teaspoon vanilla extract
- About 4 tablespoons sweetened shredded coconut, toasted*
Preparation
Make your crust: You can do this a day before, as it needs plenty of time to chill. In a large bowl, whisk flour and salt together. Using a pastry cutter, cut in butter and shortening until the mixture looks like coarse crumbs – this means pea-sized pieces, but it doesn’t have to be totally uniform.
Measure out 1/4 cup of water and add ice; stir, then pour out 1/4 cup to use in your dough. Drizzle into flour mixture 1 tablespoon at a time, stirring with a spatula after each addition. Stop adding water when the dough starts to form large clumps. Transfer to a floured work surface and flour your hands, then fold the dough into itself to fully incorporate the butter and shortening into the dry mixture. Be gentle – pastry doesn’t like to be handled too much or it gets tough. Flatten into a disc, cover in plastic wrap, and chill for at least 2 hours.
Once your dough is chilled, it’s time to blind bake the crust. Lightly flour your work surface and roll out your pie dough to a circle about 12 inches wide; this will fit into a 9-inch pie dish. Gently transfer to the pie dish and flute or crimp your edges; chill for 30 minutes.
While your dough is chilling, preheat your oven to 375 degrees. Line the chilled crust with parchment paper and fill with pie weights or dried beans (I’ve been blind-baking crusts with dried beans forever). Bake for 15-16 minutes, until edges are set and starting to brown. Remove the weights/beans and parchment and continue baking for another 14-15 minutes, until bottom is golden brown. My crust shrank a bit during this phase, but it was still perfectly fine. Remove from oven and allow to cool completely before making the filling.
Make your filling: In a large glass measuring cup (like the 4-cup variety), whisk egg yolks and cornstarch; set aside. In a medium saucepan, combine coconut milk, half-and-half, sugar, and salt. Cook over medium heat, whisking regularly, and bring to a boil. Boil for 2 minutes, then reduce the temperature to medium-low heat.
Remove about 1/2 cup of the mixture and, pouring a slow, steady stream, whisk into the egg yolk/cornstarch mixture to temper the eggs – keep your whisk moving so they don’t scramble. Pour this mixture back into the pot (again, slowly and steadily), whisking constantly to combine. The mixture will thicken immediately; keep whisking and cooking for another 90 seconds. Remove from heat and stir in coconut, butter, vanilla extract, and coconut extract; pour into cooled pie crust. Cover the surface of the filling with plastic wrap and refrigerate until set, at least 3 hours or overnight.
*Now is a great time to toast your coconut for the garnish! Place about 4 tablespoons of sweetened shredded coconut into a shallow frying pan over medium-low heat. Stir consistently, keeping a very close eye, until the coconut turns golden brown. Keep your coconut moving so it doesn’t burn! You can also do this in a 350-degree oven, stirring every few minutes. Remove from pan and allow to cool completely.
Once the pie is set, make your whipped cream and garnish. Place heavy cream, powdered sugar, and vanilla extract into the bowl of a stand mixer fitted with the whisk attachment. Whisk on low, then medium speed, until medium peaks for – this takes about 3-4 minutes. Transfer whipped cream to a piping bag fitted with a large star tip.
Remove pie from the fridge and remove the plastic wrap; pipe stars all over the pie surface to fully cover it, then sprinkle with toasted coconut. Keep the pie in the refrigerator until you’re ready to serve it; makes about 8 servings.
 The Kentucky Derby is in May…so why I did bake a derby pie in November? Well, Mike made shrimp and grits on Friday, and I wanted a dessert to complement it. But the recipe I tried failed, and once I fail at a recipe I must try again. I’ve spent literal years perfecting honey cake and buttercream, my friends. I could not let something that sounded as delicious as derby pie – essentially a pecan pie with chocolate and bourbon – go unperfected.
 My mom Genny, an occasional subject on this blog, is coming from dinner this evening. She requested something simple – “just hamburgers, or whatever” – and instructed me not to go to any trouble. Well, I can’t have my mom over for Mother’s Day dinner without preparing some kind of dessert.