 Why is pie a classic Thanksgiving dessert? Apparently colonial bakers learned to use pumpkin, which had long been cultivated in North America, in the early days of the United States. Apples are also harvested in fall, making them, along with pumpkins, popular pie choices for this time of year. But what if you’re not a pie person? Maybe you want, for example, a Thanksgiving cupcake.
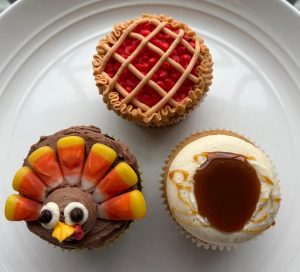
Don’t get me wrong: I love pumpkin pie. But for this year’s Thanksgiving, spent with people very dear to me, I chose to make cupcakes decorated like Thanksgiving staples: turkeys, mashed potatoes, and pies. Yes, the decoration took a while to do, but the end results were so adorable it was worth every minute. I made two different cupcake batters to offer some variety, so I’ve outlined both below. You could mix and match cupcakes and decorations however you like, and you’ll have some frosting left over for other treats. The next time I make something like this, I’ll make a bit less frosting.
Ingredients
For the chocolate cupcakes
- 1 1/2 cups flour
- 3 tablespoons cocoa powder
- 1 cup sugar
- 1 teaspoon baking soda
- 1/2 teaspoon salt
- 1 tablespoon vinegar
- 1 teaspoon vanilla
- 3 tablespoons vegetable oil
- 1 cup water
For the caramel cupcakes
- 1 2/3 cups flour (spooned and leveled, or 209 grams if measuring by weight)
- 1/2 teaspoon baking powder
- 1/4 teaspoon baking soda
- 1/2 teaspoon salt
- 1/2 cup unsalted butter, melted
- 1 cup light brown sugar
- 1 egg, at room temperature
- 1/4 cup sour cream
- 3/4 cup milk
- 2 teaspoons vanilla extract
For the chocolate buttercream
- 3/4 cup (1 1/2 sticks) butter, at room temperature
- 3 cups powdered sugar
- 1/4 cup cocoa powder
- 1 tablespoon vanilla extract
- 2 tablespoons heavy cream
For the vanilla buttercream
- 1 3/4 cups (3 1/2 sticks) butter, at room temperature
- 6 cups powdered sugar
- 2 tablespoons vanilla extract
- 3-4 tablespoons heavy cream
For the decorations
- Miniature chocolate chips, for turkey eyes
- Candy corn, for turkey feathers
- Salted caramel sauce, for mashed potatoes (see notes below)
- Yellow, red, and brown food coloring
- Wilton piping tips 1A (large plain), 12 (medium plain), 5 (small plain), 352 (leaf), and 67 (leaf) or small star of your choice (for the pie crust effect)
Preparation
Preheat oven to 350 degrees. Line cupcake tins with paper liners; the chocolate batch makes 12-14 and the caramel batch makes 14-16, depending on how full you fill your cupcake wells.
To make chocolate cupcakes: In a large mixing bowl, combine flour, cocoa powder, sugar, baking soda, and salt. Mix until well-blended, then make three wells for the wet ingredients.
Place vinegar, vanilla, and vegetable oil into the wells; add water and mix until the batter is smooth. The mixture will bubble up slightly when you add the water, so just keep mixing until you get a smooth consistency in the batter, which will be fairly thin.
Using a 1/4 cup measure, fill cupcake wells about half full. Bake for 18-22 minutes, until a cake tester comes out clean. Cool in pan for a few minutes, then remove from pan and cool completely on wire racks. Cool completely before frosting.
To make caramel cupcakes: In a large bowl, combine flour, baking powder, baking soda, and salt; set aside. In a microwave-safe bowl, melt butter, then add brown sugar and stir to combine; mixture will be grainy. Refrigerate for 1 minute, then remove from the fridge and add mix in the egg, sour cream, milk, and vanilla extract until completely combined. Stir into the flour mixture until no lumps remain.
Using a 2-inch cookie scoop, scoop batter into tins and fill about 2/3 to 3/4 full. Bake for 20-24 minutes, until a cake tester comes out clean. Remove from oven and place cupcakes on wire racks to cool completely.
To frost and decorate, you’ll want to make both batches of frosting first, as you need both chocolate and vanilla buttercream for the turkeys.
For chocolate buttercream, place butter in a mixing bowl and beat for a few minutes using the paddle attachment. Add powdered sugar and sift in cocoa powder to remove any lumps; you can also sift in both your powdered sugar and cocoa if you like. Beat on low speed until the sugar and cocoa are fully incorporated into the butter. Add vanilla extract and beat, then add heavy cream and beat until smooth.
For vanilla buttercream, place butter in a mixing bowl and beat for a few minutes using the paddle attachment. Add powdered sugar and beat on low speed until the sugar is fully incorporated into the butter; this will take several minutes. Add vanilla extract and beat, then add heavy cream and beat until smooth.
To maximize your vanilla frosting, I recommend going in the following order to tint and decorate your cupcakes.
First, frost your mashed potato cupcakes. Place about 1 cup frosting into a piping bag fitted with a Wilton 1A tip and pipe blobs onto the tops of each cupcake. Using a spoon, make a small well in the center of each cupcake and place about 1/2 teaspoon salted caramel sauce into the well, drizzling a bit over the sides. See notes below for caramel tips – mine made quite a mess because I tried to use too much!
If you have vanilla frosting left from your mashed potato cupcakes, return it to your bowl. Fit another piping bag with a small plain tip and place a few tablespoons vanilla frosting inside; set aside to make the turkey faces, as this will be the whites of the turkey eyes.
Take about 1/4 cup vanilla frosting and tint it yellow; place in a piping bag fitted with the 352 leaf tip; set aside to make the turkey beaks.
Divide remaining vanilla into two portions. Tint one red for the pie filling and the other golden brown (using both brown and golden yellow food coloring) for the pie crust. Fit a bag with a small plain tip and set aside; this will be both your turkey wattles and pie filling detail. Fit another bag with another small plain tip for your pie crust lattice.
To make the turkeys, frost the tops of your cupcakes with chocolate buttercream using an offset spatula, then fit a piping bag with a medium plain tip. Pipe a blob of frosting for the turkey’s head, then add the whites of the eyes and miniature chocolate chips for pupils. Pipe on beaks, then wattles. Add candy corn feathers; I used seven pieces per cupcake.
To make the pies, frost a thin layer of red over the top of each cupcake, leaving about 1/4 inch around the edges. Using the piping bag fitted with the small plain tip, pipe cherry details over the top. Using your golden brown frosting, pipe lattice stripes across the top of each cupcake, then switch tips and add the crust edge detail.
Caramel Notes: I used Smucker’s salted caramel ice cream topping for the gravy of my mashed potato cupcakes and recommend the following:
- Use room-temperature caramel topping for these cupcakes for the easiest application. Wait to add the caramel until shortly before you’re serving, or keep cool in the fridge for a few hours before serving.
- You need between 1/4 and 1/2 teaspoon of caramel sauce per cupcake – be very careful not to over-fill your wells or to drizzle too close to the edges. A few of my cupcakes were a mess because I used too much, as the caramel spilled over the sides.
- The caramel sauce will absorb into the buttercream after a while, so keep leftovers in the fridge to prevent this from happening.
Below is a detail of Herb, the first turkey I created. I felt bad eating him but he was absolutely delicious. Alternatives to candy corn include M&Ms and Reese’s Pieces, but candy corn is a good choice for folks who can’t have nuts or products manufactured on machines that may have also made nut candies.

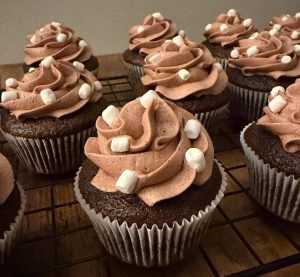
 Valentine’s Day took place this past weekend, and I wanted to make something Valentine-ish. Chocolate and strawberry seem to be a good choice, but chocolate and raspberry are actually my preference, hence these treats. They’re basic but delicious chocolate cupcakes with easy raspberry buttercream, requiring no fresh raspberries but rather raspberry jam.