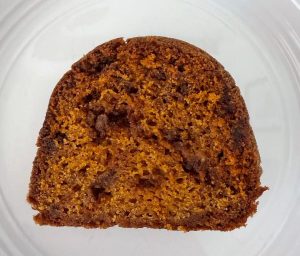
Pumpkin Cinnamon Chip Cake

‘Tis pumpkin season. We’re heading into the fall, with the autumn equinox just a few days from now, and the holiday season right around the corner. Pittsburgh is cooler today than it has been for a while, and I’m here for it. I love all seasons, but this summer was sticky, hot, and grey – not my favorite weather. I’m definitely ready for cooler days and nights, and all the treats that fall baking brings.

Pumpkin Bundt cake is among my favorites – really I love any type of pumpkin treat, but this cake is a winner, whether it’s plain, studded with dark chocolate chips, or this variety, a cinnamon chip version. Hershey’s makes great cinnamon chips, but I don’t see them in stores very often, so I try to pick them up whenever I can. They were a great addition to this recipe, and it was a big hit at work. One item to note – I’ve used a 10-cup Bundt pan for this cake many times, but I invested in a 12-cup one recently and want to try that out, as this cake takes a very long time to bake and I always worry the outside is a little well done. We’ll see how that goes!

Ingredients

  • 3 cups flour
  • 2 teaspoons baking soda
  • 1 teaspoon cinnamon
  • 1 teaspoon nutmeg
  • 1/4 teaspoon cloves
  • 1/2 teaspoon salt
  • 2 1/2 cups sugar
  • 1 cup vegetable oil
  • 3 eggs
  • 15 ounces pumpkin puree (1 regular-sized can)
  • 12-ounce bag cinnamon chips chips

Preparation

Preheat oven to 350 degrees. Generously grease a 10-cup Bundt pan (or give it a try with a 12-cup pan if you’re willing).

In a medium bowl, combine flour, baking soda, cinnamon, nutmeg, and cloves; set aside.

In a large mixing bowl, stir together sugar and oil until very well-combined. Add eggs, 1 at a time, mixing very well after each.

Stir in flour mixture and pumpkin alternatively, stirring until well-combined and smooth. Fold in cinnamon chips, then spoon or pour into prepared pan.

Bake for about 45 minutes, then check with a cake tester or toothpick; continue baking for a few minutes at a time, checking frequently, until the cake tester comes out clean. My cake baked for about 50 minutes.

Remove from oven and cool cake in pan for 10 minutes. Flip out onto a wire rack to cool completely before serving. Store in an airtight container at room temperature for 2-3 days.

Makes about 12-16 slices, depending on the size.
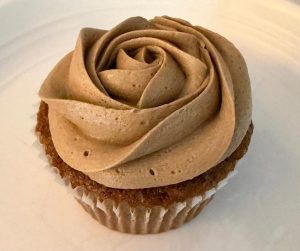
Root Beer Cupcakes

Root beer extract…it’s a thing. I found mind on Amazon after discovering a recipe for what were billed as root beer float cupcakes, and that seemed exactly like the kind of thing I wanted to bake.

Full disclosure, there’s not really a root beer float vibe to these treats – they’re basically root beer cupcakes without the vanilla flavor you’d have with the ice cream in a float. Sometime soon I’ll make vanilla cupcakes and frost them with my root beer buttercream, and I suspect that will be heaven. Still, these treats were a huge hit at work, with people coming to my office and saying “root beer cupcakes!?!?!” in wondrous delight.

Ingredients

For the cupcakes

  • 2 1/2 cups flour
  • 2 1/2 teaspoons baking powder
  • 1/2 teaspoon salt
  • 12 tablespoons butter, at room temperature
  • 1 1/2 cups sugar
  • 3 eggs, at room temperature
  • 1 tablespoon root beer extract
  • 1/2 teaspoon vanilla
  • 1 cup root beer

For the frosting

  • 1 cup butter, at room temperature
  • 4 cups powdered sugar
  • 5 tablespoons root beer
  • 2 teaspoons root beer extract
  • 1 teaspoon vanilla extract

Preparation

Preheat oven to 350 degrees. Line cupcake tins with paper liners; I honestly cannot recall how many cupcakes this made, but I want to say between 20 and 24. I baked this one a while back!

In a medium bowl, stir together flour, baking powder, and salt; set aside.

In a mixer fitted with the paddle attachment, cream butter and sugar until light and fluffy. Add eggs, root beer extract, and vanilla extract and beat to combine. Alternatively add flour and root beer, mixing to combine – you just want your batter to come together, so don’t over-mix.

Fill cupcake wells about 2/3 full; bake for 15-20 minutes, until a cake tester comes out clean. Remove from oven and remove cupcakes from wells; cool completely on a wire rack before frosting.

To make the frosting, beat butter in a mixer for 1-2 minutes; add powdered sugar and beat on low until all the sugar is incorporated into the butter. Add root beer, root beer extract, and vanilla extract and beat to completely combine; you may need to add a bit more powdered sugar if your frosting is too runny.

Pipe generous swirls of frosting onto cupcakes; store in an airtight container at room temperature for 2-3 days.


Strawberry Lemonade Cake

The first time I baked this strawberry cake, I under-baked it slightly and had to do a second cake, having watched the middle sink because, well, it was raw in there. The exact same thing happened to me this time, too, so I really can’t stress the need to bake this cake for at least 30 to 35 minutes enough (or at least I need to, anyway – your oven might be different). This was a special treat for my mom and her twin sister, who celebrated their 80th birthday back in June. This past weekend my family and I traveled to Deep Creek, Maryland, for a little get-together in honor of the twins, and this cake was a massive hit.

This time I added a bit of lemon zest to the batter (though the man in my life says there could have been more, and I have to agree with him) and frosted the cake with a lemon buttercream. It has incredible strawberry lemonade vibes, so I’ve decided to call it strawberry lemonade cake. It’s a recipe I’ll go back to many times, for sure.  

Ingredients

For the cake

  • 2 3/4 cups flour
  • 2 tablespoons cornstarch
  • 3/4 tablespoon baking soda
  • 1 teaspoon baking powder
  • 1 teaspoon salt
  • 3/4 cup vegetable oil
  • 1/4 cup unsalted butter, melted
  • 1 1/2 cups sugar
  • 3 eggs
  • 2 teaspoons vanilla extract
  • 1/3 cup milk
  • 340 grams fresh strawberries, pureed to make about 1 1/2 cups liquid
  • zest of 1/2 lemon (I recommend using at least a whole lemon and will do so next time)

For the frosting and decoration

  • 1 1/4 cups (2 1/2 sticks) unsalted butter, at room temperature
  • 5 – 6 cups powdered sugar
  • 1 teaspoon vanilla extract
  • 1 teaspoon lemon extract
  • 2-3 teaspoons lemon juice 
  • Green, pink, and red gel food coloring, for flower and leaf decorations
  • Wilton M1, 2D, 21, and 352 piping tips

Preparation

Preheat oven to 350 degrees. Spray a 9 x 13 baking tin with baking spray.

In a large bowl, sift together flour, cornstarch, baking soda, baking powder, and salt; set aside. In another large bowl, whisk vegetable oil, melted butter, sugar, eggs, vanilla extract, milk, strawberry puree. and lemon zest. Add dry mixture to wet mixture and whisk gently, folding to combine until no lumps remain.

Pour into prepared baking tin and bake for 30 – 35 minutes, or until a cake tester inserted in the center comes out clean. My cake needed at least 35 minutes, and I gave it a few more, risking over-baking, just to be sure I didn’t have a raw middle yet again. Cool completely in the tin on a wire rack before frosting. 

To make frosting, beat butter on medium speed for 1 minute. Add about 4 cups powdered sugar and beat on low until all the sugar is incorporated into the butter; this takes several minutes. Add vanilla extract, lemon extract, and 1 teaspoon lemon juice and beat to combine; add 1-2 additional cups powdered sugar to reach a soft but pipeable texture; add more lemon juice if desired. You can also adjust the amount of lemon extract, but be careful – you don’t want it to taste fake. 

To decorate the cake, reserve a small portion of frosting and tint green for leaf accents., then tint remaining frosting varying shades of pink, red, and purple. Pipe roses and other flower shapes all over the cake, then add leaf decorations. 

Store in an airtight container at room temperature; makes about 18 servings, depending on how large you slice the pieces. I do admit to giving my gentleman friend the largest slice of this one, and to having an extra little sliver myself, it was so good. 

Cinnamon Orange Bundt Cake

Cinnamon and orange are a flavor combination you probably don’t think of often, but they make a great pair. This cinnamon orange Bundt cake, based on my standard Bundt recipe, is one of my favorite things I’ve made recently.

Last weekend I made a Thanksgiving in July turkey dinner with the man in my life, and we had my mom over at my place. This was our dessert, and it was a huge hit. If you don’t have Vietnamese cinnamon, don’t worry – you can use regular cinnamon, but it won’t be quite a sweet. I highly recommend the Vietnamese cinnamon from Penzys, and you can order it online or at King Arthur Baking and many other online retailers. I also recommend cara cara oranges for most baking recipes, but you can use regular navel oranges if you can’t find cara caras.

Ingredients

For the cake

  • 3 cups flour
  • 2 1/2 cups sugar
  • 1 1/2 teaspoons baking powder
  • 1/2 teaspoon salt
  • 3 eggs, at room temperature
  • 1 1/2 cups whole milk
  • 1 cup vegetable oil
  • 1 tablespoon vanilla extract
  • 1 teaspoon butter extract
  • 3/4 teaspoon orange extract
  • Zest from 2 medium cara cara oranges
  • 1 teaspoon Vietnamese cinnamon

For the glaze

  • About 2 3/4 cups powdered sugar
  • 3 – 4 tablespoons orange juice
  • 1/2 teaspoon cinnamon

Preparation

Preheat oven to 350 degrees. Grease and flour a 10-inch Bundt tin.

In a large bowl, combine flour, sugar, baking powder, and salt; set aside. In another large bowl, whisk together eggs, milk, vegetable oil, extracts, and orange zest. Stir in flour in three batches, mixing to combine completely, then stir in cinnamon.

Pour batter into prepared tin and bake for 50-60 minutes or until a cake tester comes out clean. Cool in tin for about 15 minutes, then turn out onto a wire rack to cool completely.

To make the icing, place powdered sugar in a medium bowl and add orange juice about 1 tablespoon at a time to reach a thicker pourable consistency. Stir in cinnamon, then pour over cake and allow to drip down the sides. Allow icing to set before serving.

Store in an airtight container at room temperature for several days; this cake stays moist much longer than you might expect. Makes about 12 servings, depending on how generous you are with your portions.


Lemon Raspberry Cupcakes

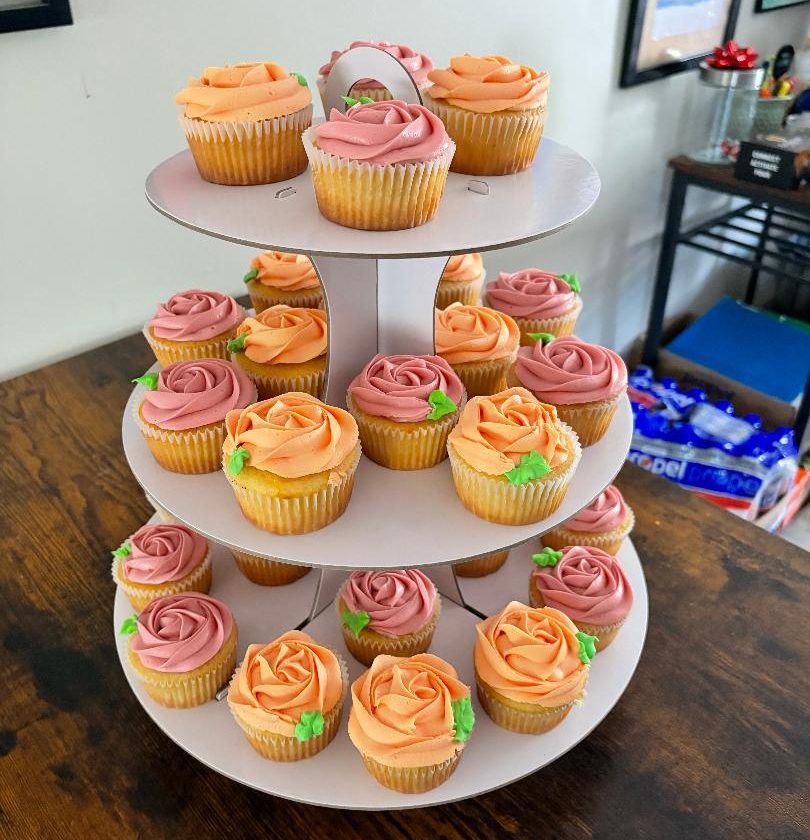
I’ve made many lemon raspberry cupcake combinations in the past, including lemon cupcakes with raspberry filling, and a previous version of the cupcake below that had a slightly different flavor balance in which the raspberry overpowered the lemon. A small recipe tweak, in which I added more lemon zest to the cupcake batter and less raspberry jam to the buttercream, yielded a wonderful treat that I prepared alongside some creamsicle cupcakes for my gentleman friend’s swim club party this weekend. The cupcake tower in the photo below is a $6 cardboard version I bought at Target, and it might be one of the prettiest displays I’ve ever done.

Obviously, the creamsicles are the orange cupcakes and the lemon raspberry are the pink ones, but they’re both made from the same base recipe, just with different flavorings. One of the best things about the recipe is that you can adapt it into many different flavors, and it always comes out tender and fluffy, thanks in great part to the vanilla yogurt in the batter. One thing I strongly recommend is baking your cupcakes for the least amount of time listed in the recipe, then continuing to bake for about 30-60 seconds at a time until the cupcakes stop sounding bubbly. I’ve learned many things from the Great British Baking Show, and the best tip might have been that cakes make a bubbling sound while they’re still baking, but once they stop “singing” they’re done.

Ingredients

For the cupcakes

  • 1 2/3 cups flour (spooned and leveled; this is also 209 grams, for those baking by weight)
  • 1/2 teaspoon baking powder
  • 1/4 teaspoon baking soda
  • 1/2 teaspoon salt
  • 1/2 cup unsalted butter, melted
  • 1 cup sugar
  • 1 egg, at room temperature
  • 1/4 cup vanilla yogurt
  • 3/4 cup milk
  • 1 teaspoon vanilla extract
  • 1 teaspoon lemon extract
  • Zest of 3 medium lemons

For the frosting

  • 10 tablespoons unsalted butter, at room temperature
  • 3 tablespoons seedless raspberry jam
  • 3 1/2 cups powdered sugar
  • Red food coloring
  • Green food coloring

Preparation

Preheat oven to 350 degrees. Line two cupcake tins with paper liners; my batch made 17 cupcakes.

In a large bowl, combine flour, baking powder, baking soda, and salt; set aside. In a microwave-safe bowl, melt butter, then add sugar and stir to combine; mixture will be grainy. Refrigerate for 1 minute, then remove and add egg, yogurt, milk, vanilla extract, lemon extract, and lemon zest. Whisk into the flour mixture until no lumps remain.

Using a 2-inch cookie scoop, scoop batter into tins and fill about 2/3 to 3/4 full. Bake for 16-18 minutes, or until the cupcakes stop sounding bubbly and/or a cake tester comes out clean. Remove from oven and place cupcakes on wire racks to cool completely.

To make frosting, beat butter and powdered sugar on low speed until the sugar is fully incorporated into the butter. Add raspberry jam and beat to combine completely; reserve just a few tablespoons frosting and tint green for leaves, then add as much red food coloring to the remaining frosting as you desire; I went with just a few drops for a darker pink hue but you can go as red as you like. Fit a large piping bag with a large star tip (I used the Wilton 2D, having recently switched from the M1) and pipe swirls of pink frosting onto cupcakes, then fit a small piping bag with a 352 leaf tip and add the green frosting, then pipe on leaves. Store in an airtight container at room temperature for 2-3 days.

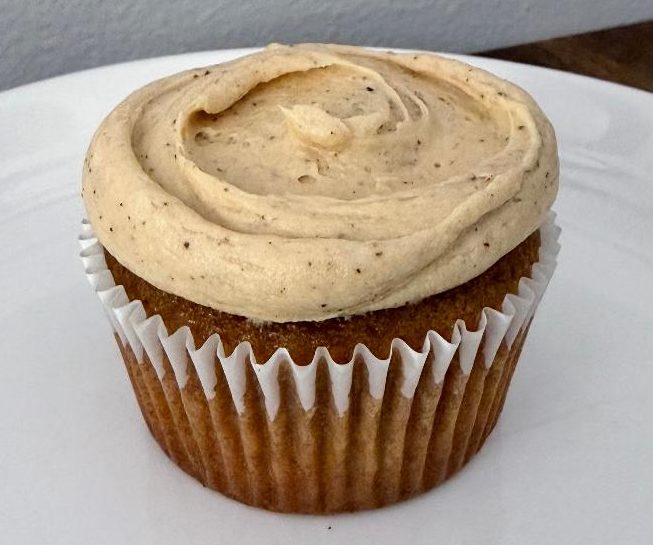
Caramel Latte Cupcakes

How do I decide what to bake each week? It depends on the time of year, what flavors are in season, and how much time I have. Earlier this weekend I baked creamsicle cupcakes and lemon cupcakes with raspberry buttercream for my gentleman friend’s swim club party, both of which are perfect summer flavors. But coffee is a great flavor at any time of year, and it works very well in many types of desserts, from cupcakes to brownies to tiramisu. Tiramisu is my favorite, though I’ve never made it. Maybe one day, so stay tuned.

I found the recipe for these cupcakes at Frosting & Fettucine and took the advice of the original baker to create a caramel latte version, using a caramel latte buttercream I invented this morning based on my standard caramel buttercream, which uses Smucker’s salted caramel sauce. The end result is a tender cupcake with very subtle flavors, so I think it needs a bit more punch the next time I make it, particularly in the cupcake itself. I fully intend to make this again and to use the recipe as a base for other flavors, likely spice-type ones in the fall, as they have wonderful texture.

Ingredients

For the cupcakes

  • 1 3/4 cup flour
  • 1/2 teaspoon baking powder
  • 1/2 teaspoon baking soda
  • 1/2 teaspoon sea salt
  • 1/2 cup granulated sugar
  • 1/2 cup light brown sugar
  • 1/2 cup vegetable oil
  • 2 teaspoons instant coffee crystals
  • 1 tablespoon warm water
  • 2 eggs, at room temperature
  • 2/3 cup buttermilk or sour milk (2 teaspoons vinegar and enough milk to make 2/3 cup, stirred and left to sit for 5-10 minutes)

For the frosting

  • 12 tablespoons unsalted butter, at room temperature
  • 3 cups powdered sugar
  • 2 teaspoons vanilla extract
  • 2 heaping tablespoons Smucker’s salted caramel sauce (I mean, heaping! Don’t hold back)
  • 2 teaspoons espresso powder

Preparation

Preheat oven to 350 degrees. Line two cupcake tins with paper liners; my batch made 18 cupcakes.

In a medium mixing bowl, combine flour, baking powder, baking soda, and salt; set aside. Combine instant coffee crystals and warm water; stir to dissolve. In a large mixing bowl, whisk together granulated sugar, brown sugar, and vegetable oil. Whisk in eggs until the mixture is smooth, then whisk in flour mixture and buttermilk/sour milk alternatively to combine. Batter will be very thin.

Fill cupcake wells 2/3 full (about 1 and 3/4 scoops of a 2-inch cookie scoop) and bake for 15-18 minutes, until a cake tester comes out clean. Remove from tins and cool completely on a wire rack before frosting.

To make the frosting, beat butter on medium speed for 1-2 minutes. Add powdered sugar and beat on low until all the sugar is incorporated into the butter; this takes a few minutes. Once all the sugar is incorporated, beat on medium for 1-2 minutes, then beat in vanilla, caramel sauce, and espresso powder. If desired, dissolve espresso powder in a few teaspoons of heavy cream so you don’t see the flecks.

Fit a piping bag with a large plain tip and pipe a blob of frosting onto each cupcake. Using an offset spatula, flatten the blobs into more even circles. Store cupcakes in airtight containers at room temperature for 2-3 days.

Classic Yellow Cake with Chocolate Buttercream

Everyone knows this classic birthday cake combination – two layers of yellow cake covered in chocolate frosting. It’s timeless, and there are many recipes for it out there. This one is a hybrid from a cake I found at Shugary Sweets and my own chocolate buttercream frosting. I added more vanilla extract to the original cake recipe, as I always do. Measure vanilla extract with your heart, bakers. If you feel a recipe needs more, follow your instincts.

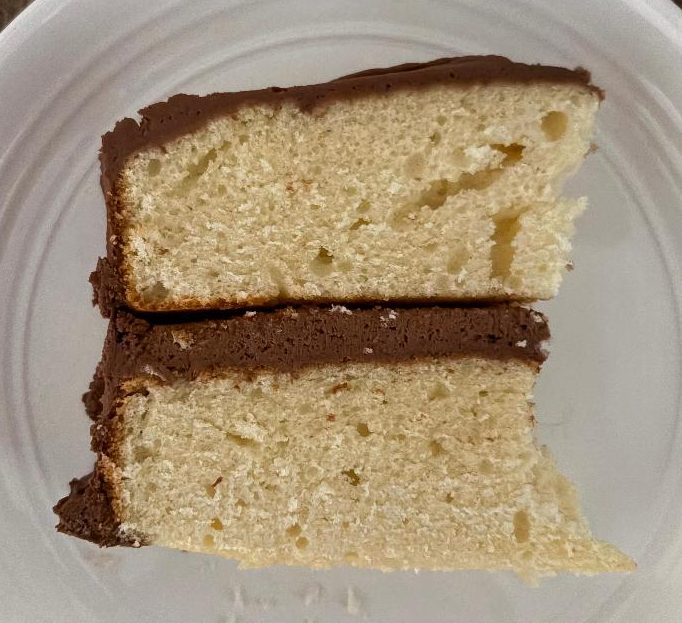
This recipe includes both buttermilk and sour cream for a lovely spongy, springy texture. My cake had a few air pockets in it as you can see from the photo, so next time I want to take greater with my mixing for less of a chance of that. I’ll also add more frosting on the tops and sides; I had a great layer of frosting in the middle, but not as much coverage on the tops and sides of the cake as I would have liked. It was a hit regardless though, which is one of the great joys of baking. Even when it’s not perfect, you can still please a crowd with whatever you’ve made.

Ingredients

For the cake

  • 1 3/4 cups flour
  • 1 3/4 cups cake flour
  • 1 tablespoon baking powder
  • 1/2 teaspoon salt
  • 12 tablespoons butter
  • 2 cups sugar
  • 1 1/2 tablespoons vanilla extract
  • 3 eggs, plus one egg yolk
  • 1/2 cup sour cream
  • 1 1/2 cups buttermilk

For the frosting

  • 1 1/2 cups (3 sticks, 24 tablespoons) butter, at room temperature
  • 5 cups powdered sugar
  • 3/4 cup cocoa powder
  • 1 1/2 tablespoons vanilla extract
  • 2-3 tablespoons heavy cream
  • Dash of salt

Preparation

Preheat oven to 350 degrees. Grease and flour two 9 x 2 round cake tins.

In a large bowl, combine flour, cake flour, baking powder, and salt; set aside. In a mixer fitted with the paddle attachment, beat butter for 2 minutes. Add sugar and vanilla extract, then add eggs and egg yolk, one at a time, beating well after each. Scrape down your bowl, then beat in the sour cream.

Add flour mixture and buttermilk alternatively, beating for about 30 seconds after each; once everything is added, beat on medium speed for about 2 minutes.

Divide batter evenly between the two cake tins; bake for 32-38 minutes, until a cake tester inserted in the center comes out clean. Cool in the tins for about 10-15 minutes, then remove to a wire rack to cool completely; I place parchment paper on my racks to avoid grid lines in the the cakes.

Once the cakes are completely cool, make your frosting. In a mixer fitted with the paddle attachment, beat butter on medium speed for 1-2 minutes. Sift in powdered sugar and cocoa powder, then cover your mixer with a kitchen towel and beat the mixture on low until all the sugar and cocoa is incorporated into the butter; this takes several minutes. Add salt, vanilla extract, and 2 tablespoons heavy cream; beat for 1-2 minutes. Check your texture; you want your buttercream to be smooth and easy to spread, so add more cream if you need to, but so so sparingly. You can always add more liquid, but you can’t take it back out.

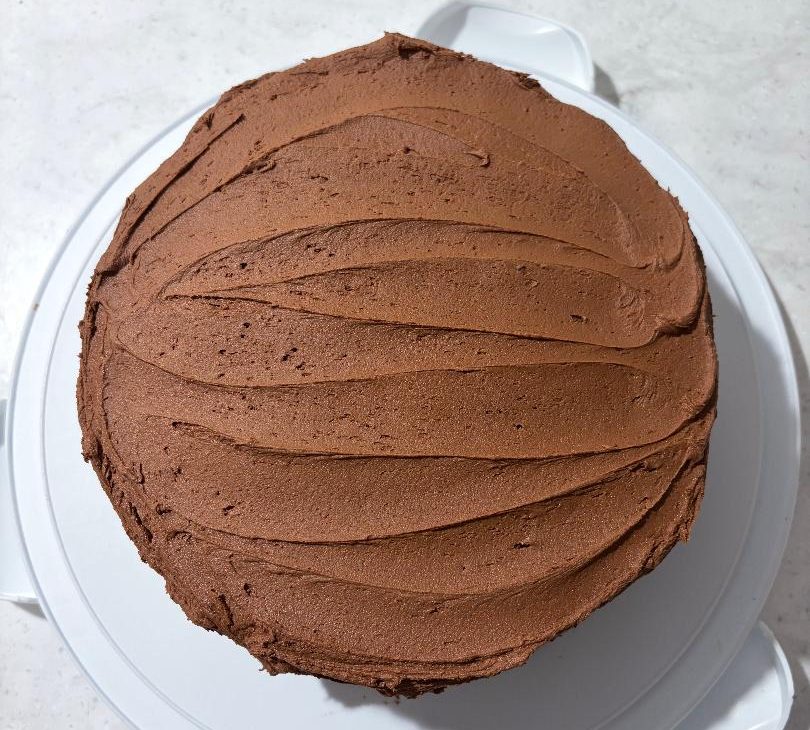
To frost your cake, place one cake on your cake stand and spread about 1 cup frosting over the top; place the second cake on top and frost the top and sides with remaining buttercream, creating whatever pattern you like. My cake was fairly basic-looking, as you can see below. Store tightly covered at at room temperature for 2-3 days; makes about 12 slices.

Chocolate Bundt Cake

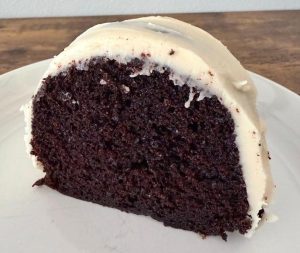
Coffee and ginger in a chocolate cake? Trust me, it works. While I’ve baked with coffee in chocolate treats before, I’d not included ginger in a chocolate recipe in the past. You don’t taste either the coffee or the ginger on their own, but they make the cake absolutely delicious.

This recipe is adapted slightly from Joy the Baker; she calls it the perfect chocolate Bundt cake, and I have to agree. I used sea salt instead of kosher and added more vanilla than the original recipe, then chose to cover it with an easy-to-make vanilla frosting. You could serve it with whipped cream or powdered sugar as Joy suggests, which would also be delicious. But the addition of the vanilla icing gives this cake a super-posh Hostess snack cake kind of vibe, and honestly it’s one of my favorite things I’ve ever baked.

Ingredients

For the cake

  • 2 cups sugar
  • 3/4 cup Dutch-process cocoa, plus more for the pan
  • 2 cups flour
  • 1 teaspoon sea salt
  • 2 teaspoons baking soda
  • 1/2 teaspoon baking powder
  • 1/2 teaspoon ginger
  • 2 eggs
  • 1 egg yolk
  • 1 cup strong brewed coffee, cooled
  • 1 cup buttermilk
  • 1 tablespoon vanilla extract
  • 3/4 cup vegetable oil

For the frosting

  • 4 tablespoons melted butter
  • 3 1/4 cups powdered sugar
  • 1/4 cup milk
  • 1 tablespoon vanilla extract

Preparation

Preheat oven to 350 degrees. Grease a 10-inch Bundt pan and dust with Dutch-process cocoa powder, tapping out the excess cocoa. Set aside.

In a large bowl, combine sugar, Dutch-process cocoa powder, flour, sea salt, baking soda, baking powder, and ginger.

In another bowl, whisk together eggs and egg yolk, then whisk in coffee, buttermilk, and vegetable oil one ingredient at a time – this helps avoid the mixture sloshing around and splashing out all over your counter.

Pour wet ingredients into dry ingredients and mix with a spatula until the batter comes together, then whisk to fully combine so that no lumps remain; the batter is fairly thin. Pour into prepared Bundt pan and bake for 40 – 50 minutes or until a cake tester comes out clean or with just a few moist crumbs (mine needed about 42 minutes). Cool in the pan for about 15 minutes, then invert onto a wire rack to cool completely; I place parchment on my wire rack to help support the cake and avoid that mesh pattern in the bottom as it cools. Cool completely before frosting.

To make the frosting, combine melted butter, powdered sugar, milk, and vanilla extract and mix until completely smooth. Spoon over the cake, allowing it to drip down the sides and middle; you end up with a lot of frosting for this and it basically covers the cake completely. Allow frosting to set before serving.

Store cake in an airtight container at room temperature; this cake will stay moist for at least a few days. Makes about 12 slices.

Strawberry Cake

My first attempt at this cake a few weekends ago brought every baker’s fear to life: the middle was raw. Fearful of over-baking, I’d pulled what appeared to be a fully baked cake from the oven after 30 minutes of baking, only to watch it deflate on my countertop. Despite its raw middle, the edges were baked and tasted delicious. So back I went to give it another try last weekend, leaving it to bake longer (about 35-37 minutes) and achieving success. I found the original recipe at Bake with Zoha and adapted it to include buttercream, rather than cream cheese frosting. I think either would work very well.

I meant to put lemon zest in the cake batter, because I did that on my first attempt, but I got distracted by text messages from the man in my life and there sat my lemon, un-zested as the cake went into the oven. It’s delicious even without the zest in the batter, though; the frosting is a strawberry lemon buttercream so you get a nice sweet/tart balance.

Ingredients

For the cake

  • 2 3/4 cups flour
  • 2 tablespoons cornstarch
  • 3/4 tablespoon baking soda
  • 1 teaspoon baking powder
  • 1 teaspoon salt
  • 3/4 cup vegetable oil
  • 1/4 cup unsalted butter, melted
  • 1 1/2 cups sugar
  • 3 eggs
  • 2 teaspoons vanilla extract
  • 1/3 cup milk
  • 340 grams fresh strawberries, pureed to make about 1 1/2 cups liquid

For the frosting and decoration

  • 1 1/4 cups (2 1/2 sticks) unsalted butter, at room temperature
  • 5 – 6 cups powdered sugar
  • About 3/4 cup seedless strawberry jam
  • 1 teaspoon vanilla extract
  • 1/2 teaspoon lemon extract
  • Zest from 1/2 medium lemon (optional, you can leave it out if you don’t like zest in your frosting)
  • Green, pink, and red gel food coloring, for flower and leaf decorations
  • Wilton M1, 4B, and 352 piping tips

Preparation

Preheat oven to 350 degrees. Spray a 9 x 13 baking tin with baking spray.

In a large bowl, sift together flour, cornstarch, baking soda, baking powder, and salt; set aside. In another large bowl, whisk vegetable oil, melted butter, sugar, eggs, vanilla extract, milk, and strawberry puree. Add dry mixture to wet mixture and whisk gently, folding to combine until no lumps remain.

Pour into prepared baking tin and bake for 30 – 35 minutes, or until a cake tester inserted in the center comes out clean. I think it’s easier to under-bake this cake than to over-bake it, so make sure your center is fully baked. Cool completely before frosting.

To make frosting, beat butter on medium speed for 1 minute. Add about 4 cups powdered sugar and beat on low until all the sugar is incorporated into the butter; this takes several minutes. Add strawberry jam, vanilla extract, and lemon extract and beat to combine; add 1-2 additional cups powdered sugar to reach a soft but pipeable texture; add lemon zest if desired.

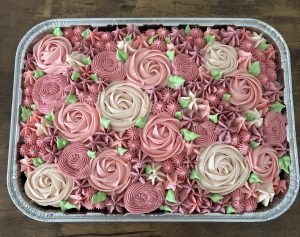
To decorate the cake, reserve a small portion of frosting and tint green for leaf accents. Fit a piping bag with a coupler and a large star tip (I used the Wilton M1 for my rose shapes) and  use about 3/4 to 1 cup of frosting to pipe swirls of frosting to look like roses and individual stars to look like blossoms. The palest pink color in the photo above is the natural color of the frosting; tint a shade or two darker to add more flowers and blossoms. I switched to the Wilton 4B tip (this is where the coupler comes in very handy) for additional swirls and blossom-type shapes to fill in the remainder of the cake. Fit a smaller piping bag with the 352 leaf tip and pipe leaves as you like.

Store in an airtight container at room temperature; makes about 18 servings, depending on how large you slice the cake. This beauty went to work with me and got demolished in less than about four hours.

Lemon Poppy Seed Bundt Cake

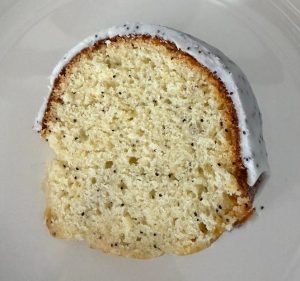
This is my favorite base recipe for Bundt cake, and I’ve made it in many versions over the years – lemon, creamsicle, vanilla, almond, and poppy seed without the lemon. This weekend I brought together two of my favorite things – lemon and poppy seed – for what might be my favorite version yet.

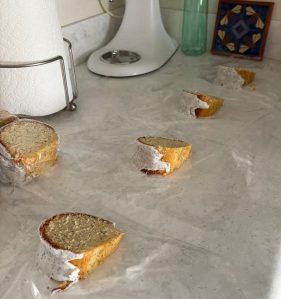
This cake will go to work with me tomorrow, and you might wonder how one transports a Bundt cake for individual services to their office. I slice up my cake and wrap the slices in individual portions in plastic wrap, like in the assembly line below. That way, folks can grab a slice and enjoy it whenever they like; with their morning coffee, after lunch, or later in the evening.

Ingredients

For the cake

  • 3 cups flour
  • 2 1/2 cups sugar
  • 1 1/2 teaspoons baking powder
  • 1/2 teaspoon salt
  • 3 eggs, at room temperature
  • 1 1/2 cups whole milk
  • 1 cup vegetable oil
  • 1 tablespoon vanilla extract
  • 1 teaspoon butter extract
  • 3/4 teaspoon lemon extract
  • Zest from 3 medium lemons
  • 1 tablespoon poppy seeds

For the glaze

  • About 2 3/4 cups powdered sugar
  • 3 – 4 tablespoons lemon juice
  • 1 teaspoon poppy seeds

Preparation

Preheat oven to 350 degrees. Grease and flour a 10-inch Bundt tin.

In a large bowl, combine flour, sugar, baking powder, and salt; set aside. In another large bowl, whisk together eggs, milk, vegetable oil, extracts, and lemon zest. Stir in flour in three batches, mixing to combine completely, then stir in poppy seeds.

Pour batter into prepared tin and bake for 50-60 minutes or until a cake tester comes out clean. Cool in tin for about 15 minutes, then turn out onto a wire rack to cool completely.

To make the icing, place powdered sugar in a medium bowl and add lemon juice about 1 tablespoon at a time to reach a thicker pourable consistency. Stir in poppy seeds, then pour over cake and allow to drip down the sides. Allow icing to set before serving.

Store in an airtight container at room temperature for several days; this cake stays moist much longer than you might expect. Makes about 12 servings, depending on how generous you are with your portions.

Pictured below is my individual wrapping assembly line, in which I stretch out a big piece of plastic wrap, then cut it into little individual pieces to wrap the cake slices. It works very well.