Merry Christmas, friends! This year, for a Christmas Eve party with people very dear to me, I made a heap of cookies, a pan of brownies, and this Yule log. It’s a slight variation on the classic French buche de noel, using a chocolate cake and cream cheese filling recipe from the Better Homes & Gardens Baking book, plus my standard chocolate buttercream on the outside. It was delicious, and a massive hit.
While my Yule log suffered a few cracks during the rolling/unrolling process, the cream cheese filling I chose literally filled in the cracks and instead of seeping out, set beautifully while it chilled (tightly wrapped in the fridge) overnight. I chose to dress my Yule log up with some “soil” made from crumbled brownies and mushrooms made with banana stems and strawberry caps. Next time, I’ll go for some rosemary for that fir-like look…because I will absolutely make this again.
Ingredients
For the cake
- 1/3 cup flour
- 1/3 cup cornstarch
- 1/4 cup unsweetened cocoa powder
- 1/4 teaspoon baking soda
- 1/4 teaspoon salt
- 4 whole eggs, at room temperature*
- 4 egg yolks, at room temperature*
- 1 teaspoon vanilla extract
- 3/4 cup sugar
*Yes, you need a total 8 eggs for this, 4 whole and 4 just the yolks. Reserve the 4 whites you’re not using and make them into meringue cookies (which can be shaped like mushrooms for embellishing the log if you wish) or macarons if you like.
For the filling
- 4 tablespoons butter, at room temperature
- 4 tablespoons cream cheese, at room temperature
- About 3 cups powdered sugar
- 2 teaspoons vanilla extract
For the frosting and decoration
- 12 tablespoons butter, at room temperature
- 3 cups powdered sugar
- 1/4 cup unsweetened cocoa powder
- 2 teaspoons vanilla extract
- 2-3 tablespoons heavy cream
Preparation
Preheat oven to 375 degrees. Line a 10x15x1 jelly roll pan with parchment paper.
Sieve together flour, cornstarch, cocoa powder, baking soda, and salt; set aside. Place a clean, thin kitchen towel next to your oven and generously dust it with powdered sugar; this is where you’ll flip your cake onto for rolling once it’s baked.
In a mixer, beat eggs, egg yolks, and vanilla together on high speed until thick and lemon-colored, about 4-5 minutes. Gradually beat in sugar, one tablespoon at a time, beating for an additional 2 minutes. Add flour mixture one-third at a time, folding gently to just combine; make sure you scrape the sides and bottom of your bowl so you don’t have surprise pockets of flour.
Pour batter into jelly roll tin and smooth out the top. Bake for 12 minutes, or until the top of the cake springs back when touched (be very careful not to over-bake here). Remove from oven and allow to cool in the tin for 3 minutes; loosen the sides and flip the cake out onto the towel dusted with powdered sugar; remove parchment paper and immediately roll up starting at the short side. Allow the cake to cool completely.
Once the cake is cool, make your filling. In a mixer, beat butter and cream cheese on medium speed for 2-3 minutes. Add powdered sugar and beat on low, allowing the sugar to fully incorporate into the butter/cream cheese mixture; this will take a few minutes. Beat in vanilla extract.
Carefully unroll your cake and spread with filling; re-roll, place seam-side down, and wrap in plastic wrap. Chill for about 30 minutes (or overnight) before frosting.
To make frosting, beat butter on medium speed for about 1 minute. Add powdered sugar and cocoa powder and beat on low speed until the sugar and cocoa are fully incorporated into the butter; this takes a few minutes. Add vanilla extract and 2 tablespoons heavy cream and beat for 2-3 minutes. Add remaining heavy cream if necessary; you want a smooth consistency.
Unwrap the log and place it on your serving plate; frost using a small offset spatula, creating a bark-like pattern on the outside and ends. If desired, crumble up brownies for soil and place around the log; add strawberry banana mushrooms. There are lots of other ideas for embellishing Yule logs; I’ve listed a few below. Serve immediately; store any leftovers in the fridge (because cream cheese filling needs refrigeration).
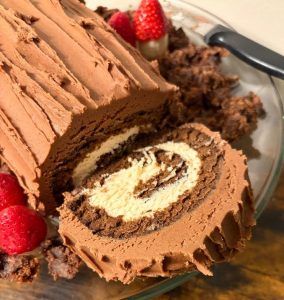 Here’s a close-up of the inside of the log, and some ideas for embellishment:
Bake meringue cookies in the shape of mushrooms and add them to the outside of the log. I’m pretty sure this is what Martha Stewart does!
Bake lace cookies or Florentines, break them into pieces, and stick them along the sides – this will also look like fungi.
Pipe mushrooms or sprigs of pine with buttercream (see my tree trunk cake here).
Create mushrooms using Hershey’s Kisses for the caps and marshmallows for the stems.
Set sprigs of rosemary along the sides, which look like pine, and dust with powdered sugar to look like snow.