Chocolate Cookies with Peanut Butter Chips

Many years ago I baked this recipe, which I found on the back of the bag of Reese’s peanut butter chips, as cookie bars. They were a huge hit at one of my video shoots at work, where I shared with my colleagues that any time there’s a recipe on the back of something, it’s bound to work out well. Why? Because ingredient makers have test kitchens where bakers spend hours trying out recipes. The best ones end up on the backs of packages…and this is one of those recipes.

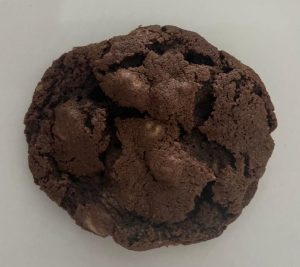
This time I chose to follow the recipe on the bag to bake as cookies (well, sort of, I made them much larger than I should have), but I think I liked the bar version better. These are delicious of course, but bars are so much easier in the grand scheme – mix the dough, press it into the pan, and bake it. Efficient and delicious. Maybe that should have been the name of this blog!

Ingredients

  • 2 cups flour
  • 3/4 cup cocoa powder
  • 1/2 teaspoon salt
  • 1/2 teaspoon baking soda
  • 1 1/4 cups (2 1/2 sticks) butter, softened
  • 2 cups sugar
  • 2 teaspoons vanilla extract
  • 2 eggs
  • 10-ounce package Reese’s Peanut Butter baking chips

Preparation

Preheat oven to 350 degrees. Line several baking sheets with parchment paper.

In a large bowl, combine flour, cocoa powder, salt, and baking soda; set aside.

In a mixing bowl fitted with the paddle attachment, cream together butter and sugar until light and fluffy. Add eggs and vanilla and beat to combine.

Add flour mixture in two batches, beating well and scraping the sides of the bowl between each addition. Stir in peanut butter chips.

Using a 1 or 2-inch cookie scoop, drop scoops of dough onto the baking sheets, leaving a few inches between each; I baked 6 cookies per sheet using a 2-inch scoop. Bake for 8-10 minutes, until edges are set but centers are still puffy. Remove from oven and cool on the baking sheets for a few minutes, then place on a wire rack to cool completely. Makes about 24 2-inch cookies.

Shark Cookies

Last week was Shark Week, an annual event on the Discovery Channel that aims to educate people about these often-feared aquatic creatures. As I’ve posted before, I actually love sharks, even if Jaws and great whites in general scare the living daylights out of me. But whenever I visit an aquarium, the sharks are always my favorite creatures, gliding serenely through the tanks. I aspire for the level of serenity I imagine them to have.

Anyway…these treats are an easy bake as standard sugar cookie cut-outs, but boy, do they take a while to decorate. They’re also massive; I didn’t chill my dough long enough before baking them and they spread immensely in the oven, but they were delicious nonetheless.

For the cookies

  • 1 cup butter, softened
  • 2 cups sugar
  • 2 eggs
  • 4 cups flour
  • 4 teaspoons baking powder
  • 1 teaspoon salt
  • 3 teaspoons vanilla extract

For the icing

  • 6 tablespoons shortening
  • dash of salt
  • 2 egg whites
  • 4-5 cups powdered sugar
  • 2-3 teaspoons vanilla extract
  • 1 – 2 teaspoons water, if necessary*
  • Blue food coloring
  • Miniature chocolate chips, for eyes

*Sometimes your egg whites will be larger than others, so you may not need the extra liquid for the frosting. You can always add a few teaspoons of water if you need to, but do so sparingly – once you add it, you can’t take it back out! 

Preparation

Stir together flour, baking powder, and salt in a medium bowl; set aside.

Cream together butter and sugar until fluffy. Add egg and beat well. Add vanilla and about half the flour mixture, beating until combined; beat in remaining flour. If your dough is still crumbly, add 1-2 teaspoons of water.

Divide dough in half and knead each just slightly.  Form each half into a disc and place on plastic wrap; cover with another piece of plastic wrap and roll out to flatten into about 1/4 inch thickness. This helps later on, so you don’t have to work your dough as much when rolling and re-rolling after cutting, making your cookies more tender. Refrigerate until just barely firm, about 20-30 minutes. If you refrigerate overnight, let your dough stand at room temperature for about 15 minutes before you roll it out.

Preheat oven to 375 degrees. Line several baking sheets with parchment paper. Remove dough from fridge and roll to about 1/8 inch thickness. Cut into shapes and place on baking sheets, leaving room for the cookies to spread; I baked 6 sharks on each sheet.

Bake for 8-10 minutes, until just golden at the edges.  Cool on a wire rack completely before frosting.

To make the frosting, combine shortening, egg whites, salt, and one cup powdered sugar in a mixing bowl.  Beat on low speed until combined, then increase speed to medium, then high, and beat for 1 minute. Add remaining powdered sugar, one cup at a time, beating for about 1 minute each time – you can add as much as 5 whole cups of powdered sugar but may need a little extra extract or water to keep the consistency as easily spreadable. Add extracts and beat; if your frosting is too thick, add 1-2 teaspoons of water. You want a smooth consistency that’s easy to pipe.

Reserve about 1/3 cup of white frosting; tint the remainder light blue (or if you want to make grey, use a few drops of black food coloring). Using a small offset spatula, frost the bellies of the sharks white, then frost the remainder of the body and bottom fin with blue. Add a mini chocolate chip eye; allow frosting to set before storing cookies between sheets of waxed paper at room temperature. Makes about 36.

Speckled Egg Cookies

It’s finally spring – though in Pittsburgh, spring can mean 70 degrees or 30 degrees from day to day. Despite this, birds are chirping and trees and flowers are blooming, so even the colder days are more bearable. And the days are getting longer, so I’ll take it.

These speckled egg cookies are a cute springtime treat, and there are a few different options for speckling material. They’re a basic sugar cookie, frosted and dusted with chopped up chocolate chips, but you could easily use Oreo crumbs (and I will the next time I make anything speckled).

Ingredients

For the cookies

  • 8 tablespoons butter, softened
  • 1 cup sugar
  • 1 egg
  • 2 cups flour
  • 2 teaspoons baking powder
  • ½ teaspoon salt
  • 1 teaspoon vanilla

For the frosting and decoration

  • 3 tablespoons shortening
  • dash of salt
  • 1 egg white
  • 2 cups powdered sugar
  • 1 teaspoon vanilla extract
  • 1 teaspoon almond extract, optional (you can make this frosting with just vanilla)
  • 1 – 2 teaspoons water, if necessary
  • Blue liquid food coloring*
  • Semi-sweet chocolate chips, very finely chopped so they are almost like dust

*Gel food coloring, even when used in only one drop, yields a very intense color. Liquid food coloring will give you better pastel shades. 

Preparation

Stir together flour, baking powder, and salt in a medium bowl; set aside.

Cream together butter and sugar until fluffy. Add egg and beat well. Add vanilla and about half the flour mixture, beating until combined; beat in remaining flour.

Note: if your dough is too crumbly, you can add just a bit of water or another 1/4 teaspoon of vanilla.

Divide dough in half and knead each just slightly.  Form each half into a disc and place on plastic wrap; cover with another piece of plastic wrap and roll out to flatten into about 1/4 inch thickness. This helps later on, so you don’t have to work your dough as much when rolling and re-rolling after cutting, making your cookies more tender. Refrigerate until just barely firm, about 20-30 minutes. If you refrigerate overnight, let your dough stand at room temperature for about 15 minutes before you roll it out.

Preheat oven to 375 degrees. Line several baking sheets with parchment paper. Remove dough from fridge and roll to about 1/8 inch thickness. Cut into egg shapes and place on baking sheets about 2 inches apart.

Bake for 8-10 minutes, until just golden at the edges.  Cool on a wire rack completely before frosting.

To make the frosting, combine shortening, egg white, salt, and one cup powdered sugar in a mixing bowl.  Beat on low speed until combined, then increase speed to medium, then high, and beat for 1 minute. Add remaining powdered sugar, beating for about 1 minute. Add extracts and beat; if your frosting is too thick, add 1-2 teaspoons of water. You want a smooth consistency that’s easy to spread.

Tint your frosting light blue (go easy and use liquid food coloring, as noted above) and frost each cookie. Sprinkle with chocolate chip dust; allow frosting to set before storing between layers of waxed paper in an airtight container. Makes about 3 dozen, depending on the size of your cookie cutter.

Pineapple Sugar Cut-Outs

Here we are, in the dead of winter. By many accounts Pittsburgh has had it easy winter-wise these last few years, but Mother Nature seems to be making up for lost time. This winter reminds me of those from my childhood, snowy and very cold. And while I’m not a winter hater, I’m definitely ready for some warm weather.

Pineapples grow in tropical climates, of course, and I would love to be in one of those right now. These treats would be fun for a summer party, especially because pineapples are a symbol of hospitality. I’ll definitely make these again, maybe along with some watermelon cut-outs for a bright, fun cookie tray.

Ingredients

For the cookies

  • 8 tablespoons butter, softened
  • 1 cup sugar
  • 1 egg
  • 2 cups flour
  • 2 teaspoons baking powder
  • ½ teaspoon salt
  • 1 teaspoon vanilla

For the frosting

  • 6 tablespoons shortening
  • dash of salt
  • 2 egg whites
  • 4 cups powdered sugar
  • 2 teaspoons vanilla extract
  • 2 teaspoons almond extract
  • 1 – 2 teaspoons water, if necessary
  • Yellow and green food coloring

Preparation

Stir together flour, baking powder, and salt in a medium bowl; set aside.

Cream together butter and sugar until fluffy. Add egg and beat well. Add vanilla and about half the flour mixture, beating until combined; beat in remaining flour.

Note: if your dough is too crumbly, you can add just a bit of water or another 1/4 teaspoon of vanilla.

Divide dough in half and knead each just slightly.  Form each half into a disc and place on plastic wrap; cover with another piece of plastic wrap and roll out to flatten into about 1/4 inch thickness. This helps later on, so you don’t have to work your dough as much when rolling and re-rolling after cutting, making your cookies more tender. Refrigerate until just barely firm, about 20-30 minutes. If you refrigerate overnight, let your dough stand at room temperature for about 15 minutes before you roll it out.

Preheat oven to 375 degrees. Line several baking sheets with parchment paper. Remove dough from fridge and roll to about 1/8 inch thickness. Cut into shapes and place on baking sheets about 2 inches apart; I baked 6 pineapples per sheet, and my cutter is 4 inches tall.

Bake for 8-10 minutes, until just golden at the edges.  Cool on a wire rack completely before frosting.

To make the frosting, combine shortening, egg whites, salt, and one cup powdered sugar in a mixing bowl.  Beat on low speed until combined, then increase speed to medium, then high, and beat for 1 minute. Add remaining powdered sugar, one cup at a time, beating for about 1 minute each time. Add extracts and beat; if your frosting is too thick, add 1-2 teaspoons of water. You want a smooth consistency that’s easy to pipe.

Take about 1/4 of your frosting and place it in a small bowl. Tint green for pineapple leaves. Tint remaining frosting yellow.

Fit a piping bag with a small star tip (or a leaf tip, if you prefer) and fill with green frosting; fit another bag with a medium star tip and fill with yellow frosting. Pipe the yellow stars in even lines across each pineapple, then pipe on leaves. Allow frosting to harden before storing; store between sheets of parchment or waxed paper so the cookies don’t stick together. Makes about 22 cookies.

Iced Oatmeal Cookies

icedoatmealcookies
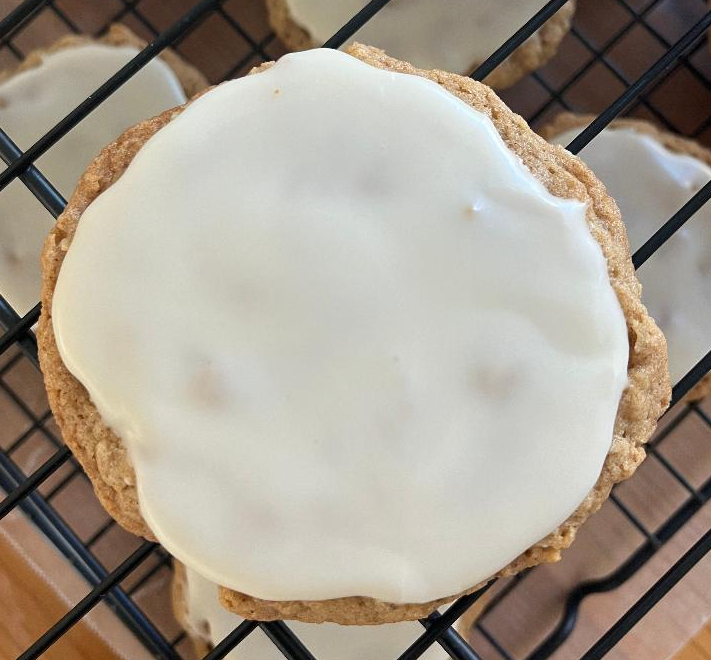
Everyone my age (let’s say young Generation X) ate store-bought iced oatmeal cookies as a kid. There were several brands, from (what seemed like fancy) Archway to generic, but they all had a similar flavor and crunchy texture.

These aren’t nearly as crunchy, but they’re pretty delicious; I added nutmeg to my dough to give it a little extra flavor. You could easily double the recipe; I cut the original one down, but used a generous 1-inch scoop of dough for each cookie to get 22 treats.

Ingredients

For the cookies

  • 1 cup flour
  • 1/4 teaspoon baking powder
  • 1/4 teaspoon baking soda
  • 1 teaspoon cinnamon
  • 1/4 teaspoon salt
  • 1/8 teaspoon nutmeg
  • 8 tablespoons butter, at room temperature but still cool
  • 1/2 cup brown sugar
  • 1/4 cup white sugar
  • 1 egg
  • 1 teaspoon vanilla
  • 1 cup plus 2 tablespoons old-fashioned oats

For the icing

  • 1 1/2 cups powdered sugar
  • 2 tablespoons water
  • 1 teaspoon vanilla extract

Preparation

Preheat oven to 375 degrees. Line several baking sheets with parchment paper.

In a small bowl, combine flour, baking powder, baking soda, cinnamon, salt, and nutmeg; set aside. Cream together butter and sugars until light and fluffy; add egg and vanilla and beat to combine. Add flour and beat until just combined, then stir in oats.

Scoop generous 1-inch balls of dough and place about 2 inches apart on the baking sheets; I baked six cookies per sheet. Bake for 10-11 minutes, until edges are golden brown. Remove from oven and cool on the baking sheets for about 5 minutes; place on a wire rack to cool completely.

To make the icing, combine powdered sugar, water, and vanilla extract in a small bowl and stir until smooth. Place about 1 teaspoon of icing on each cookie and spread with a spoon or small spatula; I covered my cookies a bit more than the store-bough versions were covered, but you can leave them a little more bare (or use thinner icing by adding a bit more water to your mixture) if you prefer. Allow icing to set; store between sheets of waxed paper at room temperature for 2-3 days. Makes 22.

Almond Sugar Cookies

almondsugarcookie
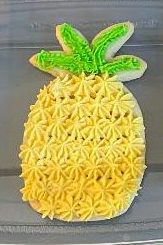
Sugar cookies can be whatever flavor you want them to be, from vanilla to creamsicle to anything in between. Last week I baked these almond sugar cookies for my goddaughters, Mo and Margo, as their back-to-school treat. It’s a very simple recipe that needs very little to dress it up, if anything. I went with sanding sugar, but you could frost them too if you wanted.

I’d like to experiment with a lemon version (too bad I don’t have a lemon-shaped cookie cutter, hmm), an orange version similar to the creamsicle but with less vanilla, and a chocolate/peppermint for the holidays. Stay tuned.

Ingredients

  • 8 tablespoons butter, softened
  • 1 cup sugar
  • 1 egg
  • 2 cups flour
  • 2 teaspoons baking powder
  • 1/2  teaspoon salt
  • 1 teaspoon vanilla extract
  • 1 1/4 teaspoons almond extract
  • Sanding sugar, if desired

Preparation

Stir together flour, baking powder, and salt in a medium bowl; set aside. Cream together butter and sugar until fluffy. Add egg and beat well. Add vanilla and about half the flour mixture, beating until combined; beat in remaining flour.

Note: if your dough is too crumbly, you can add just a bit of water or another ¼ teaspoon of vanilla.

Divide dough in half and knead each just slightly until dough sticks together.  Form each half into a disc and wrap in plastic. Refrigerate until just barely firm, about 20-30 minutes.

Preheat oven to 375 degrees. Pour sanding sugar onto a plate or into a shallow bowl and set aside. Line several baking sheets with foil or parchment paper.

Roll dough to 1/8 inch thickness and cut into desired shapes; I used a fluted cutter for these, but they didn’t keep their shape as well. Press the top of each cookie into the sanding sugar to coat completely; place on baking sheets about 2 inches apart.

Bake for 8-10 minutes, until just golden. Remove from oven and cool on the baking sheet for 2-3 minutes, then cool completely on a wire rack. Makes about 3 dozen, depending on the size of your cutter.

Sand Dollar Cookies

sanddollarcookies
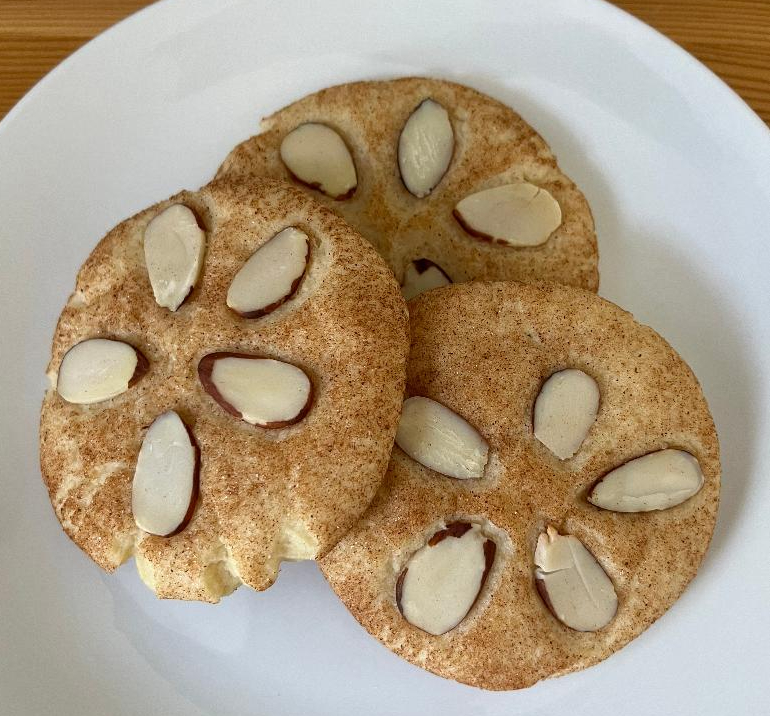
Everyone I know is going the beach this summer. Ocean City, Sandbridge, Nags Head, Rehoboth…you name it, someone I know has recently been to it, is currently on it, or will soon be visiting it. Alas, there is no beach vacation in my summer plans. But I do hope to get a little lakeside beach time at Deep Creek this summer, so we’ll see.

Sand dollars – which I didn’t know until today are a type of sea urchin – are also called sea cookies in New Zealand and Spanish-speaking parts of the Americas, and I love that. These sand dollar cookies were very easy to make; I found my recipe over at Krazy Kitchen Mom, though there are several options for sand dollar cookies out there.  This is the snickerdoodle-topped-with-almonds variety, rather than the sugar-cookie-cutout-topped-with-almonds variety. I might try those sometime soon, though.

Ingredients

For the dough

  • 2 3/4 cups flour
  • 1 1/2 teaspoons cream of tartar
  • 1/2 teaspoon baking powder
  • 1 teaspoon salt
  • 1 cup butter, at room temperature
  • 1 1/2 cups sugar
  • 2 eggs, at room temperature
  • 1 tablespoon vanilla extract

For the topping

  • 1/3 cup sugar
  • 1 tablespoon cinnamon
  • Flaked almonds

Preparation

In a large bowl, whisk together flour, cream of tartar, baking powder, and salt; set aside. In mixer with a paddle attachment, cream butter and sugar until fluffy. Add eggs, one at a time, beating well after each; mix in vanilla. Add about half the flour mixture and beat to combine, then beat in remaining flour. Cover and chill dough for about 1 hour.

Preheat oven to 350 degrees. Line several baking sheets with foil. Combine 1/3 cup sugar and 1 tablespoon cinnamon in a small bowl; set aside.

Using a 2-inch cookie scoop, scoop dough and roll into balls. Dip in cinnamon sugar, then place on the baking sheets and flatten; top with 5 flaked almonds, pressing the almonds in just slightly. I put six cookies on each baking sheet, as they spread.

Bake for 10-12 minutes, until set. Remove from oven and cool on baking sheets for about 10 minutes, then place on a wire rack to cool completely. Makes 28.

Homemade Nutter Butters

homemadenutterbuttersNutter Butter cookies are my second favorite store-bought cookie, right behind the Double Stuf Oreo. For some reason I always have them on road trips, and honestly don’t know why. A homemade, copycat version came across my Pinterest feed from The Soccer Mom Blog recently and I thought, why not? As always, I added more vanilla to my filling than the original recipe called for, because I never think recipes have enough.

Anyway, here’s the thing…these cookies are massive. I mean, massive. They claim to have 230 calories each, and I believe it. The next time I make them (likely tomorrow) I’m going to make them smaller, and probably try a chocolate filling instead of peanut butter just because. While they’re not crunchy like the store-bought version, they’re absolutely delicious. 

Ingredients

For the cookies

  • 1 1/2 cups flour
  • 1 teaspoon baking soda
  • 1/4 teaspoon kosher salt
  • 8 tablespoons unsalted butter, at room temperature
  • 1 cup light brown sugar
  • 1 cup smooth peanut butter
  • 1 egg
  • 1/2 teaspoon vanilla extract
  • 1/2 cup granulated sugar, for rolling

For the filling

  • 4 tablespoons butter, at room temperature 
  • 1/2 cup smooth peanut butter
  • 1 1/2 cups powdered sugar
  • 2 tablespoons whole milk
  • 1 teaspoon vanilla extract 

Preparation

Preheat oven to 350 degrees. Line several baking sheets with parchment paper. In a small bowl, combine flour, baking soda, and salt; set aside. Place granulated sugar in another small bowl to roll your dough in, and set that aside as well.

In a mixer fitted with the paddle attachment, cream butter, peanut butter, and brown sugar together. Add egg and vanilla and beat to combine, then add in flour mixture and beat until just combined.

Using a 1-inch cookie scoop, scoop out portions of dough. Roll into balls, roll in granulated sugar, then form into log shapes and place about two inches apart on the baking sheets. To create the peanut shape, pinch the middle of each log, then use a fork to make the crisscross pattern like you would on a regular peanut butter cookie. Bake for about 10 minutes, until edges are just starting to turn golden brown – you don’t want to over bake these (or any treats, really). Remove from oven and cool cookies on the baking sheets for 3-4 minutes, then remove to a wire rack to cool completely.

Once cookies are cool, make the filling. Cream together butter and peanut butter, then add in powdered sugar, milk, and vanilla. Beat until smooth, then place in a piping bag and pipe about one tablespoon of filling onto half of the cookies. Top with the remaining cookies to create sandwiches. My batch yielded 15 sandwiches, and I had plenty of filling left over – about a half-cup, at least. I’m holding onto that for another treat.

Italian Orange Cookies

italianorangecookiesI don’t know what makes these cookies Italian, but according to Marisa’s Italian Kitchen, they are. They’re also delicious, very soft and tender with a nice crunchy sugar coating. The original recipe called for rolling them in both granulated sugar and powdered sugar, but I just went with granulated.

I think I should have chilled my dough for longer, because while Marisa’s cookies were more sturdy-looking, mine spread a bit when they baked. I suspect they would be good as sandwich cookies, maybe with some chocolate ganache between the layers. I might still do that, add a dark chocolate ganache – because chocolate and orange are really good flavor friends. You could also fill them with a vanilla buttercream for more of a creamcicle vibe…so maybe next time. Stay tuned.

Ingredients

  • 8 tablespoons butter, at room temperature
  • 1/2 cup sugar
  • 1 egg yolk, at room temperature
  • zest from 1 medium orange
  • 2 tablespoons orange juice
  • 1 teaspoon vanilla extract
  • 1 1/2 cups flour 
  • 1 teaspoon baking powder
  • 1/8 teaspoon salt
  • Additional granulated sugar, for rolling

Preparation

In a mixer fitted with the paddle attachment, cream butter and sugar until fluffy. Add egg yolk, and beat to combine, then add orange zest, orange juice, and vanilla and beat well. Add flour, baking powder, and salt and beat to combine completely. Cover and chill for about 1 hour.

Preheat oven to 350 degrees. Line two baking sheets with parchment paper. Place sugar in a small bowl for rolling; set aside.

Using a small cookie scoop, scoop scant balls of dough – you want them to be about the size of a gumball. Roll into balls, then coat in sugar. Place on the baking sheets and bake for 13-15 minutes, then edges are just golden. Remove from oven and cool on baking sheets for a few minutes, then place on a wire rack to cool completely. Makes about 22.

Chinese Restaurant Almond Cookies

chineserestaurantalmondcookies
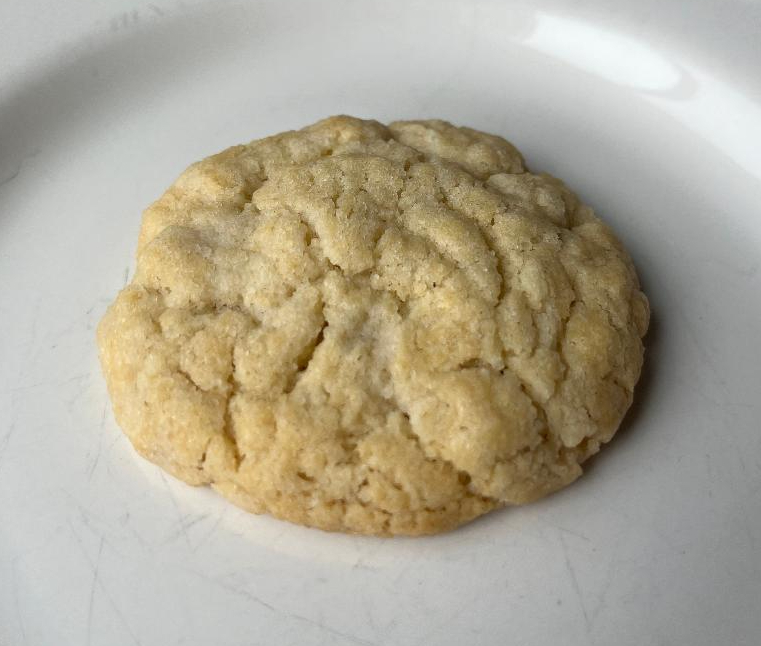
Confession: Asian food isn’t really my jam. No offense, Asia – I know your various cuisines are popular with many, many folks. And while I enjoy some fried rice now and then, I haven’t spent must time in Chinese restaurants in my life. I’ve certainly not encountered these cookies there, either. But they do seem familiar to me.

Our local grocery chain, Giant Eagle, used to sell something called a “rainbow cookie” in its bakery. They were usually swirled with a few different colors – green and yellow, red, white, and blue – and they had the same crumbly texture as these treats. This recipe comes from the King Arthur Flour Cookie Companion, and the only change I made was to omit the whole blanched almond in the middle since I didn’t have any on hand. There’s also an option to glaze these with chocolate, but I think they’re better plain.

Ingredients

  • 2 3/4 cups flour
  • 1 cup sugar
  • 1/2 teaspoon salt
  • 1/2 teaspoon baking soda
  • 1 cup vegetable shortening, chilled
  • 1 1/2 teaspoons vanilla extract
  • 2 teaspoons almond extract
  • 1 egg
  • 1 egg yolk

Preparation

Preheat oven to 325 degrees. Line three baking sheets with parchment paper.

In a medium mixing bowl, whisk together flour, sugar, salt, and baking soda. Cut chilled shortening into cubes, then cut into the flour mixture using a pastry cutter until the mixture is uniformly crumbly.

In a separate bowl, whisk vanilla extract, almond extract, egg, and egg yolk. Sprinkle over the flour/shortening mixture and stir until a cohesive dough forms; I used my hands to fully incorporate the ingredients and make a smooth dough.

Using a 1-inch cookie scoop, scoop generous portions of dough and roll into balls. Place on the baking sheets and flatten to about 1/2 inch thickness; bake for 16-18 minutes, until just set; this means a fingerprint will remain in the cookie and not spring back. You don’t want to over-bake these, otherwise they’ll be too hard, so I’d err on the side of under-baking just slightly and allowing the cookies to cool a few minutes (and continue baking) on the baking sheets before removing to a wire rack to cool completely. Makes about 2 dozen cookies.