Pumpkin Patch Sugar Cut-Outs

IMG_9069To some people, frosting dozens of cut-out cookies might be stressful. But for me, it’s Zen time; this endeavor allows me to be completely focused on one task. And that task, when complete, will bring joy to others. It’s a win-win for my mental health, I’d say.

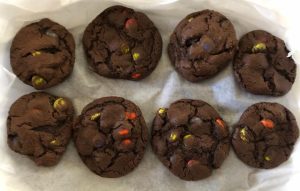
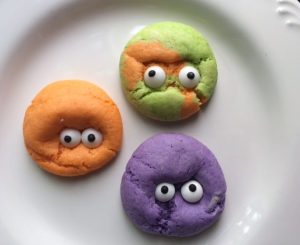
Yesterday I baked a batch of pumpkin-shaped cut-outs for Halloween and decided to frost them with various shades of orange, along with green and white. They turned out really well, and Mike will take them to work tomorrow for his colleagues to enjoy. Granted, I’m keeping a few back for us – I think the green ones are my favorites.

For the cookies

  • 1 cup butter, softened
  • 2 cups sugar
  • 2 eggs
  • 4 cups flour
  • 2 teaspoons baking powder
  • 1 teaspoon salt
  • 3 teaspoons vanilla
  • 1-2 teaspoons water

For the frosting

  • 3 egg whites*
  • 9 tablespoons shortening
  • Dash of salt
  • 6 cups powdered sugar
  • 2 1/2 teaspoons vanilla extract
  • 1 1/2 teaspoons almond extract
  • Orange, yellow, red, moss green, and brown gel food coloring

Preparation

Stir together flour, baking powder, and salt in a medium bowl; set aside. Cream together butter and sugar until fluffy. Add eggs and beat well. Add vanilla and about half the flour mixture, beating until combined; beat in remaining flour. If necessary, add 1-2 teaspoons of water for a less crumbly dough; you’ll need a more pliable dough to roll and cut later.

Divide dough in half and knead each just slightly until dough sticks together.  Form each half into a disc and wrap in plastic. Refrigerate until just barely firm, about 20-30 minutes.

Preheat oven to 375 degrees. Line several baking sheets with parchment paper. 

Roll dough to 1/8 inch thickness and cut into desired shapes; I used large, medium, and small pumpkin-shaped cutters. Be sure to bake like-sized shapes on one sheet – otherwise you’ll have an uneven bake. 

Bake for 8-10 minutes, until just golden. Remove from oven and allow to cool on cookie sheets for 2-3 minutes before carefully transferring to wire racks to cool completely.

For the frosting, combine egg whites, shortening, salt, and 2 cups powdered sugar in a mixing bowl.  Beat on low speed until combined, then increase speed to medium, then high, and beat for one minute.

Add additional cup powdered sugar and beat on low speed until combined, then on high speed for one minute. Add vanilla and almond extracts.  Beat on high speed for one or two minutes, until very well combined.

Check the frosting’s texture; it should be like very, very soft peanut butter and very easily spreadable.  If necessary, you can add one to two teaspoons of water to thin the frosting and beat well to combine.

Tint to your desired shades; I used a very light orange with just one drop of orange coloring, then darker shades that blended yellow, red, and brown into the already-orange frosting. For the stem colors, use brown for some and moss green for others; the green pumpkins are tinted with a generous amount of moss green coloring. 

Frost to look like pumpkins, using your knife to make the ridges. Allow icing to set before storing cookies between sheets of waxed paper in an airtight container. Makes about 5 dozen, depending on the size of your cutters. 

Advertisement

Halloween M&M Cookies

Finding Halloween cookies that ship well can be a challenge. Many adorable treats involve icing, frosting, or other decorations that aren’t quite suitable for a trip across the country. Sure, I’d love to bake adorable sandwich cookies with eyes and fangs that look like The Monster Book of Monsters from Harry Potter, or witch hat cookies made with Hershey’s kisses, or even just cute cut-outs frosted to look like ghosts and tombstones, with but such treats don’t hold up in shipping.

Fortunately I found these easy-to-bake, easy-to-ship Halloween M&M cookies at Cooking with Karli. I amended her recipe just a bit by adding two tablespoons of vanilla extract, rather than just one. I also meant to keep some M&Ms out to press into the tops of these cookies but totally forgot, so they definitely look more cookie-from-the-black-lagoon with the M&M lumps in them than I’d intended…but that actually works well for Halloween, right?

Ingredients

  • 1 1/2 cups flour
  • 1/2 cup cocoa powder
  • 1 teaspoon baking soda
  • 1/2 teaspoon salt
  • 12 tablespoons butter, softened
  • 1/2 cup sugar
  • 1/2 cup light brown sugar
  • 1 egg
  • 2 tablespoons vanilla extract
  • 1 tablespoon milk
  • 11.4 ounce package Ghoul’s Mix M&Ms

Preparation

Preheat oven to 350 degrees. Line several baking sheets with parchment paper.

In a medium bowl, combine flour, cocoa powder, baking soda, and salt; set aside.

In a mixer fitted with the paddle attachment, cream butter, sugar, and brown sugar until light and fluffy, about 3 minutes. Add egg and vanilla and beat until creamy.

Add flour mixture all at once and beat with the mixer running on low speed; when the flour mixture is about halfway incorporated into the butter/egg mixture, add milk. Beat to combine completely, then stir in M&Ms. Though the original recipe said the dough will be very soft, mine was pretty sturdy.

Using a 1-inch cookie scoop, scoop dough and roll into balls, then flatten the balls slightly and place on the parchment-lined baking sheets. If your dough is softer, you’ll be able to just drop the scoops onto the baking sheet. Bake for 8-10 minutes, until edges are set and tops no longer look shiny. Remove from oven and cool on the baking sheets for a few minutes, then remove to a wire rack to cool completely.

Store in an airtight container; if shipping, store between layers of waxed paper. Makes about 30 cookies.

Creature Cookies

Here’s another great cake mix-based recipe for busy bakers. I found this recipe on several other blogs, so it’s difficult to give credit to whoever came up with it – I imagine it was an inventive test kitchen baker at a cake mix company.

I chose to add princess cake and cookie flavor to the dough, an amazing product available at King Arthur Flour that promises – and delivers – that classic “from the bakery” flavor. It’s kind of similar to the flavor of an animal cookie and makes a subtle yet wonderful addition to this dough. If you don’t have it, you can substitute vanilla extract if you like, or just leave the dough as-is.

Just a few notes about handling the dough: it’s incredibly sticky, so when you stir in your food coloring, you’ll want to use a mixer. I started out with three separate colors, then realized after some orange dough got into the green dough from my cookie scoop that mixing the colors would also be fun. Lastly, I used two different methods for placing the eyeballs; on the first two batches, I baked the cookies first, then pressed in the eyes when they came out of the oven (resulting in the look of the orange and purple cookies above). On the last batch, I pressed them into the dough before baking, and you can see the difference in the green/orange cookie above. Either method would be fine – you’ll just end up with a slightly different look based on what you choose.

Ingredients

  • 1 box white cake mix
  • 1/3 cup vegetable oil
  • 2 eggs
  • 1/2 teaspoon princess cake & cookie flavor
  • Purple, orange, green, and yellow food coloring
  • Candy eyeballs

Preparation

In a large bowl, combine cake mix, vegetable oil, eggs, and flavoring; stir very well to completely combine. Divide dough into three portions. Tint one purple, one orange, and one green (I found that using both green and yellow yields a Frankenstein-like color, which is what I wanted); I used my stand mixer, fitted with the paddle attachment, to really work the food coloring into the dough. Chill dough for 30-60 minutes, until easier to handle; it will remain quite sticky, but the chilling process does help.

Preheat oven to 350 degrees. Line 3 baking sheets with parchment.

Using a 1-inch cookie scoop, scoop portions of dough, then divide each portion in half – you want your portions to be about the size of a gumball. Roll into balls, combining colors if you like.

Place balls on parchment-lined baking sheets and press in candy eyeballs if you like, or wait until after baking and press eyeballs in then, whatever you prefer.

Bake for 9-11 minutes, until cookies are set. Remove from oven and allow to cool on baking sheets for a few minutes, then transfer to a wire rack to cool completely.

Store in an airtight container at room temperature.

Makes 40.