Banana Bread

banana bread


In the 1930s, recipes for banana bread began to appear in American cookbooks. Some culinary historians cite the availability of baking soda and baking powder as the impetus for this treat, while others believe it came simply from the kitchen of an enterprising and thrifty gal who didn’t want her overripe and hard-earned bananas to go to waste. I’d wager that both are the truth, and being a thrifty baker myself, applaud the woman who mashed up her spotty bananas and whipped up the first heavenly-scented loaf of banana bread.

Banana bread is simple, and very easy to make. Being a quick bread, there is no yeast, kneading, or rising time involved; the whole process, from mixing bowl to table, takes about an hour. Banana bread can be served warm but many bakers, myself included, believe that it tastes better after a day or so, when the flavors have had time to settle.

Ingredients

  • 1 1/2 cups flour
  • 1 1/2 teaspoons baking powder
  • 1/4 teaspoon baking soda
  • generous 1/4 teaspoon cinnamon
  • 1 egg
  • 3 medium very ripe bananas, mashed
  • 3/4 cup sugar
  • 1/4 cup vegetable oil

Preparation

Preheat oven to 350 degrees.

Grease an 8x4x2 loaf pan and set aside.

In a medium bowl, combine flour, baking powder, baking soda, and cinnamon.  Make a well in the center and set aside.

In another medium bowl, combine egg, mashed bananas, sugar, and vegetable oil.

Pour into flour mixture and stir until combined.

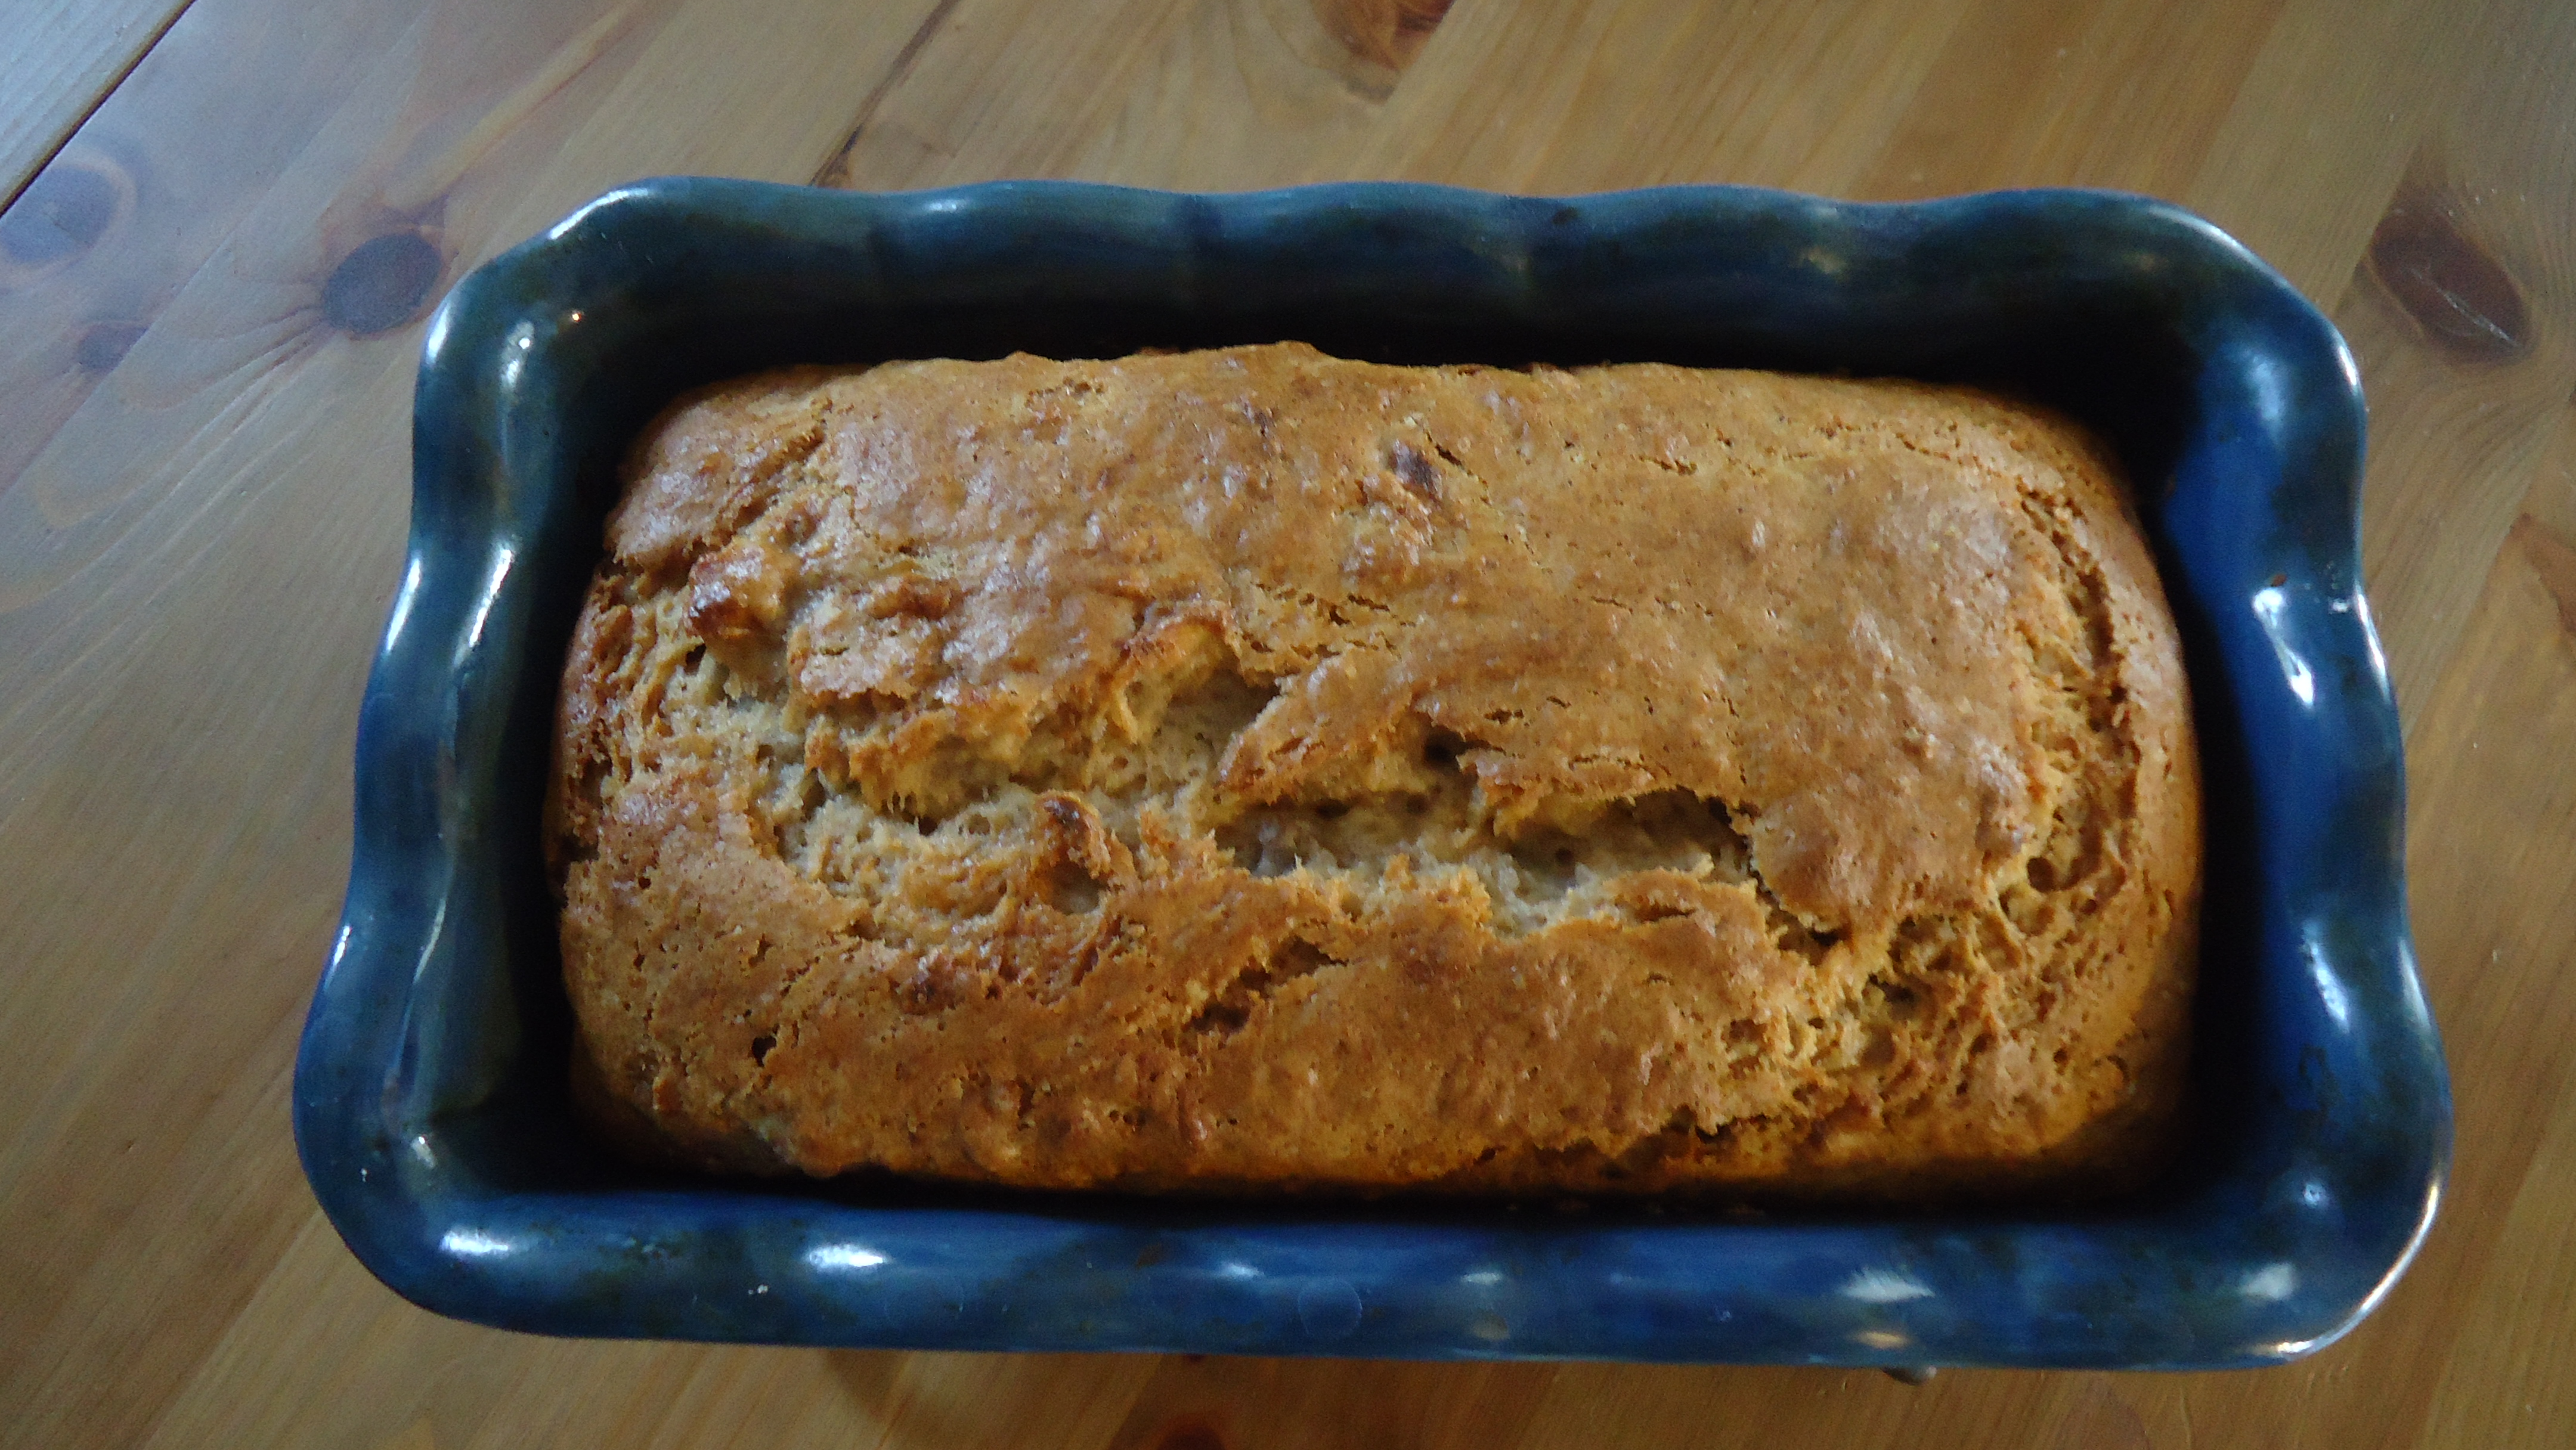
Pour into loaf pan and bake for about 50 minutes, until a cake tester comes out clean; check the bread at about 40 minutes to make sure the top isn’t browning too quickly; if it is, make a tent of aluminum foil and cover the bread until it is through baking.

Cool completely in the plan.


AVC (Almond Vanilla Caramel) Cupcakes

vanilla caramel cupcakes


Tonight, my mom is having “the kids” over for dinner. The kids” used to mean my brother Andy and me, then morphed into either one of us and our spouses, or all four of us. Add my nephew Roman in and “the kids” range in age from five to 39.

Because there will be a small group of us at dinner and I’m not eating sweets for the next four months (let’s just say my scale and I aren’t friends at the moment and leave it at that for now), I wanted a recipe that would make just one dozen, so I adapted a basic one-dozen recipe to include both almond and vanilla flavors, then added caramel icing because my mom is a caramel fan. Midway through the caramel, I decided to whip up some chocolate drizzle icing to embellish half of the cupcakes for those who are chocolate fans. The end result is a cupcake from my wildest dreams. Too bad I won’t be eating them!

Almond Vanilla Cupcakes

Ingredients

  • 1 1/2 cups flour
  • 1 teaspoon baking powder
  • 1/2 teaspoon salt
  • 8 tablespoons butter, softened
  • 1 cup sugar
  • 3 eggs
  • 1 1/2 teaspoons vanilla extract
  • 3/4 cup milk

Preparation

Preheat the oven to 350 degrees.

Line a cupcake pan with paper liners; set aside.

In a medium bowl, sift together flour, baking powder, and salt.

In a mixing bowl, cream butter and sugar until light and fluffy.

Add eggs, one at a time; scrape down bowl, and beat in vanilla.

Add flour mixture and milk alternatively, beginning and ending with flour mixture.

Divide batter evenly among liners, about three-quarters full each.

Bake until golden and tops spring back to touch, 20-22 minutes.

Transfer pans to wire rack; cool completely before frosting.

Caramel Frosting

Ingredients

  • 3 tablespoons butter
  • 1/2 cup packed brown sugar
  • About 1.5 ounces milk (you need half of 1/3 of a cup of milk)
  • 1-2 teaspoons vanilla extract
  • About 1 1/2 cups powdered sugar

Preparation

Combine butter and brown sugar in a medium saucepan and slowly bring to a boil.

Boil for one minute, remove from heat, and stir in milk.

Return to heat and bring to a boil once again.

Pour mixture into mixing bowl and allow to cool slightly, about 5 minutes.

Beat caramel mixture on medium speed for a few minutes to disperse heat; the mixing bowl should not be too hot for you to touch, but if it remains warm that is fine.

Add one cup powdered sugar and one teaspoon vanilla, beating until smooth.

Slowly add the remaining powdered sugar and vanilla, beating until smooth.

Transfer frosting to a 12-inch piping bag fitted with a large plain tip. Working quickly, pipe frosting onto cupcakes.

Chocolate Drizzle

Ingredients

  • 1 1/2 tablespoons butter
  • 1 tablespoon cocoa powder
  • 1 tablespoon milk
  • 1/2 teaspoon vanilla extract
  • About 1 cup powdered sugar

Preparation

In a small saucepan, melt butter.

Add cocoa powder and stir to combine, then remove from heat.

Add milk, vanilla, and powdered sugar, stirring until smooth. It may be necessary to add additional powdered sugar to ensure that your drizzle isn’t too thin.

Transfer drizzle to an 8-inch piping bag fitted with a medium plain tip. Pipe drizzle over caramel frosting. Alternatively, you could just use a spoon and literally drizzle the drizzle.

Almond Crinkles

almond crinkles


Almond paste and marzipan are both confections made of ground almonds and sugar, with some recipes including egg whites as a stabilizer. Throughout the world, almond paste and marzipan are interchangeable, but here in the US, they’re different products for different purposes.

According to American Almond Products Co., almond paste contains equal parts ground almonds and sugar. It is commonly used in fillings for tarts, pastries, and cakes and can be used to make marzipan, which has a higher sugar to ground almond ratio. The higher quantity of sugar in marzipan makes it more pliable and suitable for molding, which explains why cake decorators use it to fashion tiny fruits, vegetables, animals, and all manner of objects.

I had six ounces of almond paste left over from my Christmas baking and had to scour the internet to find a recipe that called for this amount, fortunately finding the simple cookie below. The end result is a buttery, almondy, sugar-type cookie that would welcome a drizzle of melted chocolate.

Ingredients

  • 8 tablespoons butter, softened
  • 1/2 cup shortening
  • 6 ounces almond paste
  • 1 1/3 cup sugar
  • 1 egg
  • 1 teaspoon baking soda
  • 2 cups flour

Preparation

Preheat oven to 400 degrees.

Line several baking sheets with foil or parchment.

In a mixing bowl, cream together butter, shortening, almond paste, and sugar until very fluffy.

Add egg and beat until combined.

Add baking soda and flour, beating until combined.

Using a one-inch cookie scoop, scoop out dough and roll into balls. Place two inches apart on baking sheets.

Bake for 10-11 minutes, until tops are just golden brown.

Cool on a wire rack.


Chocolate Cake

chocolate cake


My five-year-old nephew Roman took a bite of a homemade sugar cookie on Christmas Day and made a face I wasn’t expecting: he wrinkled his nose and shook his head, the universal sign for “I don’t like this.” How could this be, I wondered? He’s a kid, right? Don’t children love sugar?

My brother Andy, Roman’s dad, remarked that kids eat a lot of processed foods, that they’re not necessarily used to homemade tastes. This make me think about the difference between the baked goods you buy at the store–packaged cookies, boxed cake mixes–and how different they really are from homemade. If you bake a cake from a mix, you’ll get fluffy, moist layers that will stay fresh for several days. Bake a cake from eggs, flour, butter, and sugar, and you’ll get a denser, more crumbly treat that lasts three, maybe four days tops (depending on your ability to resist slicing up a huge piece every time you pass your cake stand).

This recipe is a simple, one-bowl affair that requires no melted chocolate, just cocoa powder, and yields a single layer. Caramel frosting pairs well with this cake, but I chose to dust it with powdered sugar, make some whipped cream, and serve it “plain.”

Ingredients

  • 1 cup flour
  • 1 cup sugar
  • 1/4 cup unsweetened cocoa powder
  • 1 teaspoon baking powder
  • 1/4 teaspoon salt
  • 3/4 cup milk
  • 1/4 cup shortening
  • 1/2 teaspoon vanilla
  • 1 egg
  • Powdered sugar, for dusting
  • Sweetened whipped cream, for garnish, if desired

Preparation

Grease and flour a nine-inch round cake pan; set aside. Note: if you plan to leave the cake in the pan, you can simply grease and flour it, but if you wish to remove the cake from the pan to set it on a cake stand, I recommend greasing the bottom of the pan, lining it with a circle of waxed paper, then greasing and flouring the paper.

In a mixing bowl, combine flour, sugar, baking powder, and salt.

Add milk, shortening, and vanilla, beating on medium speed for two minutes.

Add egg and beat on medium speed for another two minutes.

Pour batter into prepared pan; it will be a light brown color and very fluffy in texture.

Bake for 30 minutes, or until a cake tester inserted in the center comes out clean.

Cool cake on a wire rack in the pan for 10 minutes, then remove from the pan (if you desire) to cool completely.

Dust with powdered sugar and top with sweetened whipped cream if desired.

Sweetened Whipped Cream

Ingredients

  • 3/4 cup whipping cream
  • 3-4 tablespoons powdered sugar

Preparation

Chill your bowl and beaters (or whisk attachment) for 10-15 minutes.

Add whipped cream and powdered sugar to the chilled bowl and beat on medium, then medium-high speed until soft peaks form.


Buckeyes

buckeye


Reese’s Peanut Butter Cups are my favorite commercial candy, and this recipe reminds me of a slightly sweeter version of the classic cup. If you search the internet, you’ll find dozens of recipes for buckeyes, all different, from the ingredients to the process to the preference for dipping partway or dipping completely. Whichever one you choose, you can’t go wrong. My recipe is very simple, using three ingredients for the filling and Baker’s dipping chocolate, which you can find in the baking aisle at the supermarket, for the coating. Someday, I plan to make buckeyes that are coated in chocolate mixed with paraffin wax, like my brave friend Mysty, but I’m not quite there yet.

Full disclosure: I made these buckeyes as a Christmas gift for myself. And no, I am not sharing.

Ingredients

  • 3 tablespoons butter, softened
  • 1/2 cup peanut butter
  • 1 cup powdered sugar, sifted
  • 1 7-ounce cup Baker’s dipping chocolate candy coating

Preparation

In a medium bowl, stir together butter and peanut butter until very well blended.

Add powdered sugar a quarter-cup at a time, mixing until very well combined. I use my hands to make sure the ingredients are completely incorporated and smooth.

Using a one-inch cookie scoop, scoop out peanut butter filling and roll into balls. Let stand on a parchment or waxed paper-lined baking sheet until dry, about 30 minutes.

Melt candy coating according to the package directions. Dip peanut butter balls into candy coating and return to baking sheet, then let stand until coating has hardened. I place my baking sheet in the fridge to help the coating set, then store the finished buckeyes in the fridge.

Buche de Noel

yule log


At last…buche de noel. This cake took me literally all day to make, between other baking, errands, and visits. A quick internet search revealed the the yule log was a literal log, tossed on the fire around winter solstice. The literal log somehow evolved into a French treat of chocolate cake, whipped cream-like filling, and chocolate ganache frosting. I love traditional buche de noel, but since my mom is coming over for Christmas dinner tomorrow and she doesn’t eat chocolate, voila…almond buche de noel!

Part One: Almond Sponge Cake

Ingredients

  • 4 eggs
  • 3/4 cup sugar
  • 1 teaspoon almond extract
  • 3/4 cup flour
  • 1 teaspoon baking powder
  • 1/2 teaspoon salt

Preparation

Grease a 10 x 15 x 1 baking pan; line with parchment and grease the parchment; set aside.

In a small bowl, combine flour, baking powder, and salt; set aside.

In a mixing bowl using the whisk attachment, beat eggs on medium speed for three minutes.

Gradually add sugar and beat until mixture is thick and lemon-colored.

Stir in almond extract.

Gently fold in flour mixture.

Pour batter into prepared pan.

Bake 15 minutes, until center of cake springs back when touched.

Remove from oven; flip onto a cooling rack, remove parchment paper, then quickly flip onto a towel coated with powdered sugar.

Roll up tightly from the short end, place on a cooling rack, and allow to cool completely before filling.

Part Two: Almond Whipped Cream Filling

Ingredients

  • 3/4 cup whipping cream
  • ½ teaspoon almond extract
  • 3 tablespoons powdered sugar

Preparation

In a chilled bowl, combine whipping cream, almond extract, and powdered sugar.

Using a chilled whisk beater, beat on medium speed until soft peaks form.

Carefully un-roll cake and spread filling inside.

Re-roll cake tightly in plastic wrap and place in the refrigerator for a few hours before frosting.

Part Three: Vanilla Buttercream Frosting

Ingredients

  • 8 tablespoons butter, room temperature
  • 1 1/2 cups powdered sugar, sifted
  • 1/8 teaspoon salt
  • 1 tablespoon vanilla extract

Preparation

Place butter in a mixing bowl fitted with a paddle attachment and beat for a few minutes.

Add powdered sugar, and with the mixer on low, beat until all sugar is incorporated into the butter. (Hint: I place a kitchen towel over my mixer during this stage to prevent a powdered sugar blizzard.)

Increase speed to medium; add vanilla and beat for three minutes, then taste. If you’d like a stronger vanilla flavor or to increase the sweetness, add additional extract and a few tablespoons of powdered sugar.

Remove cake from plastic wrap; cut off each end to create a flat surface, or leave intact for a more rustic appearance. Brush off excess powdered sugar, otherwise your frosting will not stick.

Frost cake to look like a log, using broad strokes with a butter knife.

Gingerbread Cookies

gingerbread cookies


Gingerbread has a long history among religious men and women in Europe, but when the Brothers Grimm published Hansel and Gretel, spicy treat catapulted into mainstream German culture and folks began to decorate gingerbread houses like the one in the story. When German immigrants came to America, they brought this tradition, along with many other Christmas standards we now think of as American, right along with them.

This was the first time I’d ever made gingerbread cut-outs, and next year I hope to make a house with this recipe. It is sturdy enough to hold up, I think…but only time and royal icing will tell!

Ingredients

For the cookies

  • 2 1/2 cups flour
  • 1 teaspoon ginger
  • 1 teaspoon cinnamon
  • 1/2 teaspoon allspice
  • 1/2 teaspoon baking soda
  • 1/4 teaspoon salt
  • 1/4 teaspoon pepper
  • 1 cup butter, softened
  • 1/3 cup molasses
  • 1/3 cup sugar

For the glaze

  • 1 cup powdered sugar
  • 1-2 tablespoons hot (just below boiling) water

Preparation

In a medium bowl, combine flour, ginger, cinnamon, allspice, baking soda, salt, and pepper; set aside.

In a mixing bowl, beat butter, sugar, and molasses until fluffy, about three minutes.

Add flour in two batches, beating until well-combined.

Divide dough in half and flatten into discs (dough will be very sticky); refrigerate about one hour, until easy to handle.

Roll dough to 1/8 inch thickness and cut into desired shapes.

Bake for about 12 minutes; you do not want the gingerbread to burn, so keep an eye on it.

Remove from oven and cool on baking sheets for a few minutes, then cool completely on a wire rack.

If glazing:

Combine 1 cup powdered sugar and one tablespoon very hot water; gradually add more water, 1/4 teaspoon at a time, until icing can be piped through a pastry bag fitted with a plain tip.

Pipe as desired, or thin out icing further and drizzle.

Peanut Butter Blossoms

pb blossoms


My mom, Genny, made these cookies every Christmas when I was growing up. Her recipe involved a box of yellow cake mix, and I suspect that’s because she was a busy lady with a full-time job, two children, a million things to do at Christmas, and very little time for completely scratch-made treats.

Charlie Brown asked the immortal question “Isn’t there anyone who knows what Christmas is really all about?” and the ever-earnest Linus Van Pelt (who I suspect became a minister when he grew up) gave him a thoughtful answer in this clip. I think we’d all do well to remember, in this time of door-busters and inflatable snowmen and pop stars crooning about chestnuts and drummer boys and reindeer, what Christmas is really all about. So enjoy your friends and family. Bake some cookies (these ones, maybe?). Buy creative gifts from local merchants. Hang out in your pajamas. And take some time to reflect on what Christmas is really all about, and what it really means to you.

Ingredients

  • 1/2 cup shortening
  • 1/2 cup peanut butter
  • 1/2 cup sugar
  • 1/2 cup brown sugar
  • 1 teaspoon baking powder
  • 1/8 teaspoon baking soda
  • 1 egg
  • 2 tablespoons milk
  • 1 teaspoon vanilla
  • 1 3/4 cups flour
  • 1/4 cup sugar, for rolling
  • 36 Hershey’s Kisses

Preparation

Preheat oven to 350 degrees.

Line several baking sheets with foil or parchment paper.

Unwrap 36 Kisses and set aside in a cool place, away from the heat of the oven so they don’t start to melt.

In a small bowl, measure out 1/4 cup sugar for rolling; set aside.

In another small bowl, measure out 1/2 cup sugar, brown sugar, baking powder, and baking soda; set aside.

In a mixing bowl, beat shortening and peanut butter until smooth.

Add sugar mix and beat until combined, scraping the sides of the bowl as necessary.

Add egg, milk, and vanilla and beat until combined.

Add flour and beat until well-combined.

Using a one-inch cookie scoop, scoop out dough and roll into balls; roll balls in sugar and place two inches apart on prepared baking sheets.

Bake for 10-11 minutes; remove from oven and immediately press one Kiss in the center of each, then transfer the entire baking sheet to a wire rack away from the oven to cool for about 5 minutes.

Remove cookies and cool completely on a wire rack.


Peppermint Snowballs

peppermint snowballs


Peppermint is a wonderful flavor often associated with winter, and these cookies, found in a delightful Christmas cookie magazine, have been on my list to bake for the past several weeks. Sometimes, you can tweak a recipe and make it better; other times, what you add or omit affects the finished product in what I wouldn’t necessarily call a bad way, but in an unexpected, less than desirable way.

Hoping for intense peppermint flavor, I added more crushed peppermint candies than recommended. At the time, I didn’t think about how they increased quantity of candy (essentially, melting sugar, which turns to liquid) would affect the dough, and it certainly did. Rather than turning out button-like as Russian Tea Cakes do, these were flat, and took longer to bake. The cookies still taste good, but next time, I’ll stick closer to the recipe and incorporate 1/2 teaspoon of peppermint extract, then decrease the vanilla to 1/2 teaspoon as well.

Ingredients

  • 1 cup butter, softened
  • 2/3 cup powdered sugar
  • 1/2 cup crushed peppermint candies (20 candies)
  • 1 teaspoon vanilla
  • 1/2 teaspoon salt
  • 2 cups flower
  • 1 cup powdered sugar, for rolling

Preparation

Preheat oven to 350 degrees.

Line two baking sheets with parchment paper.

In a mixing bowl, beat butter on medium speed for 30 seconds.

Add the 2/3 cup powdered sugar, crushed peppermints, vanilla, and salt; beat until well combined.

Add flour, one cup at a time, beating until combined.

Using a one-inch cookie scoop, scoop out dough and roll into balls, then place at least one inch apart on baking sheets.

Bake for 10-12 minutes, until bottoms are golden brown.

Remove from oven, let stand on baking sheets for 5 minutes.

Roll in powdered sugar and place on a wire rack to cool completely.

The Scrap Cookie…

scrap cookie


With Christmas right around the corner and Hanukkah on day two, I imagine many folks are baking sugar cookies today. And so, I pay tribute to the scrap cookie.

Scrap cookies are always misshapen, but they taste just as good as the regular ones that you’ve rolled, cut, and baked in the shape of pumpkins, turkeys, shamrocks, trees, dreidls, whatever. I encourage all bakers of sugar cookies to embrace the imperfection of the scrap cookie, to hold it up as an example for life in general. While not everything will turn out as pretty as you might have wanted, or look the way you thought it should, it’s still valuable and important.

Plus, the scrap cookie allows you to be as creative as you like. So roll into a ball and press it flat with the bottom of a glass (which is what I always do), or shape it free-form. Either way, you’ll have something tasty.