Dark Chocolate Meringues (Gluten-Free!)

dark chocolate meringuesSeveral folks in my life are gluten-free, so it’s been interesting for me to experiment with gluten-free baking. Thus far, my gluten-free endeavors have centered in the macaroon/meringue world, including today’s dark chocolate meringues, but I do hope to branch out into non-wheat-based flours in the New Year.

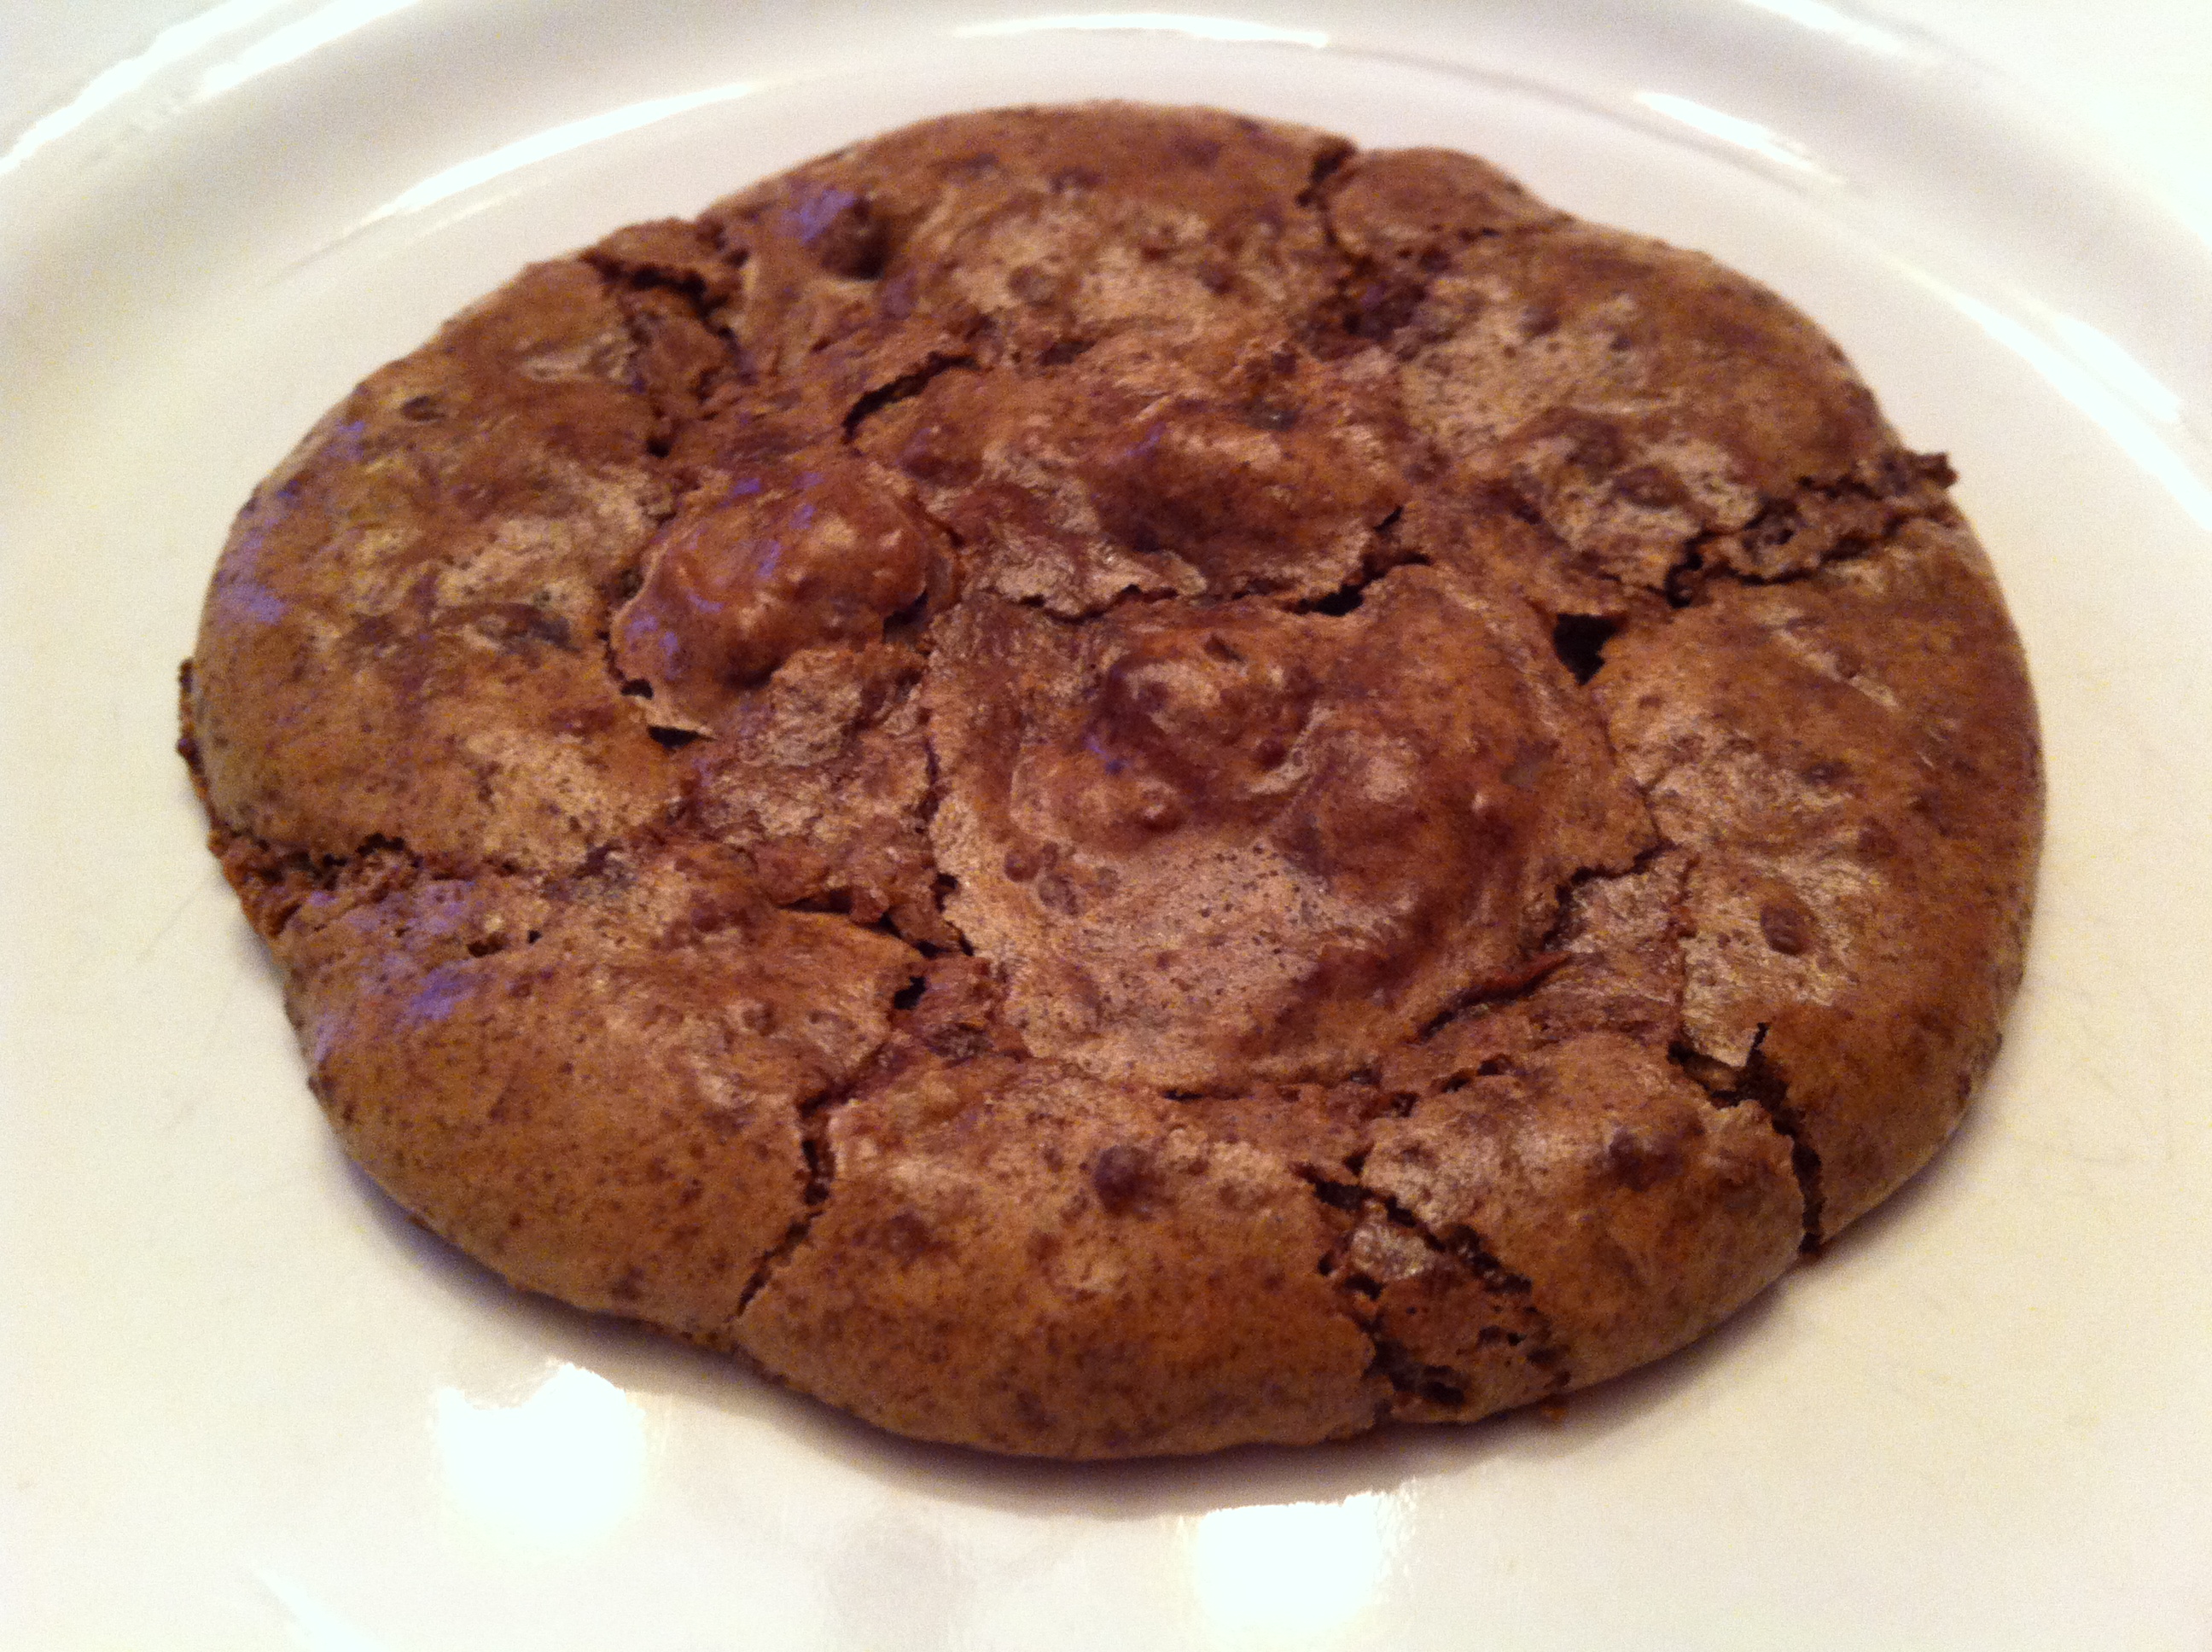
I’ll admit that this recipe needs some work; it’s adapted from Ron Ben-Israel’s dark chocolate meringue recipe that was part of this year’s Food Network 12 Days of Cookies. And although I’m a huge fan of dark chocolate, this cookie is a bit too bitter even for me. I’m not sure how to tone down the bite in this cookie, but I’m certainly open to suggestions; so far I’m considering increasing the amount of nuts and perhaps using pecans instead of walnuts, and maybe using a blend of milk and dark chocolates, rather than all dark. This is the beauty of baking, though…the possibilities are endless!

Ingredients

  • 12 ounces dark chocolate chips (53% cacao)
  • 1/2 teaspoon vanilla extract
  • 1/4 teaspoon salt
  • 1 tablespoon vinegar
  • 4 egg whites
  • 1 cup sugar
  • 1/2 cup walnuts, finely chopped

Preparation

Preheat oven to 325 degrees. Line two baking sheets with parchment paper.

Melt chocolate in a microwave-safe bowl by microwaving in 30-second intervals, stirring after each, until chips are nearly completely melted. Remove bowl from microwave and stir until remaining chips melt completely. Allow to cool, but not to harden. Stir in vanilla. (Note: the chocolate thickened significantly after I stirred in the vanilla, so I kept stirring it to keep it smooth while the egg whites were whipping.)

Place salt, vinegar, and egg whites in a mixing bowl fitted with a whisk attachment and mix on medium speed until whites are foamy, about 1 minute. Add sugar in a steady stream with the mixer running and allow whites to whip to stiff peaks, about 4-5 minutes.

Stir about one-third of the whipped whites into the chocolate, then fold the combined whites/chocolate mixture into the remaining whites. It’s important to note that you want to keep the mixture as light as possible, but you do need to fold more firmly than you would normally in order to incorporate the chocolate mixture properly.

Fold in walnuts, then place the dough into a large resealable plastic bag (or pastry bag), snip off one corner, and pipe the dough in 1 1/2 inch circles on the parchment-lined baking sheets.

Bake both batches at once, for about 12 minutes. Cookies are done when the tops are shiny and cracked. Allow to cool for 10 minutes on baking sheets, then cool completely on a wire rack.

Pfeffernüssen

pfeffernussenGermans have been immigrating to America since the colonial days, bringing beer, hamburgers, and all manner of delicious baked goods with them. German Americans represent the largest ancestry group in the U.S., with about 50 million individuals tracing their heritage back to Germany. Mike is about three-quarters German, and I’m one-quarter, thanks to my mom’s mom, Genevieve Feaga (pronounced Fig-ee) O’Donnell.

Many Christmas traditions in the U.S. originated in Germany, from Christmas trees to gingerbread houses. Pfeffernüssen seem to be the über-spicy cousins of gingerbread, packing in cinnamon, allspice, cloves, nutmeg, and even pepper in their dough. The recipe below is slightly adapted from the Martha Stewart Cookie Book recipe; I increased my spices a bit and just used regular nutmeg and pepper, rather than freshly grated or ground, as I only had the regular kind. Also, I spiced these very generously; while I wouldn’t describe the spice measurements below as “heaping,” you definitely don’t need to be stingy when measuring.

Ingredients

  • 2 1/4 cup flour
  • 1/4 teaspoon baking soda
  • 1/4 teaspoon black pepper
  • 3/4 teaspoon cinnamon
  • 1/2 teaspoon allspice
  • 1/4 teaspoon nutmeg
  • 1/2 teaspoon cloves
  • 8 tablespoons butter, room temperature
  • 3/4 cup light brown sugar
  • 1/4 cup molasses
  • 1 egg
  • 1/2 teaspoon vanilla extract
  • 1 1/4 cup powdered sugar, for coating

Preparation

Preheat oven to 350 degrees. Line two baking sheets with parchment paper.

Place powdered sugar in a brown paper bag and set aside.

In a medium bowl, combine flour, baking soda, and spices; set aside.

In a mixing bowl, combine butter, brown sugar, and molasses. Beat on medium speed until fluffy, about 2-3 minutes.

Add egg and vanilla and mix until combined.

With the mixer on low, slowly add flour, mixing until just combined.

Using a 2-inch cookie scoop, scoop out dough, roll into balls, and place about 1 1/2 inches apart on prepared baking sheets.

Bake for 15-17 minutes, until tops crack and just begin to brown. Allow to cool for about 10 minutes.

Once cookies have cooled slightly, place 2-3 cookies in the brown paper bag at a time and gently shake to coat. Remove from bag and place on a wire rack to cool completely.


Peanut Butter Chocolate Chip Cookies

IMG_1597I’ve been away from my oven for the past two weekends, first traveling for work and then sidelined with a cold. Today, I simply needed to bake something.

My health coach recently asked me what I love about baking, and I told her that I love both the structure and creativity of it. You can look at a recipe and know, with some certainty, how it will turn out, but you also have the power to add or omit or change a few ingredients and come up with something entirely different. This recipe is a good example of that creativity, as it blends two classic cookies, the peanut butter cookie and the chocolate chip cookie, and makes them into something new and delicious.

Just a few notes about these treats: while they’re baking, you want to keep a close eye on them, because they over-bake very quickly. Check them around 10 minutes in the oven, then give them another minute or two, but make sure you pull them when they’re golden brown at the edges and still just slightly raw-looking in the centers. Don’t worry about under-baking them; they’ll continue to bake for a few minutes while they cool on the cookie sheets anyway, but you won’t be able to achieve the soft, chewy texture you’re after if you bake them too long.

Ingredients

  • 1 1/2 cups flour
  • 1 teaspoon baking soda
  • 1/2 cup sugar
  • 1/2 cup brown sugar
  • 1 cup butter, softened
  • 1/2 cup peanut butter
  • 1 teaspoon vanilla
  • 1 egg
  • 1 12-ounce bag milk chocolate chips
  • About 1/4 cup sugar, for pressing onto tops of cookies before baking

Preparation

Preheat oven to 350 degrees.

Line several baking sheets with foil or parchment paper.

In a small bowl, combine flour and baking soda; set aside.

In a mixing bowl, cream together white sugar, brown sugar, butter, peanut butter, and vanilla, scraping sides of the bowl frequently.

Add egg and beat well.

Add flour mixture in two batches, mixing until well-combined.

Stir in chocolate chips.

Using a 2-inch cookie scoop, drop scoops of dough about 2 inches apart on prepared baking sheets.

Butter the bottom of a glass and dip it into sugar, then press onto each scoop of dough to flatten. You’ll need to dip the glass into the sugar before flattening each scoop of dough.

Bake for 10 minutes and check progress; cookies are done when their edges are golden brown but the centers appear just slightly raw. Average baking time is 12-14 minutes, depending on your oven. Remove cookies from oven and cool for 5 minutes on cookie sheets before transferring to a wire rack to cool completely.


Pumpkin Chocolate Chip Cookies II

pumpkin chocolate chip cookies 2It’s pumpkin season. Today, Pittsburgh is a cool 60 degrees with rain, and the tops of the trees are tinged orange and brown. Fall, my favorite of the seasons, is here.

Last week’s pumpkin ginger cookies left me with about a cup of unused pumpkin, and there were so many possibilities for its use. Tomorrow I’ll be baking another pumpkin-themed treat, but today, because Mike was able to come home early from work, I decided to whip up a batch of pumpkin chocolate chip cookies for him. These differ slightly from pumpkin chocolate chip cookies i, in that they have a combination of semisweet and bittersweet chocolate chips and no nuts.

Incidentally, pumpkin is quite good for you. It contains vitamins A and C, magnesium, iron, and potassium and is low in both fat and cholesterol. Granted, mixing it with sugar and chocolate chips changes things, but let’s focus on the positives, eh?

Ingredients

  • 2 1/4 cups flour
  • 1 teaspoon baking powder
  • 1/2 teaspoon baking soda
  • 1/2 teaspoon salt
  • 1 1/2 teaspoons cinnamon
  • 1/2 teaspoon ginger
  • 1 cup butter, softened
  • 1/2 cup sugar
  • 1/2 cup brown sugar
  • 15 ounces pumpkin
  • 2 eggs
  • 1 teaspoon vanilla extract
  • 1 cup semisweet chocolate chips
  • 1 cup bittersweet chocolate chips

Preparation

Preheat oven to 375 degrees.

Line several baking sheets with parchment paper.

In a medium bowl, combine flour, baking powder, baking soda, salt, cinnamon, and ginger; set aside.

In a mixing bowl, cream together butter and sugars.

Add pumpkin, eggs, and vanilla; mix well.

Slowly add flour mixture and beat until well combined.

Stir in chocolate chips.

Using a two-inch cookie scoop, drop scoops of dough about two inches apart on the baking sheet.

Bake 17 minutes, until edges are lightly browned.

Cool for 5 minutes on baking sheet, then cool completely on a wire rack.

Pumpkin Molasses Cookies

pumpkin molasses cookiesMy kitchen smells so amazing right now that if the Yankee Candle folks could be here they’d create a candle based on it. I almost called these treats Pumpkin Dreams, because their original title didn’t quite seem to capture their aromatic deliciousness; I also considered calling them Septembers, because they’re an excellent combination of fall ingredients.

I will readily admit that I ate one the moment it was cool enough to consume without burning my mouth, and they are among my favorites, ever, which is really saying something.The perfect marriage of a pumpkin cookie and a gingersnap, they are spicy and sweet with a crunchy outer edge and soft, pillowy center.

The triple threat in these treats is the combination of pumpkin, molasses, and the spice blend of cinnamon, ginger, and cloves. Each ingredient highlights the next, so you get layers of flavor; the spicy sweetness of the cinnamon and the pumpkin, the rich and slightly bitter molasses and cloves, and the light zing of the ginger. This cookie is an excellent example of how certain flavors can bring others out, in the best of senses. Next time, I may toss in a bit of nutmeg into the mix and see what happens.

Ingredients

  • 2 1/3 cups flour
  • 2 teaspoons baking soda
  • 2 1/2 teaspoons cinnamon
  • 1 1/2 teaspoons ginger
  • 1 1/2 teaspoons cloves
  • 1/2 teaspoon salt
  • 8 tablespoons butter, softened
  • 1 cup sugar
  • 1/2 cup canned pumpkin (not pie filling)
  • 1/4 cup molasses
  • 1 egg
  • 1 teaspoon vanilla extract
  • 1/2 cup sugar, for rolling

Preparation

In a medium bowl, combine flour, baking soda, cinnamon, ginger, cloves, and salt; set aside.

In a mixing bowl, cream butter and sugar until fluffy.

Add pumpkin, molasses, egg, and vanilla and beat until combined.

Add flour in two batches, mixing well.

Cover and chill dough for about 1 hour, until easier to handle.

Preheat oven to 350 degrees.

Line several baking sheets with parchment paper.

Using a 2-inch cookie scoop, scoop dough and roll into balls, then coat each ball very well in sugar and place about 2 inches apart on the baking sheets.

Bake for 13-15 minutes, until edges are set and centers are puffy. Remove from oven and cool on baking sheets for 5 minutes before removing to a wire rack to cool completely.

.

Molasses Spice Cookies

molasses spice cookies (2)These treats are destined for my awesome friend Bryan out in New Mexico, to both celebrate the impending arrival of autumn and to cheer him up since he’s been a bit stressed lately. My natural inclination is to comfort people with baked goods, and the wonders of FedEx, UPS, and overnight service from the post office make this possible even at a great distance.

Some cookies are definitely better candidates for shipping than others. I’ve had the greatest luck shipping cookies that are more sturdy, like drop cookies, rolled cookies (like these), or plain cut-outs that are in basic shapes like circles or squares. Frosted cookies might be tricky because the frosting itself raises the moisture content, which might cause the cookies to begin to disintegrate or go stale quicker. These cookies have a slightly soft texture; they’re not chewy like a chocolate chip but not hard like a gingersnap, so I’m hoping they hold their ground until Bryan can enjoy them.

For the actual shipping, I pack cookies in several layers of waxed paper for cushion in a container that will allow for very little wiggle room, then place the container in a box packed with tissue paper or bubble wrap. Budget-wise, you can usually get a reasonable rate for two-day delivery, so if you’ve baked on a Monday and are mailing on Tuesday, your treats will arrive by Thursday and should be perfectly fine. Because homemade cookies have a shorter shelf life than store-bought, I wouldn’t go beyond two-day delivery.

Ingredients

  • 1 3/4 cups flour
  • 1/2 teaspoon baking soda
  • 1/2 teaspoon kosher salt
  • 1 1/4 teaspoons cinnamon
  • 1/4 teaspoon nutmeg
  • 1/4 teaspoon ginger
  • 1/4 teaspoon cloves
  • 1/8 teaspoon black pepper
  • 8 tablespoons butter
  • 1/2 cup packed light brown sugar
  • 1 egg
  • 1 teaspoon vanilla
  • 1/4 cup molasses
  • zest of 1 orange
  • 1/3 cup raw sugar

Preparation

In a medium bowl, combine flour, baking soda, cinnamon, nutmeg, ginger, cloves, and pepper; set aside.

In a mixing bowl, cream butter and brown sugar.

Add egg and beat until just combined.

Add vanilla and molasses and beat until just combined.

Add flour and beat until just combined. Cover dough with plastic wrap and chill 1-2 hours.

Preheat oven to 350 degrees.

Line several baking sheets with parchment paper.

In a small bowl, combine raw sugar and orange zest.

Using a 1-inch cookie scoop, scoop out dough and roll into balls, then dip each ball into the raw sugar/zest.

Place on prepared baking sheets about 2 inches apart and flatten with the tines of a fork like you would a peanut butter cookie.

Bake 10 minutes, until edges are just beginning to brown and centers are set.

Cool on baking sheet for 5 minutes, then cool completely on a wire rack.


Lemon Pie Cookies

lemon pie cookiesMy grandpap, Andy Kozusko Sr., loved lemon meringue pie. My grandma Zella would make it occasionally, a labor-intensive affair involving carefully formed crust, homemade filling, and cloud-like meringue. He always proclaimed it delicious, and thanked her for making one of his favorite treats.

Girls from Pittsburgh seem to have special relationships with their grandpaps (in itself, a very Pittsburgh word). I had the fortune of living just five doors up from mine, able at any moment to skip down the sidewalk and stand by his side at his work bench or help him weed the vegetable garden. Our birthdays were four days apart, so they were often celebrated together; the year I turned five and he turned 61, we shared a Strawberry Shortcake-themed birthday cake. He was the gentlest of souls, and I lost him to lung cancer when I was in high school. To this very moment, I miss him as if it just happened yesterday.

If he were still on this earth, my grandpap would have turned 92 last week, so I made these cookies in honor and memory of him. Like his favorite lemon meringue pie, they are also quite labor-intensive, so I’m providing two ways of preparation for those who are short on time.

Version 1:

Ingredients

  • 1 recipe pie crust
  • 2 10-ounce jars lemon curd
  • 1 egg
  • 1 teaspoon water
  • sugar, for sprinkling

Preparation

Preheat oven to 350 degrees. Line several baking sheets with parchment paper.

Prepare egg wash by whisking egg and water together; set aside.

Prepare pie crust and roll out to about 1/4 inch thickness. Using a 3-inch cookie cutter, cut circles and set aside; re-roll scraps and continue cutting circles of dough until you’ve used it all and have an equal number of top circles and bottom circles for the cookies.

Take each circle and roll it out again, to about 1/8 inch thickness; you want the crust to be thin, but not so thin the cookies will burst when baking.

Spread about 1 teaspoon of lemon curd onto one circle, leaving about 1/4 inch border at the edge, then top it with another circle of dough. Pinch the edges together, place on the prepared cookie sheet, then press the edges closed with the tines of a fork.

You should be able to fit about 6 cookies on each cookie sheet; once your sheet is full, brush each cookie with the egg wash, sprinkle it with sugar, and cut a vent in the top of each cookie.

Bake for 15-20 minutes, until edges just begin to turn golden brown. Remove from cookie sheets and cool on a wire rack.

Version 2: Please note that this is not how I prepared my cookies, though the original recipe called for this kind of preparation using store-bought pie dough.

Ingredients

  • 1 recipe pie crust (you will only need two of the three crusts that the recipe yields)
  • 1 10-ounce jar lemon curd
  • 1 egg
  • 1 teaspoon water
  • sugar, for sprinkling

Preheat oven to 350 degrees. Line several baking sheets with parchment paper.

Prepare pie crust and roll out two circles to about 1/4 inch thickness and 9 inches in diameter; it will be important for your crusts to line up so that you can place one over the other.

On the bottom crust, spread lemon curd, leaving about 1/4 inch border at the edges. Using a 3-inch cookie cutter, cut through both layers of crust. Transfer cookies to prepared cookie sheets and press edges to seal, brush with egg wash, sprinkle with sugar, and cut a vent in each top.

Bake for 15-20 minutes, until edges are just golden brown. Remove from cookie sheets and cool on a wire rack.

Chocolate Peanut Butter Whoopie Pies

choc pb whoopies If ever there was a treat worth fighting over, it would be the whoopie pie. Pennsylvania, Maine, and New Hampshire all claim that whoopie pies were invented in their states, though some food historians believe that it was in fact the Amish in Pennsylvania, who migrated to other places, who pioneered these amazing cookies.

Pittsburghers call these treats gobs, but I think that whoopie pie is an infinitely happier term. Traditional whoopie pies are tender, cakey chocolate cookies with a thick layer of fluffy white frosting in between, but they’ve been adapted to incorporate an array of flavors, like pumpkin or lemon or vanilla. This recipe is adapted from the Martha Stewart Cookie Book recipe; I am pleased to say that it is delicious, among my favorite things that I’ve made lately.

Just a note: the peanut butter filling is really the key to this cookie. If it’s too sweet, the entire cookie will be overwhelming, so it’s important to have the right balance of peanut butter flavor, and this is why I suggest adding additional peanut butter to taste as you go along. I added about two additional tablespoons to the 3/4 cup of peanut butter to achieve the flavor I wanted.

Chocolate Cookies

Ingredients

  • 1 3/4 cups flour
  • 3/4 cup unsweetened cocoa powder
  • 1/2 tablespoon baking soda
  • 1/2 teaspoon baking powder
  • 1/2 teaspoon salt
  • 8 tablespoons butter, softened
  • 1 cup sugar
  • 1 egg
  • 1 cup buttermilk
  • 1 teaspoon vanilla

Preparation

Preheat oven to 400 degrees.

Line several baking sheets with parchment paper.

In a medium bowl, sift together flour, cocoa powder, baking soda, baking powder, and salt; set aside.

In a mixing bowl, cream together butter and sugar until very light and fluffy.

Add egg, buttermilk, and vanilla and mix well.

With the mixer on low, slowly add the flour mixture and beat until combined.

Using a one-inch cookie scoop, drop scoops of dough onto prepared sheets at least 2 inches apart.

Bake for 8 minutes, rotating baking sheets halfway through to ensure even baking.

Cool on wire racks completely before filling.

Peanut Butter Filling

Ingredients

  • 8 tablespoons butter, softened
  • 3/4 cup peanut butter, plus additional tablespoons to taste
  • 1 cup powdered sugar

Preparation

In a mixing bowl, beat together butter and 3/4 cup peanut butter.

Add powdered sugar, 1/4 cup at a time, beating until smooth.

Taste the filling and add additional peanut butter if desired.

To assemble cookies: using a one-inch cookie scoop, drop scoops of filling onto the flat sides of half of the cookies, smooth with a knife, then top with another cookie.

Store in the refrigerator for up to 3 days.


Lemon Raspberry Whoopie Pies

lemon raspberry whoopiesSome of my fondest memories from our time in DC involve my dear friend Kelly. If I had a nickel for every time she and I went to Starbucks together, neither one of us would have to work anymore.

When we met, Kelly and I were 20-somethings working our fingers to the bone to establish ourselves professionally. During one lunchtime excursion, as a wedge of lemon sat on one of our plates, we discussed the challenges of working for a newly-merged nonprofit where the processes, procedures, lines of communication, and chains of command were still in development. We decided that it was sort of like being told to take care of a lemon, making that lemon into lemonade, then being told by a different supervisor that we should have made lemon pie, while another person wanted us to make lemon cookies. While this story is likely not funny to anyone but Kelly and me, we continue to reference it to this day.

Kelly has worked overseas for the past few years, and I’ve certainly missed her. Yesterday, during her visit to Pittsburgh, she and I made these lemon raspberry whoopie pies, which are admittedly more like lemon raspberry sandwich cookies. Either way, they involve lemons…in the best of senses.

Lemon Cookies

Ingredients

  • 1 1/2 cups flour
  • 1/2 teaspoon baking powder
  • 1/4 teaspoon baking soda
  • 1/4 teaspoon salt
  • 6 tablespoons butter, softened
  • 1 cup sugar
  • 1 tablespoon lemon zest
  • 1 egg
  • 1 tablespoon lemon juice
  • 1 teaspoon vanilla extract
  • 1/2 cup buttermilk

Preparation

Preheat oven to 350 degrees.

Line three baking sheets with parchment paper.

In a medium bowl, sift together flour, baking powder, baking soda, and salt; set aside.

In a mixing bowl, cream together butter, sugar, and lemon zest until very light and fluffy.

Add egg, lemon juice, and vanilla and beat for 1 minute.

Add half the flour mix, then buttermilk, then remaining flour mix, beating until just combined after each addition.

Using a two-inch cookie scoop, drop scoops of dough at least 2 inches apart on the cookie sheets – they will spread when baking.

Bake for 11-13 minutes, until cookies are set.

Allow to cool completely before filling and assembling.

Raspberry Filling

Ingredients

  • 8 tablespoons butter, softened
  • 1 7-ounce jar marshmallow fluff
  • 1/4 cup raspberry jam
  • 1/2 teaspoon vanilla extract
  • 1/2 teaspoon raspberry extract
  • 1 to 1 1/3 cups powdered sugar

Preparation

Combine butter, marshmallow fluff, jam, vanilla extract, raspberry extract, and 1 cup powdered sugar in a mixing bowl and beat well. Add another 1/3 cup powdered sugar if your mixture is too thin; you want an easily-spreadable consistency but not one that is too runny.

To assemble cookies: using a one-inch cookie scoop, scoop filling onto one half of each cookie and spread with a knife, leaving about 1/4 inch around the edges. Top with another cookie; filling will spread slightly. Store in the refrigerator.


Oatmeal Craisin Chocolate Chip Cookies

oatmeal craisin dark chocAs far as chocolate goes, people tend to have strong opinions; many are milk chocolate loyalists, while others embrace the antioxidant properties of dark. I will eat any kind of chocolate except white, which I maintain is not really chocolate, given that its cocoa solids are removed during production. And, white chocolate just tastes strange to me. But anyway…

While I tend to prefer milk chocolate chips in classic chocolate chip cookies, there are many recipes in which semisweet, dark, or bittersweet chips are more appropriate in order to balance their accompanying flavors. To complement the tart dried cranberries in this recipe, I sought bittersweet chips, which are 60 percent cacao. Fortunately my local grocery store had Ghirardelli bittersweet chips, but both Hershey and Nestle make dark chocolate chips containing 53 percent cacao that could have worked just as well. A fun aspect of dark and bittersweet chocolate chips is that they’re larger than both milk and semisweet chips, which adds to their visual appeal.

Side note: as I’m not a dried fruit fan, Mike tasted these cookies and proclaimed them excellent, proving my theory about bittersweet chocolate chips balancing tart dried cranberries to be correct.

Ingredients

  • 8 tablespoons butter, softened
  • 2/3 cup packed light brown sugar
  • 1 egg
  • 1/2 teaspoon vanilla extract
  • 1/2 cup white flour
  • 1/4 cup whole wheat flour
  • 1/2 teaspoon baking soda
  • 1/2 teaspoon cinnamon
  • 1/4 teaspoon salt
  • 1 1/2 cup old-fashioned rolled oats
  • 3/4 cup dried cranberries
  • 3/4 cup bittersweet chocolate chips

Preparation

Preheat oven to 350 degrees.

Line three baking sheets with parchment paper.

In a small bowl, combine white flour, wheat flour, baking soda, cinnamon, and salt; mix and set aside.

In a mixing bowl, cream together butter, brown sugar, egg, and vanilla.

Stir in flour mixture until well combined.

Stir in oats; at this point, you may need to reach in and use your hands to thoroughly incorporate them.

Stir in dried cranberries and chocolate chips; again, you will likely need to use your hands.

Using a two-inch cookie scoop, generously scoop out dough and roll into balls, then flatten slightly. Place at least 2 inches apart on the prepared baking sheets.

Bake 11-12 minutes, until edges are golden but centers appear slightly under-baked. You do not want these cookies to appear totally baked when you pull them from the oven, as they will continue to bake for several minutes on the hot baking sheet once they’re out.

Let stand on cookie sheets for 5 minutes, then cool completely on a wire rack.