Coconut Lime Macaroons

coconut lime macaroons
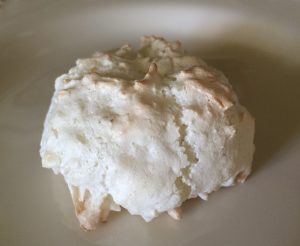
Why would you put the lime in the coconut? Perhaps to make delicious coconut lime macaroons.

Okay, so I didn’t literally put the lime in the coconut to make these treats. Technically, I put the lime and the coconut into a meringue and (gently) mixed it all together. This was the first time I’ve used cream of tartar to stabilize my egg whites, and I’m glad I did. It took far less time to reach both soft peak and stiff peak stage during the meringue preparation. Big thanks to The Culinary Chase for this recipe, which I adapted just slightly.

While these baked, my kitchen smelled a bit like a mojito, prompting Mike to call these “mojito-roons.” The end result is a very light cookie with a great balance of coconut and lime flavor. They were a big hit at last night’s seder.

Ingredients

  • 2 egg whites
  • 1/4 teaspoon cream of tartar
  • pinch of salt
  • 3/4 cup sugar
  • zest from 1 lime
  • 2 teaspoons lime juice

Preparation

Preheat oven to 325 degrees. Line two baking sheets with parchment.

In a mixer fitted with the whisk attachment, beat egg whites until foamy.

Beat in cream of tartar and salt until soft peaks form, then add sugar, about 2 teaspoons at a time, beating until stiff peaks form (about 5 minutes).

Fold in coconut, lime zest, and lime juice.

Using a 2-inch cookie scoop, drop scoops of batter onto prepared sheets; you can fit about 8 or 9 drops on each sheet.

Bake for 14-16 minutes, until tops are just golden. Cool on baking sheets for 10 minutes, then remove to a wire rack to cool completely.

Store in an airtight container at a cool room temperature for about 3 days. Meringue-based cookies like macaroons will start to break down in warmer rooms, so cooler room temperatures are better.

Advertisement

Orange Almond Cake (gluten-free!)

orange almond cakeWhat exactly is gluten? In simple terms, it is a protein present in wheat, which provides stability to breads, cakes, cookies, and other baked goods. Gluten-free baking relies on other ingredients that can bind together and provide structure, ranging from eggs and nut flours to thickeners like xantham gum.

As a savvy baker, I understand that gluten-free recipes can bring about a number of challenges, and I’ve been sorely disappointed by nut-based, high-egg-volume cake recipes in the past. I baked this as a trial run for our seder, which will take place on the first night of Passover in just a couple of weeks. The recipe came from a food blogger in Australia, hence the use of grams below. The preparation is fascinating, as I think you may agree once you read the directions. I’m happy to say that it turned out very well; my plan for the seder is to add some slices almonds to the top, which will brown nicely during baking.

Ingredients

  • 2 medium oranges
  • 6 eggs, at room temperature
  • 250 grams sugar, processed to super-fine consistency*
  • 250 grams almond meal
  • 1 teaspoon baking powder

*To make regular sugar super-fine, place it in a food processor fitted with a steel blade and pulse several times until you get a consistency like sand.

Preparation

Wash the oranges well. Place them in a large cooking pot with plenty of water and bring them to a boil. Turn down to a simmer, and simmer for 2 hours, checking frequently. Remove oranges from the water and allow to cool completely.

Preheat oven to 375 degrees. Line a 9-inch springform pan with parchment, extending the paper over the sides.

Remove the ends of the oranges, which can be bitter, and place the oranges, skin and all, into a food processor. Pulse to a smooth consistency.

In a large bowl, whisk eggs and sugar together very well. Add orange puree and whisk together.

Add almond meal and baking powder, stirring with a wooden spoon to blend completely.

Pour batter into prepared pan and bake for 50-60 minutes, until a cake tester comes out clean. Be careful not to over-bake; the sides and bottom of the cake will darken considerably and you do not want them to burn.

Remove from oven and cool in pan for about 10 minutes; remove the cake from the pan, leaving it in the parchment, and place it on a wire rack to cool completely. Remove parchment; store at room temperature.

Note: this cake is very moist, and according to the original recipe it becomes even more so after a few days. Be sure to store in an airtight container.


Vanilla Bean Cheesecake (for Passover)

passover cheesecakeI may have gone slightly overboard with the Passover desserts this year. There just seemed like so many interesting options, and I had to try them all. In addition to our toffee chocolate matzoh and truffles on tomorrow night’s seder table, there will be this cheesecake, a leaven-free treat of vanilla bean and almond goodness.

The crust for this lovely dessert is a concoction of almonds, matzoh cake meal, sugar, and melted butter, and the filling is a standard cream cheese and sugar mixture that includes the seeds of two vanilla beans, as well as a dash of almond extract. Garnish-wise, you could pair many foods with this cheesecake; strawberries and raspberries come to mind, as does good old-fashioned whipped cream, or perhaps chocolate curls.

I’m so excited about this cheesecake, I may have to break my sugar fast tomorrow night. Passover is about freedom, after all.

Ingredients

  • 3/4 cup chopped blanched almonds, toasted and cooled
  • 2/3 cup matzoh cake meal
  • 2/3 cup sugar
  • 1/4 teaspoon salt
  • 8 tablespoons butter, melted and slightly cooled
  • 3 8-ounce packages cream cheese
  • 3/4 cup sugar
  • 3 eggs
  • seeds scraped from 2 vanilla beans
  • 1/4 teaspoon almond extract

Preparation

Preheat oven to 350 degrees.

In the bowl of a food processor, combine almonds, matzoh cake meal, sugar, and salt. Pulse until finely ground, then transfer to a medium bowl and drizzle in butter, mixing with a spoon to incorporate evenly. Mix with your hands to combine; you want a sandy texture.

Press the crust mixture into the bottom and 1 inch up the sides of a 9-inch springform pan and bake for 12-15 minutes, until one shade darker in color. Cool completely on a wire rack.

In a mixing bowl, combine cream cheese and sugar and beat for 2 minutes on medium speed to combine, scraping the sides of the bowl as necessary. Add eggs, one at a time, beating well after each addition.

Add vanilla seeds and almond extract and beat until well combined, about 1-2 minutes more.

Place springform pan in a shallow baking dish and pour filling into crust. Bake for 45-50 minutes, until filling is set 1 1/2 inches from the edge but still wobbly in the middle.

Remove from oven and baking dish; set springform pan on a cooling rack and immediately run a knife around the edge of the crust, then remove the side of the pan and allow cheesecake to cool completely. Store in the refrigerator.


Truffles

trufflesI am now a chocolatier. An amateur one for sure, but that still counts, right?

Yesterday, I chopped up an enormous block of bittersweet chocolate with my big scary chef’s knife and made my first-ever batch of real truffles, using only chocolate and heavy cream and butter and flavorings. I had the music from the movie “Chocolat” in my head the whole time and tried my best to channel my inner Vianne Rocher.

Here’s what I’ve learned about working with ganache: once you try to roll it in your hands, all bets for cleanliness are off. It melts immediately, turning one’s hands into a chocolate-coated sticky mess. The end result is worth it, though: according to Mike, these truffles are “like taking a bite out of hot chocolate.” They are super-chocolaty and could of course be flavored and coated with any number of things, but I chose a simple orange extract and cocoa powder enhancement.

Ingredients

  • 12 ounces bittersweet chocolate, chopped
  • 1 cup heavy cream
  • 1 tablespoon butter
  • pinch of salt
  • 1/2 teaspoon vanilla extract
  • 1/2 teaspoon orange extract
  • about 1/4 cup cocoa powder, sifted

Preparation

Place chopped chocolate in a medium heat proof bowl; set aside.

In a medium saucepan, bring heavy cream, butter, and salt to a simmer. Immediately pour over chocolate and let set until chocolate is melted, about 10 minutes. Stir with a spatula until smooth.

Whisk in vanilla extract and orange extract (or just use 1 teaspoon vanilla extract if you don’t have orange), then continue stirring until chocolate is shiny and smooth. Pour into a shallow baking dish and let set overnight.

Line a baking sheet with parchment. Using a one-inch scoop, scoop out chocolate and roll into balls. Beware, this is a messy endeavor: I kept paper towels nearby and wiped my hands several times during the process. Coat each truffle in cocoa powder then place on the parchment-lined baking sheet. Cover with plastic wrap and chill at least 1 hour; once truffles are chilled, place in an airtight container and store in the refrigerator.

Peppermint Meringues (Gluten-Free!)

peppermint meringuesMeringue cookies are a great option for using up leftover yolks; they’re easy to make, easy to adapt, and usually gluten-free, depending on what you combine with them.

The next time I make these cookies, I’ll do just a few things differently: first, I may bake them another 5 minutes or so, and second, I’ll remove them from the kitchen for cooling. The residual heat from my oven caused these meringues to get sticky within the first few minutes of cooling, which is something I haven’t experienced with meringues before. Despite their stickiness, they’re very nice peppermint treats, both with and without their chocolate enhancement!

Ingredients

  • 3 egg whites
  • 1/2 teaspoon cream of tartar
  • 1/2 teaspoon peppermint extract
  • pinch of salt
  • 3/4 cup sugar
  • red gel paste food coloring, for tinting

Chocolate Drizzle, for dipping cookie bottoms (optional)

  • 1/2 cup semisweet chocolate chips
  • 1 tablespoon shortening

Preparation

Preheat oven to 200 degrees. Line several baking sheets with parchment paper.

In a mixing bowl, combine egg whites, cream of tartar, peppermint extract, and salt; beat on medium speed until soft peaks form. Slowly add sugar and whip on high speed until stiff peaks form; when whites are approaching stiff peak stage, add red gel paste food coloring to tint.

Transfer meringue to a pastry bag fitted with a star tip and pipe 1-inch circles of meringue onto prepared baking sheets.

Bake for 1 hour and 15 minutes, until meringues are dry and firm when lightly touched. Transfer meringues to wire racks and cool completely in a cool room.

Optional: combine semisweet chocolate chips and shortening in a small saucepan and melt over low heat, stirring constantly. Dip bottoms of meringues in chocolate; place on parchment or waxed paper to harden.

Dark Chocolate Meringues (Gluten-Free!)

dark chocolate meringuesSeveral folks in my life are gluten-free, so it’s been interesting for me to experiment with gluten-free baking. Thus far, my gluten-free endeavors have centered in the macaroon/meringue world, including today’s dark chocolate meringues, but I do hope to branch out into non-wheat-based flours in the New Year.

I’ll admit that this recipe needs some work; it’s adapted from Ron Ben-Israel’s dark chocolate meringue recipe that was part of this year’s Food Network 12 Days of Cookies. And although I’m a huge fan of dark chocolate, this cookie is a bit too bitter even for me. I’m not sure how to tone down the bite in this cookie, but I’m certainly open to suggestions; so far I’m considering increasing the amount of nuts and perhaps using pecans instead of walnuts, and maybe using a blend of milk and dark chocolates, rather than all dark. This is the beauty of baking, though…the possibilities are endless!

Ingredients

  • 12 ounces dark chocolate chips (53% cacao)
  • 1/2 teaspoon vanilla extract
  • 1/4 teaspoon salt
  • 1 tablespoon vinegar
  • 4 egg whites
  • 1 cup sugar
  • 1/2 cup walnuts, finely chopped

Preparation

Preheat oven to 325 degrees. Line two baking sheets with parchment paper.

Melt chocolate in a microwave-safe bowl by microwaving in 30-second intervals, stirring after each, until chips are nearly completely melted. Remove bowl from microwave and stir until remaining chips melt completely. Allow to cool, but not to harden. Stir in vanilla. (Note: the chocolate thickened significantly after I stirred in the vanilla, so I kept stirring it to keep it smooth while the egg whites were whipping.)

Place salt, vinegar, and egg whites in a mixing bowl fitted with a whisk attachment and mix on medium speed until whites are foamy, about 1 minute. Add sugar in a steady stream with the mixer running and allow whites to whip to stiff peaks, about 4-5 minutes.

Stir about one-third of the whipped whites into the chocolate, then fold the combined whites/chocolate mixture into the remaining whites. It’s important to note that you want to keep the mixture as light as possible, but you do need to fold more firmly than you would normally in order to incorporate the chocolate mixture properly.

Fold in walnuts, then place the dough into a large resealable plastic bag (or pastry bag), snip off one corner, and pipe the dough in 1 1/2 inch circles on the parchment-lined baking sheets.

Bake both batches at once, for about 12 minutes. Cookies are done when the tops are shiny and cracked. Allow to cool for 10 minutes on baking sheets, then cool completely on a wire rack.

Almond Clouds (gluten-free)


This weekend Mike and I are off to the Clarksville Picnic in my mom’s hometown of Clarksville, Maryland.  The picnic is one of the highlights of my year; it features the white elephant rummage sale, bingo, pony rides, games for kids, a bake sale, a quilt raffle (which my mom won three years ago, and that quilt is now on my bed) and a family-style fried chicken and baked ham dinner.

I love the picnic because it gives me a chance to hang out with my Maryland family, the descendants of the Feaga-O’Donnell clan.  The lynchpin is Aunt Liz, my mom’s twin sister. Yes, my mom has a twin.  And no, you cannot get a word in edgewise when they’re together.

Anyway…Aunt Liz is the youngest of the six O’Donnell kids, and her home, Glyndon, is the center of my Maryland universe.  Tucked into a corner of Montgomery County that hasn’t been developed to death, Glyndon is a classic white colonial with black shutters, a wood stove, and a dog pen that’s been home to many faithful mutts over the years.

Aunt Liz puts on meals like nobody’s business.  Her Thanksgiving dinners are legendary, her breakfasts the stuff of myths.  She’s an excellent cook and baker, but she was diagnosed with Celiac Disease a few years ago.  After mentioning some almond cookies she liked that she’d gotten at an allergy-free store, I decided to go on the hunt for a gluten-free almond cookie that I could make on my own, and I found this one.

Aunt Liz proclaimed it the best cookie she’d ever eaten in her life.  The highest of praise, indeed.

Ingredients

  • 10 ounces almond paste
  • 1 cup sugar
  • 1/4 teaspoon salt
  • 2 large egg whites, lightly beaten
  • 1/4 teaspoon almond extract
  • Powdered sugar

Preparation

Preheat oven to 325.

Line three baking sheets with parchment paper.

Break up almond paste into pieces.

In a mixing bowl, combine almond paste, sugar, and salt until uniformly crumbly.

Gradually add egg whites until dough is smooth and paste-like.

Add almond extract and beat well.

Drop by rounded teaspoonfuls onto prepared sheets, leaving ample room in between; I bake six cookies per sheet.

Using a small sieve, generously dust each cookie with powdered sugar.

Bake for 20-22 minutes, until edges are light golden brown.

Cool for several minutes on baking sheets, then remove and cool completely on a wire rack.

Dust with more powdered sugar if desired.

Coconut Macaroons (Gluten-Free!)

Mike and I are an interfaith Jewish-Catholic couple.  Passover and Easter sometimes coincide, which presents a variety of culinary challenges; Mike can’t have anything made with flour for eight days, and throughout Lent I give up sweets and avoid meat on Fridays.  I first made these macaroons a few years ago while Mike was in the midst of his nothing-leaven-for-Passover endeavors.

This recipe is entirely gluten-free and fairly easy to make, so it’s a good option for family and friends with celiac disease or gluten sensitivity.  Check out more gluten-free recipes!

Ingredients

  • 3 egg whites, room temperature
  • 1 cup sugar
  • 1 teaspoon vanilla (McCormick pure vanilla extract is gluten-free)
  • 3 cups shredded coconut

Preparation

Preheat oven to 325.

Line three baking sheets with waxed paper.

Beat egg whites on medium-high speed until frothy.

With the mixer on low, add vanilla and continue to beat.

With the mixer on medium, add sugar gradually, then increase speed to high and continue to beat until stiff peaks form; this can take 10 minutes or more, depending on your mixer.

Gently fold in coconut one cup at a time.

Drop by rounded tablespoons, spacing about two inches apart on the baking sheet; you should be able to fit 9 macaroons on one sheet, and the entire recipe makes 21 cookies.

Bake 18-20 minutes, until very, very light brown.

Cool completely on baking sheets.  When cookies are cool, carefully peel the waxed paper away from the baking sheets, then carefully peel the cookies from the waxed paper.