Vanilla Whoopie Pies

vanilla whoopie
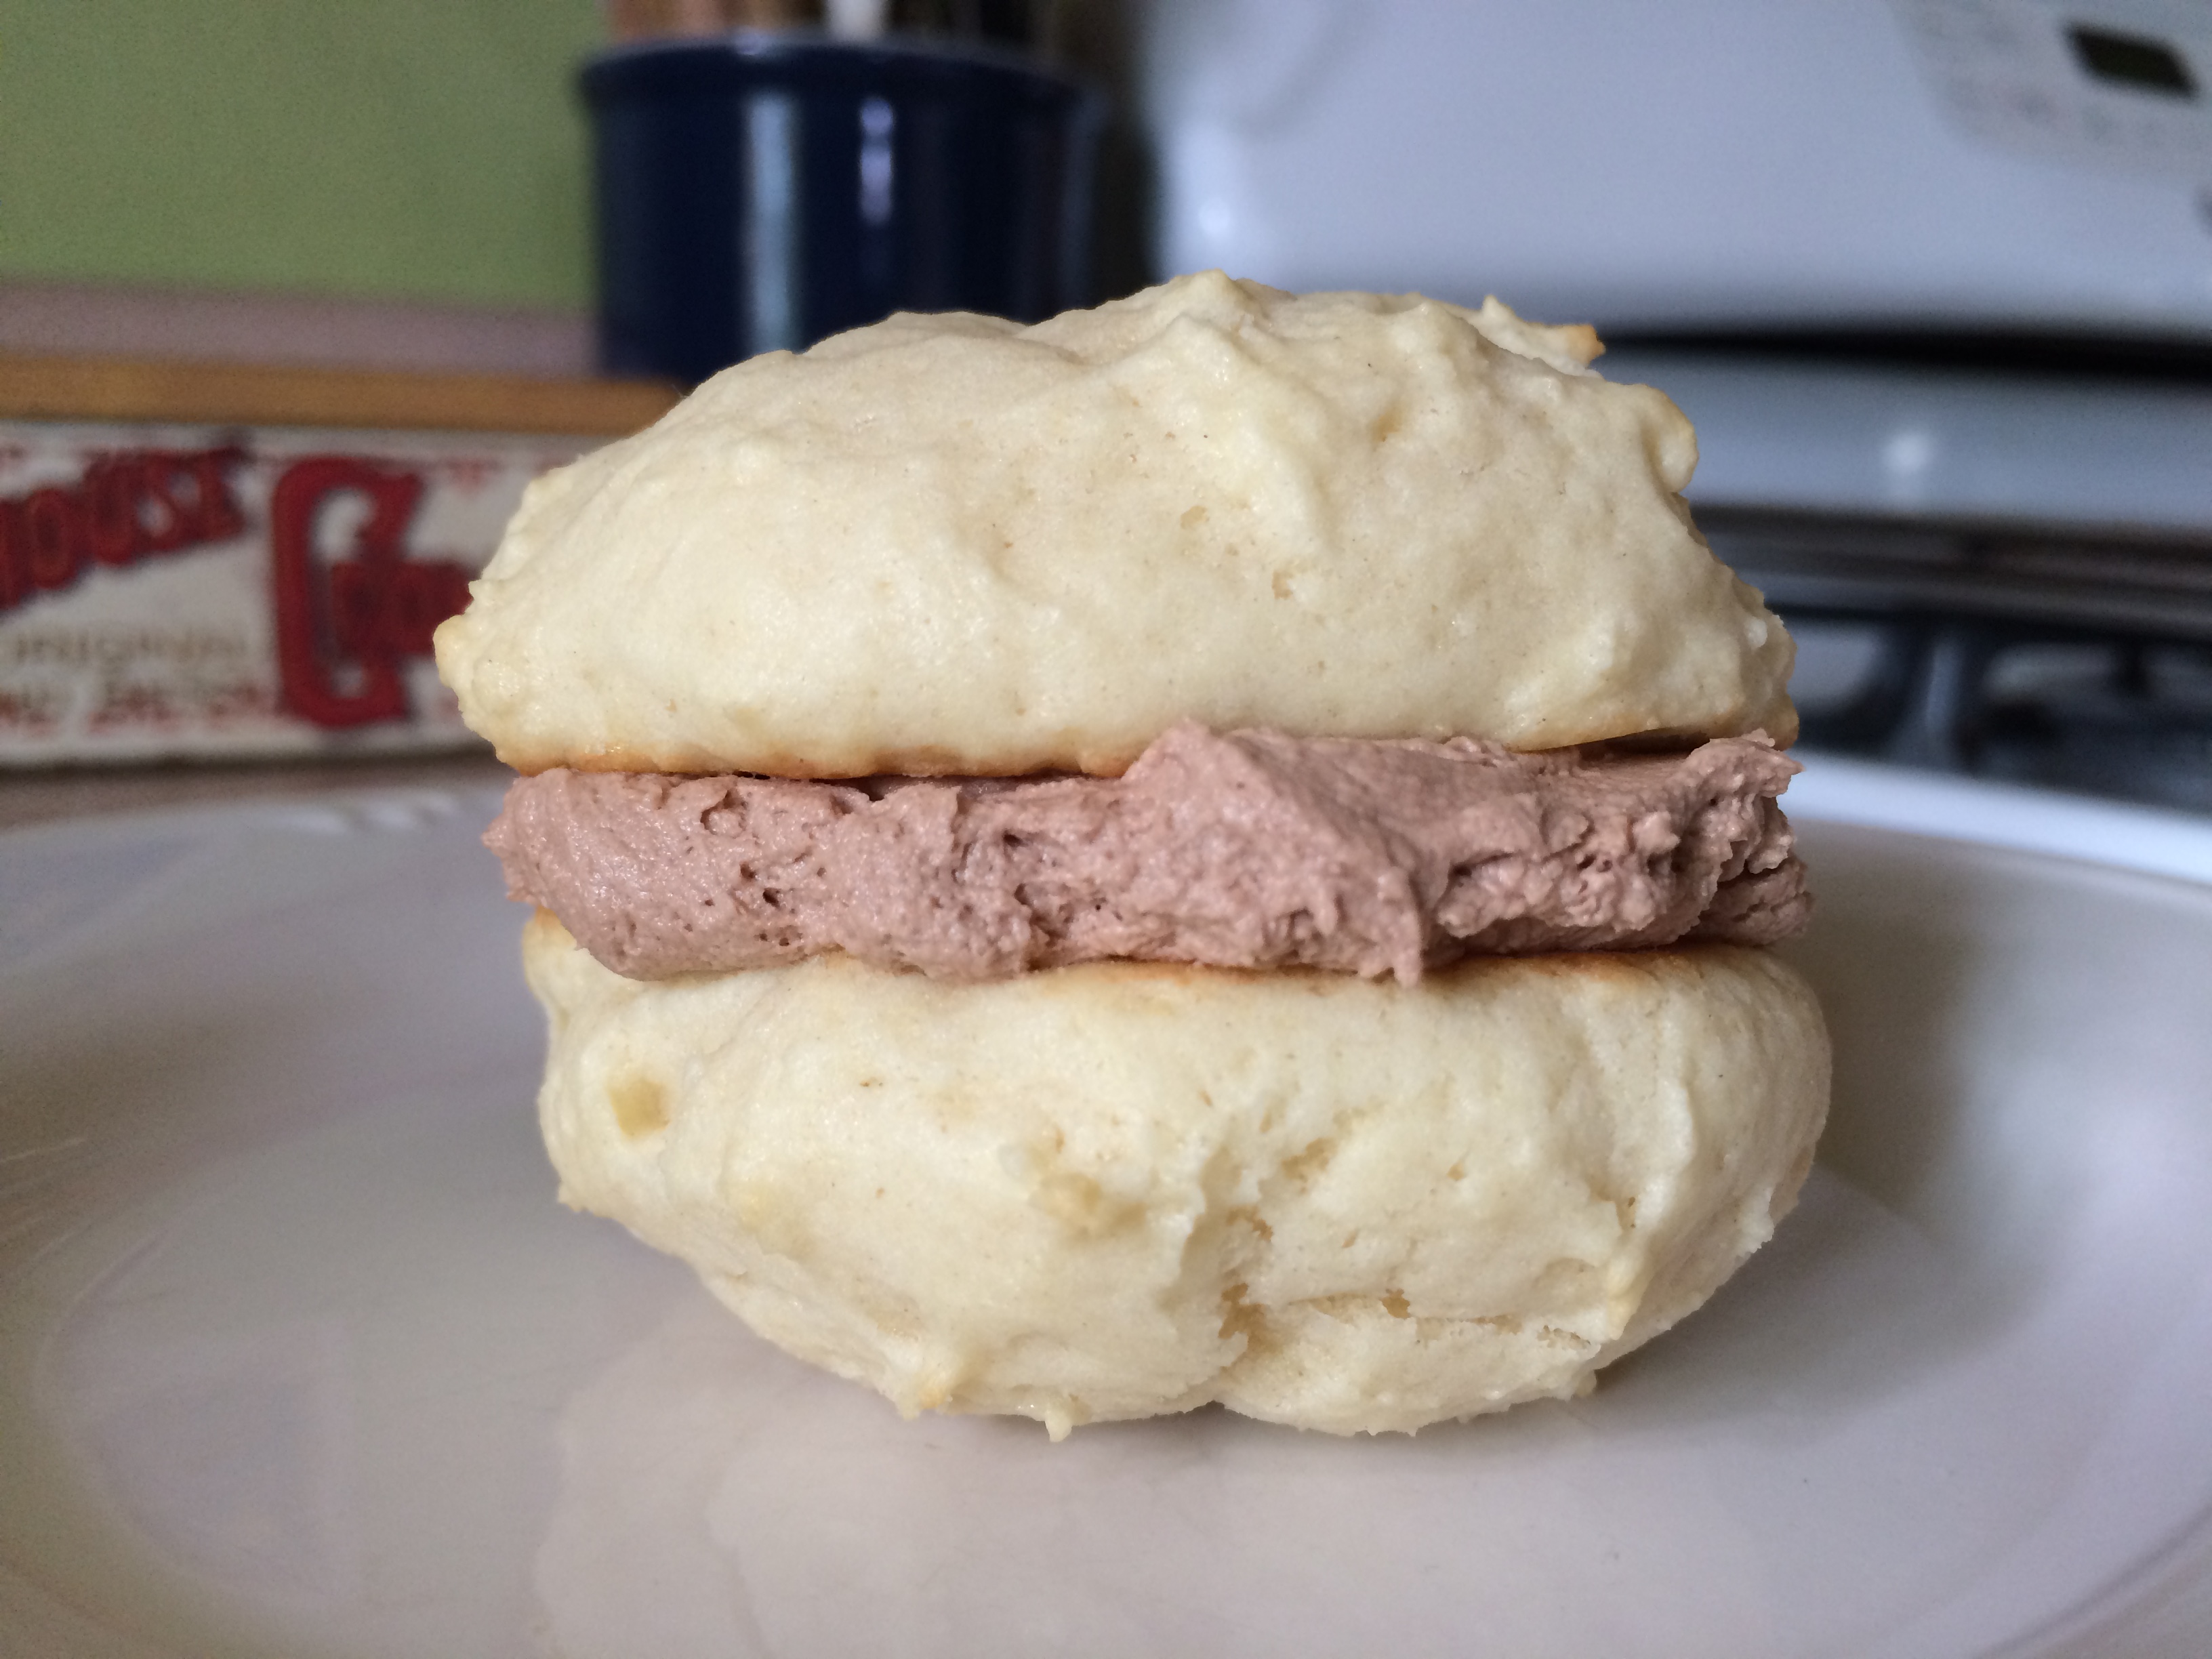
The whoopie pie comes in many varieties. I wanted to make classic chocolate cake/vanilla filling whoopies today, but I lacked buttermilk and didn’t think a sour milk substitution would do the trick. And so, I opted for a reverse on the classic: vanilla cake/chocolate filling whoopies.  (And how fun is it to say whoopie pie, by the way? A lot of fun.)

The vanilla cake part of this recipe is an adaptation from King Arthur Flour’s Double-Vanilla Whoopie Pie, and the chocolate filling is slightly adapted from a version I used in my homemade fudge rounds. I’ll admit: the flavors need a bit of tweaking, and next time I’ll probably add some more vanilla to both, and I’ll likely add more cocoa powder for the filling to ramp up the chocolateyness.

Ingredients

Vanilla Cakes

  • 1 cup sugar
  • 11 tablespoons butter, at room temperature
  • 2 teaspoons baking powder
  • 1 teaspoon salt
  • 1 tablespoon vanilla extract
  • 1/2 teaspoon almond extract
  • 2 eggs
  • 3 cups flour
  • 2/3 cup milk

Chocolate filling

  • 1/2 cup shortening
  • 1/2 cup salted butter, softened
  • 1 1/2 teaspoons vanilla extract
  • 1/2 teaspoon almond extract
  • 1/4 cup cocoa powder
  • 3 to 3 1/2 cups powdered sugar

Preparation

Preheat oven to 400 degrees. Line three baking sheets with parchment paper.

In a mixing bowl, cream together sugar and butter for about 2-3 minutes, until very light and fluffy.

Add baking powder, salt, vanilla extract, and almond extract, and beat well.

Add eggs, one at a time, beating well and scraping the bowl between each.

Add flour and milk alternatively, beginning and ending with the flour and mixing until batter is just combined. Batter will be thick and fluffy.

Using a 2-inch cookie scoop, scoop dough onto prepared sheets, placing about 2 inches apart; you should have 6 scoops on each sheet.

Bake for 8-9 minutes, until edges are set and tops are just slightly springy. Remove from oven and cool on baking sheets for a few minutes before removing to a wire rack to cool completely.

To make the filling, beat shortening and butter on medium speed for about 2 minutes. Add vanilla and almond extracts and beat until combined.

Add cocoa powder and 1 cup powdered sugar and beat until combined. Slowly add 2 additional cups powdered sugar, about 1/2 cup at a time, beating well between each addition. Beat on medium speed for about 2 minutes; if your filling is thin, add another 1/2 cup powdered sugar and beat again until the consistency is fluffy.

To fill, flip cakes over and, using a 1-inch cookie scoop, drop scoops of filling onto half of the cakes. Spread with an offset spatula and top with another cake.

Wrap whoopie pies in plastic wrap and store in an airtight container at room temperature. You could probably refrigerate these, but they might dry out a bit.

Baseball Sugar Cut-Outs

baseballsOnce upon a time, I loathed making sugar cookies. I had a sketchy recipe that never seemed to come together and make for easy rolling, frosting them could take a while depending on the shape, and in the end, they just never seemed to be worth the trouble.

One autumn in DC, I discovered a new recipe, then added a few extra teaspoons of vanilla. From that dough, I created a platter of fall-themed treats – turkeys (complete with sprinkled-on plumage), acorns, pumpkins, and colorful leaves – and took it to my Aunt Liz’s house for Thanksgiving dinner. It was a huge hit, to say the least.

Since then, I’ve used that same recipe to make treats for many seasons and reasons, including a fun batch of steamed crab cut-outs that my cousin-in-law Robb absolutely loved. Now, sugar cut-outs are among my favorite cookies to make.

These baseballs are for my nephew Roman, who turns 8 this week. Happy birthday, kiddo.

You will need:

Preparation

Bake cookies and allow them to cool completely before frosting.

Prepare frosting, reserving about 1/4 for red stitch details. I use flavorless red gel food coloring and added about 1/4 teaspoon to achieve a dark red.

Frost cookies with the white frosting, smoothing out each as much as you can.

Fit a pastry bag with a small plain tip. Pipe curved lines first, then add stitch details. Allow frosting to set before storing; store cookies between layers of waxed paper in an airtight container for up to three days.


Chocolate Nutmeg Donuts

chocolatenutmegdonutsA donut for dessert? Why not?

I wonder who decided which treats went with, or after, which meals. What makes a donut, croissant, or coffee cake more appropriate for breakfast than dessert, and a cupcake, or a slice of pie, more appropriate for dessert than breakfast? Not that I’m advocating eating cupcakes for breakfast…although if the truth be told, I did have more than one breakfast of Little Debbie’s Swiss Cake Rolls in college.

Tonight, I wanted a chocolate donut for dessert, and not the kind you get at a chain. I wanted a cakey, tender, lightly glazed creation of chocolate and the slightest hint of spice. Nutmeg is a key ingredient in achieving that bakery donut flavor; without nutmeg, these donuts would taste more like chocolate cake than chocolate donuts.

The serving of Cool Whip in the photo here is optional, of course…but this was my dessert tonight. And it was delicious.

Ingredients

For the donuts:

  • 1 cup flour
  • 1/4 cup cocoa powder
  • 1/2 teaspoon baking soda
  • 1/4 teaspoon salt
  • 1/4 teaspoon nutmeg
  • 1/2 cup packed light brown sugar
  • 1/2 cup sour milk (see note below)
  • 1 egg
  • 4 tablespoons unsalted butter, melted
  • 1 teaspoon vanilla

For the glaze:

  • 1 cup powdered sugar
  • 3 teaspoons milk
  • 1 teaspoon vanilla

Preparation 

Preheat oven to 325 degrees. Spray a 6-well donut pan with baking spray.

Make sour milk; place 1/2 tablespoon white vinegar in a glass measuring cup. Add enough milk to equal 1/2 cup, then stir and let stand for 5 minutes.

In a large bowl, combine flour, cocoa powder, baking soda, salt, and nutmeg.

In a medium bowl, combine brown sugar, sour milk, egg, melted butter, and vanilla; stir until smooth, then add all at once to flour mixture. Stir until just combined and no dry streaks or large lumps remain.

Fill a piping bag or large zip-top bag with batter; pipe into wells, filling about 3/4 full.

Bake for 13-15 minutes; remove from oven and immediately remove donuts from wells. Cool on a wire rack before glazing.

To make the glaze, combine powdered sugar and milk, 1 teaspoon at a time, mixing until completely smooth. Add vanilla and stir well; you want a very thin glaze. Dip tops of donuts in glaze and allow to set before serving.

If you like, top donuts with a spoonful of whipped cream or other whipped topping just before serving.


Sundae Donuts

sundaedonutVanilla, chocolate, and sprinkles make me think of ice cream sundaes, so I’ve decided to call these sundae donuts. Their original recipe comes from Sally’s Baking Addiction, but I’ve included some extra vanilla in the donut batter.

And, now, for a bit of food history…several American towns claim to have invented the sundae, and each story centers around a local pharmacy with a soda fountain. Blue laws, which prohibited the sale of soda on Sundays (and people think Pennsylvania’s liquor laws are strange), apparently gave way to the serving of ice cream with syrup and other toppings like fruit and whipped cream. I’m not sure where sprinkles came on the scene, but they add a fun, crunchy texture to an otherwise smooth dish.

These donuts remind me a bit of a hot fudge sundae, and you could leave them sprinkle-free if you like, or add sprinkles of other shapes and colors for holidays. Whatever you do, don’t skip the nutmeg in the donut batter – while it might seem like a strong spice, it’s necessary to achieve that classic, donut-from-the-bakery taste. Just a few notes about some of the ingredients: I used whole milk, but skim, 1%, 2%, or almond milk would be fine; I used vanilla Greek yogurt, but any plain or vanilla yogurt – regular or Greek – that you have on hand would work. Also, my sprinkles are the Betty Crocker Parlor Perfect ice cream topping variety, which can be found with the ice cream toppings at your local store.

Ingredients

For the donuts

  • 1 cup flour
  • 1 teaspoon baking powder
  • 1/4 teaspoon baking soda
  • 1/4 teaspoon nutmeg
  • 1/3 cup light brown sugar
  • 1 egg
  • 1/4 cup milk
  • 1/4 cup vanilla Greek yogurt
  • 2 tablespoons melted butter
  • 2 teaspoons vanilla

For the glaze

  • 1/2 cup semi-sweet chocolate chips
  • 2 tablespoons light corn syrup
  • 2 tablespoons butter
  • 2 teaspoons water
  • rainbow sprinkles

Preparation

Preheat oven to 350 degrees. Spray two 6-count donut pans with cooking spray; this recipe yielded 8 donuts for me.

In a large bowl, whisk together flour, baking powder, baking soda, and nutmeg; set asite.

In a medium bowl or large glass measuring cup, whisk together brown sugar, egg, milk, and yogurt until smooth. Add melted butter and vanilla and whisk to combine. Pour wet ingredients into dry mixture and mix until just combined; you don’t want to over-mix your batter.

Spoon the batter into a large zip-top bag or pastry bag and pipe into wells, filling about 2/3 full.

Bake for 9-10 minutes, until edges are golden brown. Remove from oven and let cool in the pans for about 1 minute, then gently lift each donut out (I use a small offset spatula) and transfer to a wire rack to cool before glazing.

For the glaze, place chocolate chips, corn syrup, butter, and water in a medium-sized, microwave-safe bowl. Microwave at 20-second intervals until chocolate and butter melt, stirring between each, until the mixture is completely smooth. My glaze took about 1 minute to reach the right consistency.

Place your rainbow sprinkles in a small bowl; dip tops of donuts into the chocolate glaze, then into the sprinkles, coating completely.

Donuts are best eaten the day they’re made. If you can resist, store them in an airtight container at room temperature for up to two days.

Butter Pecan Cake (& Cupcakes)

butterpecancakeMy mom, Genny, is not really a flowers-on-Mother’s-Day kind of mom. She’s more likely to plant a garden of flowers than to keep them in a vase on her table…and then mow the lawn, mulch the flower bed, and trim the hedges, all before noon. Her energy at the age of 68 far exceeds that of my energy at the age of 37. She is a force of nature, indeed.

Although Genny isn’t a big consumer of sweets, I suspect she’ll have at least a slice of this butter pecan cake, which I’ve made for her to celebrate Mother’s Day. This recipe strikes me as very Southern, or like something you’d find in the pages of Country Woman magazine – which is fitting because Genny grew up in what used to be a fairly rural part of Maryland and is now a much more populous community for commuters to Baltimore and DC.

This recipe makes quite a quantity, turning out one 8-inch round cake and 24 cupcakes. You could certainly make this as a three-layer cake, or as a two-layer cake with a dozen cupcakes, or just three dozen cupcakes. Whatever you decide, I’m sure your results will be tasty. Happy Mother’s Day!

Ingredients

For the butter pecans (make these first – you need them for both your cake and frosting)

  • 2 cups chopped pecans
  • 4 tablespoons salted butter

For the cake (or cupcakes)

  • 3 cups flour
  • 2 teaspoons baking powder
  • 1 cup salted butter, at room temperature
  • 2 cups granulated sugar
  • 1 tablespoons vanilla extract
  • 4 large eggs
  • 1 cup whole milk
  • 1 1/2 cups butter pecans

For the frosting

  • 1 cup unsalted butter, at room temperature
  • pinch of salt
  • 3 – 3 1/2 cups powdered sugar
  • 1 teaspoon vanilla extract
  • 1/2 cup butter pecans, chopped to a finer consistency than what you’re using in the batter

Preparation

For the butter pecans:

Preheat oven to 350 degrees. Line a rimmed baking sheet with foil, extending the foil over all four sides.

Place pecans and butter onto the baking sheet; bake for about 8-9 minutes, stirring frequently, until pecans are toasted and fragrant. Be careful not to burn them – pecans can burn easily after several minutes in the oven.

Remove pecans from the baking sheet and place on a platter to cool completely before using.

For the cake or cupcakes:

If you’re making a cake or cakes: grease and flour your baking pans or spray with baking spray. I lined the bottom of my baking pan with a circle of parchment as well.

If you’re making cupcakes: line cupcake pans with paper liners.

In a large bowl, combine flour and baking powder; set aside.

In a mixing bowl, cream together butter, sugar, and vanilla until light and fluffy. Add eggs, one at a time, beating well after each.

Add flour mixture and milk alternatively in three batches, beginning and ending with the flour. Stir in butter pecans.

Pour batter into prepared pans, or, for cupcakes, fill cupcake wells about 2/3 full.

Bake cakes for 25-30 minutes or cupcakes for 18-20 minutes, until a cake tester comes out clean.

Cool cake or cupcakes completely before frosting.

For the frosting:

In a mixing bowl, beat butter on medium speed for about 1 minute.

Add 3 cups of powdered sugar and beat on low speed until the sugar is completely incorporated into the butter. I cover my mixer with a towel to prevent a sugar storm.

Add vanilla and beat until combined; check your consistency and if it is too thin, add another 1/2 cup of powdered sugar. Stir in butter pecans.

Frost cakes and cupcakes using an offset spatula. I used a 1-inch cookie scoop and dropped scoops of frosting onto each cupcake first, then used all of the leftover frosting on the cake. You wouldn’t want to try to pipe this frosting because of the pecan pieces, but the old-fashioned look of hand-frosted treats suits this recipe very well.

Orange Coffee Cake with Chocolate Streusel

orangeccOrange and chocolate are great friends. Both grow in tropical climates, and as always, I marvel at the creativity of the individual who once thought, “hmm, I like chocolate, and I like oranges…I wonder what would happen it I paired chocolate and orange together?” Brilliance, that’s what.

I adapted the recipe for this coffee cake from one in the Better Homes & Gardens Baking book, using orange zest instead of chopped peel and milk chocolate chips instead of semi-sweet.

The great thing is that once you zest your orange, you can use the juice from it in this recipe as well. You could probably do without the pecans if you wanted to, but they add a nice crunchy texture.

Ingredients

For the chocolate streusel

  • 1/2 cup flour
  • 1/2 cup brown sugar
  • 1 tablespoon cocoa powder
  • 4 tablespoons butter, cut into small pieces
  • 1/2 cup chopped pecans
  • 1/2 cup chocolate chips

For the orange coffee cake

  • 3 3/4 cups flour
  • 1 tablespoon baking soda
  • 1 teaspoon baking powder
  • 3/4 teaspoon salt
  • zest of 1 medium orange
  • 12 tablespoons butter, room temperature
  • 2 cups sugar
  • 2 eggs
  • 8 ounces sour cream
  • 3/4 cup milk
  • 1/4 cup orange juice
  • 1 1/2 teaspoons vanilla

Preparation

Preheat oven to 350 degrees. Grease a 9 x 13 baking pan.

In a medium bowl, combine the 1/2 cup flour, brown sugar, and cocoa powder. Add butter and rub in with your hands until the mixture has a texture like coarse crumbs. Stir in pecans and chocolate chips; set aside.

In a large bowl, combine flour, baking soda, baking powder, salt, and orange zest. Mix well, using your fingers to distribute the zest as evenly as you can.

In a mixing bowl, beat butter and sugar for 2 minutes. Add eggs, 1 at a time, mixing well after each addition. Add sour cream, milk, orange juice, and vanilla and beat until well-combined.

Add flour mixture in several batches, beating until combined as you go. Continue beating for about 2 minutes until the mixture is smooth.

Pour half of the batter into your prepared pan. Top with half the streusel mixture and use the back of a spoon to gently press the streusel into the batter. Repeat with remaining batter and streusel.

Bake for 50-55 minutes, until a cake tester comes out clean. Remove from oven and cool on a wire rack.

This cake can be served warm, or at room temperature.

Roman’s Holy Communion Cake

communioncakeMy nephew Roman made his first Holy Communion yesterday, a huge rite of passage for young Catholic kids. When I was little, I remember “playing communion” with Nilla wafers, and I recall my own first communion very well. I have the dress and veil I wore in a cedar chest in my bedroom, along with other family heirloom garments like my grandmother’s wedding dress and my grandpap’s Navy sailor suit.

Roman requested a chocolate cake with chocolate icing for his communion celebration, and the look on his face when he first saw it was priceless. He got an enormous piece, of course.

I’ve made this cake in cupcake form before, and adapted the recipe for two 8-inch rounds here. This would also make at least 24 cupcakes, or a 9 x 13 sheet cake.

Ingredients

Dark Chocolate Cake

  • 3 cups flour
  • 6 tablespoons cocoa powder
  • 2 cups sugar
  • 2 teaspoons baking soda
  • 1 teaspoon salt
  • 2 tablespoons vinegar
  • 2 teaspoons vanilla
  • 6 tablespoons vegetable oil
  • 2 cups water

Chocolate Buttercream

  • 1 cup butter, at room temperature
  • 1/2 teaspoon salt
  • 3 1/2 cups powdered sugar
  • 1/2 cup cocoa powder
  • 3-4 tablespoons milk
  • 3 teaspoons vanilla extract

Vanilla Buttercream (for accents)

  • 4 tablespoons butter
  • Scant 1 cup powdered sugar
  • About 2 tablespoons milk
  • 1 teaspoon

Preparation

For the cake

Preheat oven to 350 degrees. Spray two 8-inch round cake pans with baking spray. Line the bottom of each pan with a circle of parchment, and spray a second time.

In a large mixing bowl, combine flour, cocoa powder, baking soda, and salt. Make three wells; place vinegar in one, vanilla in the second, and vegetable oil in the third. Add water and stir very well to combine; the batter will bubble up just slightly as the ingredients come together. Your batter will be fairly thin, but should be mostly lump-free.

Divide batter evenly between the pans. Bake for about 30 minutes, until a cake tester comes out clean. Be careful not to over-bake; the sides of these cakes set up pretty quickly and can burn if you let them go too long.

Remove cakes from oven and carefully run a knife around each edge to loosen them from their pans if they’ve stuck at all. Allow to cool for about 5 minutes in the pans, then carefully flip out onto wire racks (removing the parchment for each cake bottom) to cool completely.

For the frostings

To make the chocolate buttercream frosting, in a large bowl, sift together powdered sugar and cocoa powder and set aside.

In a mixing bowl, beat butter on medium speed for about 1 minute; add salt and beat another 30 seconds.

Add powdered sugar and cocoa and beat on low speed to incorporate as much sugar into the butter as you can.  I cover my mixing bowl with a kitchen towel during this step to prevent a sugar storm.

Add three tablespoons milk and two teaspoons vanilla extract; beat for three minutes.

Scrape down the sides of the mixing bowl and add the final teaspoon vanilla extract, then beat for another minute.

To make the vanilla buttercream frosting, in a medium bowl, sift powdered sugar and set aside.

In a mixing bowl, beat butter on medium speed for about 1 minute; add salt and beat another 30 seconds.

Add powdered sugar and beat on low speed to incorporate as much sugar into the butter as you can.

Add 1 tablespoon milk and the vanilla; beat for three minutes. Add remaining milk a half-tablespoon at a time to reach a consistency that can be easily piped.

To assemble and decorate

Flip one cake upside-down onto your cake plate; spread a medium-thin layer of frosting on top. Carefully place your second cake on top of the first layer and frost the top, then the sides.

Fit a piping bag with your desired tip; pipe decorations as you like. I decorated Roman’s cake pretty simply, with his name, a top border that looked a bit like rosary beads, and crosses on the sides.

RomanHCHere, Roman marvels at his cake (and did not lick it). 

Neapolitan Cupcakes

neapolitan cupcakesMeet the most adorable cupcakes I’ve ever baked. I wanted to make something challenging today, and I must say: mission accomplished.

These treats are a many bowl, multi-step endeavor, but they are worth it. I adapted this recipe in both ingredients and process from one I originally saw on another blog called Cooking Classy, using vanilla extract instead of scraped seeds from a vanilla bean and a different recipe for the strawberry frosting altogether.

The two batters have very different textures, and you’ll want to make sure you use the “spread with a toothpick” method to get the vanilla layer to fully cover the chocolate layer as I’ve outlined in the instructions below. While I did have some specs of chocolate pop through the top of my vanilla layer, it’s easy to cover those with frosting.

I’ve also included plenty of tips that saved me time (and dishes, being a baker without a dishwasher) throughout the process. I recommend reading through the recipe a few times to get familiar with it, as well as with your ingredients, before you start. You’ll end up with a few extra egg yolks from this, but you can reserve those for another use (mine are destined for lemon curd).

Ingredients

Vanilla Cupcake Layer

  • 1 1/2 cups cake flour
  • 1 1/2 teaspoons baking powder
  • 1/4 teaspoon salt
  • 7 tablespoons butter, room temperature
  • 3/4 cup sugar
  • 1/2 cup milk (any kind but skim)
  • 1 teaspoon vanilla extract
  • 3 egg whites (reserve one of your yolks for the yolk in the chocolate layer)

Chocolate Cupcake Layer

  • 1/3 cup unsweetened cocoa powder
  • 1/2 teaspoon baking soda
  • 1/2 cup boiling water
  • 4 tablespoons melted butter
  • 2 1/2 tablespoons vegetable oil
  • 3/4 cup granulated sugar
  • 1/4 cup heavy cream
  • 1 teaspoon vanilla extract
  • 1 whole egg
  • 1 egg yolk
  • 1 cup flour

Strawberry Buttercream Frosting

  • 8 tablespoons butter, at room temperature
  • 1/3 cup strawberry puree
  • About 3 cups powdered sugar

Preparation

Preheat oven to 350 degrees. Line two 12-cup cupcake tins with paper liners. Good news: this recipe makes exactly 24 cupcakes.

To make the cupcakes, begin by making the chocolate base for your chocolate batter first, then as it is cooling, make your vanilla batter and finish your chocolate batter once your base is cool. This will save time, believe me!

In a small mixing bowl, combine cocoa powder and baking soda. Add boiling water and whisk until smooth; allow to cool while you prepare the vanilla batter.

Prepare the vanilla batter:

In a small bowl, sift together cake flour, baking powder, and salt; set aside. In a glass measuring cup, combine milk, egg whites, and vanilla extract and whisk together until well-combined.

In a mixing bowl, combine butter and sugar. Cream together until light and fluffy.

Add the flour mixture and milk mixture alternatively in three batches, beginning and ending with the flour mixture. You want to scrape your bowl very, very well and frequently throughout the process. Your vanilla batter will be light and fluffy when it is finished; almost mousse-like. Set vanilla batter aside while you make the chocolate batter.

Prepare the chocolate batter:

In a mixing bowl, combine melted butter, vegetable oil, sugar, and mix until well-combined. Add egg, egg yolk, and vanilla; mix until combined. Add chocolate base, then heavy cream, mixing after each addition. Add flour, beating on low speed until combined.

Using a 2-inch cookie scoop, scoop chocolate batter into each cupcake well. If you don’t have a cookie scoop, you can use 2 tablespoons of batter in each well.

Using the 2-inch cookie scoop again, scoop vanilla batter and carefully layer over the chocolate batter. Use a toothpick to gently spread the vanilla batter, which is much lighter and fluffier than the chocolate batter, over the chocolate layer completely. Your wells should be about three-quarters full.

Bake for 18-20 minutes, until a cake tester comes out clean. Remove from oven, and remove cupcakes from the pans onto wire racks to cool completely.

Prepare the strawberry buttercream:

If you’ve never made strawberry puree, it is very easy. Place strawberries in a food processor (or blender) and puree until smooth. You can pass the puree through a sieve to remove the seeds if you like, but I leave mine in.

In a mixing bowl, beat butter on medium speed for about 1 minute. Add the first 2 cups of powdered sugar about 1/2 cup at a time, mixing until very well-combined.

Add strawberry puree in small batches, mixing well between each addition, then add enough additional powdered sugar – mine took about 1 cup – to make a stable buttercream.

Frost cupcakes using a small offset spatula. You can pipe them if you prefer, but I like the old-fashioned look of a hand-frosted cupcake.


Lemon Pound Cake with Poppy Seed Filling

lemonpcwithpoppyYesterday, I wondered: what should I do with a ton of leftover poppy seed filling? I should slather it into a lemon pound cake, that’s what.

This cake calls for lemon extract, and believe me when I tell you that you won’t be able to achieve the necessary level of lemony goodness in it with zest and juice alone. The fine folks at McCormick’s (which Mike always reminds me is a Maryland-based company) make lemon extract that you’ll likely find in the baking aisle at your local grocery store. It is absolutely worth the $5.

If you’d rather not use the poppy seed filling, you can omit it and just serve your cake as-is. I’m a huge fan of poppy seed though, so for me this is pretty close to pound cake heaven. You can serve it warm without glaze, or wait for it to cool and glaze it. Either way, it is delicious.

Ingredients

For the cake

  • 1 1/2 cups poppy seed filling
  • 4 teaspoons lemon juice
  • 3 cups flour
  • 2 teaspoons baking powder
  • 1/2 teaspoon salt
  • 1 cup butter, softened
  • 2 cups sugar
  • 4 eggs
  • 1 1/2 teaspoons vanilla extract
  • 1 1/2 teaspoons lemon extract
  • 1 cup 2% milk
  • zest of 1 medium lemon

For the glaze

  • 2 cups powdered sugar
  • About 2 tablespoons lemon juice

Preparation

Preheat oven to 350 degrees. Grease a bundt pan very well, then dust with flour.

In a small bowl, combine poppy seed filling and 4 teaspoons lemon juice, mixing well; set aside.

In a medium bowl, combine flour, baking powder, and salt; set aside.

In a mixing bowl, beat butter and sugar together until light and fluffy. Add eggs, one at a time, beating well after each. Add vanilla and lemon extracts and mix well.

Add the flour and milk alternatively in three batches, beginning and ending with the flour and mixing until just combined after each addition.

Add lemon zest and beat until just combined.

Pour about half of the batter into your bundt pan, then spoon in poppy seed filling and gently spread to create a ribbon. Top with remaining batter.

Bake for 60 minutes or until a cake tester comes out clean. Remove from oven and allow to cool in the pan for about 20 minutes, then carefully invert the cake onto a wire rack and allow to cool completely.

When the cake is cool, combine powdered sugar and lemon juice, about a teaspoon at a time, in a large glass measuring cup. You want a very drizzly consistency for your glaze so that it can easily drip down the sides of your cake. Pour over cake and allow to set before serving.

Remember: if you want to serve this cake warm – and it is dee-lish-ous warm – you can leave it unglazed.

Italian Sugar Cookies

IMG_4140Pennsylvania Macaroni Company is my favorite shop in Pittsburgh’s Strip District. If you’ve never been, you simply must go and marvel at the bins of almonds, the shelves of pasta and olive oil and sauces, the room with the cheese counter that rivals any I’ve ever seen.

In the room with the bread and fresh pasta, there are boxes of mixed bakery-style cookies, and in those boxes are cookies like these. Tender, vanilla-scented, covered in just the right amount of icing. The kind of cookies your grandmother made, and you never forgot.

I enjoy recipes with lots of ingredients and advanced techniques for the fun challenge they present, but there is also great comfort in baking something simple. These cookies are easy to prepare and could take on any color icing, making them ideal for holidays and celebrations.

Ingredients

For the cookies

  • 3 cups flour
  • 1/8 teaspoon salt
  • 3 teaspoons baking powder
  • 3/4 cup shortening
  • 3/4 cup sugar
  • 3 eggs
  • 1 1/2 teaspoons vanilla extract

For the icing

  • 1/4 cup milk
  • 2 tablespoons butter, melted
  • 1/2 teaspoon vanilla extract
  • 2 1/2 cups powdered sugar
  • food coloring, if desired

Preparation

Preheat oven to 400 degrees. Line several baking sheets with parchment paper.

In a medium bowl, combine flour, baking powder, and salt; set aside.

In a mixing bowl, cream shortening and sugar until light and fluffy.

Beat in eggs and vanilla.

Add flour mixture in three batches, mixing between each. Dough will pull away from the sides of the bowl when it is the right consistency.

Using a 2-inch cookie scoop, scoop dough and roll into balls. (You can use a smaller scoop if you like; next time, I’ll probably use a 1-inch scoop.) Place dough on parchment-lined baking sheets about 1 inch apart.

Bake for 8-10 minutes, until lightly browned. Remove to wire racks to cool before dipping in icing.

To make the icing, in a small bowl, combine milk, butter, vanilla, and powdered sugar until smooth. Tint with food coloring if desired.

Dip the tops of the cookies in icing; place on wire racks and allow excess to drip off. Let stand until set, then store in an airtight container at room temperature.