Peanut Butter Smoothies

What do you do when you want something like a brownie, but you can’t eat chocolate? You make these peanut butter smoothies, another treat from my beloved King Arthur Flour Cookie Companion. It’s funny to describe something chocolate-free as fudgy, but these absolutely are.

While the original recipe calls for baking in a 9 x 9 pan, I made mine in an 8 x 8. The edges are definitely darker than I wanted them to be, but the end result is delicious nonetheless. I covered mine for the last 5 minutes of baking to prevent over-browning on the top, and the center of my squares fell as it cooled, which was fine. You could substitute chocolate chips or lightly salted peanuts for the peanut butter chips if you like, and I’m sure they’d be equally delicious.

Ingredients

  • 1 cup flour
  • 1/4 teaspoon salt
  • 1 teaspoon baking powder
  • 6 tablespoons unsalted butter, at room temperature
  • 1/2 cup smooth peanut butter
  • 1 cup sugar
  • 1/4 cup light brown sugar
  • 2 eggs
  • 1 teaspoon vanilla extract
  • 1 cup peanut butter chips

Preparation

Preheat oven to 350 degrees. Lightly grease an 8 x 8 or 9 x 9 baking pan.

In a small bowl, combine flour, salt, and baking powder; set aside.

In a mixing bowl fitted with the paddle attachment, cream together butter and peanut butter until smooth. Add sugars and beat to combine. Add eggs, one at a time, beating well and scraping down the sides of the bowl after each addition. Add vanilla and beat to combine.

Add flour and beat on low speed until just combined, then mix in peanut butter chips.

Spread batter in the baking pan and bake for 25-30 minutes, until the edges are golden brown and pull away from the pan; if you use a cake tester on the center, it should have some moist crumbs sticking to it. I covered my bars for the last 5 minutes of baking to prevent them from over-browning on the top.

Remove from oven and cool completely in the pan before cutting. Cut into 16 bars.

Strawberry Vanilla Cupcakes

Filled cupcakes became a big deal a few years back, but as I’ve mentioned on this blog before, my grandma Zella made filled cupcakes back in the ’80s and ’90s. Long before shows like Cupcake Wars appeared on television, Zella scooped out her cupcake centers and filled them with lemon curd, pudding, and pie fillings. I think this strawberry vanilla cupcake would have made her proud.

If you’re using a fruit or pudding-like filling, you’ll want a sturdier cupcake so that a) the cupcake doesn’t fall apart when you take a bite and b) the filling doesn’t get too absorbed into the cake. These cupcakes are on the drier side, more like a pound cake and able to hold the strawberry filling very well. When paired with a fresh strawberry buttercream, the flavor combination is a delightfully summery treat. I recommend making your filling first and allowing it to cool completely before you bake your cupcakes and make your frosting to save time during assembly.

Strawberry Filling

Ingredients

Ingredients

  • 12 ounces strawberries, pureed
  • 1 1/2 cups powdered sugar
  • 4 teaspoons cornstarch
  • 2 teaspoons water

Preparation

In a medium saucepan, stir together strawberry puree, powdered sugar, cornstarch, and water. Cook over medium heat until the mixture boils, then allow it to boil for 1 minute, stirring well, until the mixture thickens.

Remove from heat and press through a fine sieve to filter out the seeds – this will take a few minutes, but is absolutely worth it. Allow to cool at room temperature before using; makes about 1 cup.

Old-Fashioned Vanilla Cupcakes

Ingredients

  • 1/2 cup whole milk
  • 1 teaspoon vanilla extract
  • 1/2 cup plus 6 tablespoons cake flour
  • 1/2 cup plus 2 tablespoons flour
  • 1 cup sugar
  • 1 1/2 teaspoons baking powder
  • Scant 1/2 teaspoon salt
  • 8 tablespoons butter, cut into cubes, at room temperature
  • 2 eggs, at room temperature

Preparation

Preheat oven to 350. Line two cupcake pans with paper liners.

Combine milk and vanilla extract; set aside.

In a mixing bowl, combine cake flour, flour, sugar, baking powder, and salt. Beat on medium speed for 2 minutes, then reduce mixer speed to low and add butter a few cubes at a time. Continue to beat for about 2 minutes, until the mixture looks like coarse sand.

Add eggs, one at a time, beating well between each. With the mixer running on low, slowly pour in the vanilla milk mixture.

Return to medium speed and continue to beat for 2 minutes. Scrape down the sides and bottom of the bowl well.

Using a 2-inch cookie scoop, drop scoops of batter into prepared cupcake pans, filling about 1/2 to 2/3 full.

Bake for 20-25 minutes, until a cake tester comes out clean. Remove from pans immediately and cool completely on a wire rack before filling and frosting.

Fresh Strawberry Buttercream

Ingredients

  • 8 tablespoons butter, at room temperature
  • 1 teaspoon vanilla extract
  • 2 to 3 cups powdered sugar
  • Scant ¼ cup strawberry puree

Preparation

In a stand mixer fitted with the paddle attachment, beat butter and vanilla extract on low speed until smooth and creamy, about 2 minutes.

Gradually add powdered sugar, in half-cup increments, beating until fully incorporated.

Slowly add strawberry puree, mixing until completely incorporated, about 1-2 minutes. If your mixture is too thin, slowly add more powdered sugar, about 1/4 cup at a time, until you reach a consistency that will be easy to pipe.

To assemble your cupcakes:

Use a melon baller to scoop out a small amount of cake from the center of each cupcake.

Using a pastry bag fitted with a large plain tip, pipe strawberry filling into each cupcake.

Fit a large pastry bag with a Wilton M1 tip and pipe generous swirls of frosting onto the top of each cupcake. Store in an airtight container in the refrigerator for up to 2 days, but bring to room temperature before serving.

Makes 24 cupcakes.

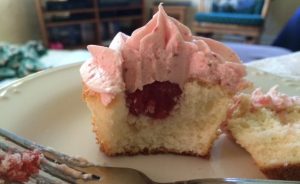
Here’s a photo of the inside! 

Chocolate Almond Biscotti

Biscotti can be simple or fancy, which is one thing that makes them such good treats. This recipe is adapted from a basic chocolate biscotti recipe in my Better Homes & Gardens Cookbook.

Instead of adding chopped white and semisweet chocolate to the dough like the original recipe called for, I chose to go the chocolate almond route. I mixed in some almond extract along with the eggs, then once the biscotti baked and cooled, I dipped them in chocolate and sprinkled on some chopped toasted almonds. You could certainly leave them plain if you like, or mix the chopped almonds into the dough. Maybe I’ll do that next time.

Ingredients

  • 5 1/3 tablespoons butter
  • 2/3 cup sugar
  • 1/4 cup cocoa powder
  • 2 teaspoons baking powder
  • 2 eggs
  • 1 teaspoon almond extract
  • 1 3/4 cups flour
  • 2 tablespoons vegetable shortening
  • 1 cup semisweet chocolate chips
  • About 1/3 cup chopped toasted almonds

Preparation

Preheat oven to 375 degrees. Line a large baking sheet with parchment.

In a mixing bowl, beat butter on medium speed for 1-2 minutes. Add sugar, cocoa powder, and baking powder, beating well to combine.

Scrape down the bowl and add eggs and almond extract, beating well to combine. Add flour and beat to combine; dough will be fairly thick and sticky.

Lightly dust your counter top with flour and turn dough out onto it; divide into two portions, and shape each portion into a 9-inch log. Transfer logs to the baking sheet and flatten each slightly.

Bake for 20 minutes, until a cake tester inserted in the center comes out clean. Remove from oven and cool for 1 hour.

Preheat oven to 325 degrees. Transfer logs to a cutting board and cut into 1-inch slices. Return slices to the baking sheet and bake for 8-9 minutes on one side, then flip and bake for another 8-9 minutes on the other side. Remove from the oven and cool completely before dipping.

Once biscotti are cool, combine shortening and chocolate chips in a small saucepan over low heat and stir until the mixture is melted and smooth.

Line a cool baking sheet with waxed paper. Dip one end of each biscotti into the chocolate, then place on waxed paper. Top with chopped toasted almonds; allow chocolate to set before storing. Store in an airtight container between sheets of waxed paper for up to 3 days.

Makes about 24

Chocolate Zucchini Bread

Mike has quite the garden going this summer, growing tomatoes, beans, squash, and zucchini in the best spot in our backyard. And because you can only grill so much zucchini, I decided to grate some and mix it into this chocolate bread.

The recipe below is adapted from King Arthur Flour’s Double Chocolate Zucchini Bread, which is simple to make and smells delicious when baking. I strongly recommend shredding your zucchini in a food processor rather than grating it by hand to save time, but you could hand-grate if you like. Also, if you add your vegetable oil before you add your honey, you can use the same measuring cup and the honey will slide right out because of the residual oil on the sides of the measuring cup. Very convenient!

Ingredients

  • 2 large eggs
  • 1/2 cup vegetable oil
  • 1/3 cup honey
  • 1/2 cup brown sugar
  • 1 teaspoon vanilla extract
  • 1 teaspoon salt
  • 1/2 teaspoon baking soda
  • 1/2 teaspoon baking powder
  • 1/3 cup cocoa powder
  • 1 2/3 cups flour
  • 2 cups shredded, unpeeled zucchini, gently pressed to release some of the liquid
  • 1 cup chocolate chips

Preparation

Preheat the oven to 350 degrees.  Lightly grease an 8 x 4 loaf pan.

In a mixer fitted with the paddle attachment, beat the eggs, oil, honey, brown sugar, and vanilla until smooth.

Add the salt, baking soda, baking powder, cocoa, and flour, mixing until well-combined.

Stir in zucchini and chocolate chips.

Pour batter into the loaf pan and bake for 60-70 minutes, until a cake tester inserted into the center comes out clean or with a light smear of melted chocolate chips.

Cool in pan for 15 minutes, then turn onto a wire rack to cool completely.

Wrap well and store at room temperature for 2-3 days.

Cinnamon Bread

A few nights ago I really wanted to make a quick cinnamon bread, so I adapted a muffin recipe from my trusty Better Homes & Gardens Cookbook into a loaf. It turned out pretty well, though I’ll fully admit that this bread was best on the evening it was baked, and the morning after. It dried out quicker than I expected, but hey, live and learn.

To adapt a muffin recipe into a quick bread, you’ll need a longer baking time at a lower temperature. For example, as muffins, this recipe bakes at 400 for 20 minutes, but as quick bread, it bakes at 375 for about 35-40 minutes. Make sure to keep an eye on your bread to ensure that it doesn’t over-brown; I covered my loaf after about 25 minutes of baking to make sure it didn’t burn.

 Ingredients

  • 1 3/4 cups flour
  • 1/3 cup sugar
  • 2 teaspoons baking powder
  • 1/4 teaspoon salt
  • 1 1/2 teaspoon cinnamon
  • 1 egg, lightly beaten
  • 3/4 cup milk
  • 1/4 cup vegetable oil
  • 1 tablespoon vanilla extract

Preparation

Preheat oven to 375 degrees. Lightly grease an 8 x 4 loaf pan.

In a large bowl, combine flour, sugar, baking powder, salt, and cinnamon. Make a well in the center.

In a medium bowl, combine egg, milk, vegetable oil, and vanilla extract; pour into the well in the dry mixture and stir until just moistened. The batter will be lumpy, but that’s fine – you don’t want to over-mix.

Spoon batter into loaf pan and bake for 35-40 minutes, checking around 25 minutes to make sure your loaf isn’t browning too much. The bread will be done when a cake tester inserted in the center comes out with a few moist crumbs.

This bread can be served warm, but if you prefer to cool it, allow it to cool in the pan for about 10 minutes then turn it out onto a wire rack to cool completely. Store at room temperature for 1-2 days.

Almond Raspberry Cupcakes

Baking requires instincts, and I should know by now not to ignore mine. Usually when I fill cupcakes with a custard or fruit filling, I scoop out the centers with a melon baller and pipe the filling into the divot, yielding a nice filling-to-cupcake ratio. For cream fillings, I place the filling in a piping bag and injecting it into the cupcake, because cream fillings are heavy enough to push the cake out a bit and yield the same nice filling-to-cupcake ratio.

Because I wanted to save a bit of time, I decided to use the injection method with my raspberry filling in these cupcakes. After I’d frosted them and tried one (because what kind of baker doesn’t engage in quality control?) I realized that the injection method had failed me: my cupcake had a sad little tunnel of filling, not nearly enough for a good flavor or texture balance. I wondered for a moment if I should drizzle the tops with raspberry jam to ramp up the flavor, then decided to use the leftover raspberry filling for drizzling. Another mistake. It looked ridiculous, far too thick and amateurish.

Eager to maintain my baking cred at the office, I carefully scraped the filling off the tops and replaced it with some raspberry jam to cover the gashes in the frosting. My colleagues enjoyed them very much, but I’ve learned my lesson: my instincts are important, and the next time I get the idea not to follow them, I’ll remember these cupcakes.

Ingredients

For the almond cupcakes

  • 1 cup flour
  • 1 teaspoon baking powder
  • dash of salt
  • 8 tablespoons butter, softened
  • 3/4 cup sugar
  • 2 eggs
  • 1/2 teaspoon vanilla extract
  • 1 teaspoon almond extract
  • 1/4 cup plus 2 tablespoons milk

For the raspberry filling

  • 6 ounces fresh raspberries, mashed
  • 3/4 cup powdered sugar
  • 2 teaspoons cornstarch
  • 1 teaspoon water

For the almond frosting and raspberry jam drizzle

  • 8 tablespoons butter
  • 2 1/2 cups powdered sugar
  • 1/2 tablespoon vanilla extract
  • 1 tablespoon almond extract
  • Red food coloring
  • About 1/4 cup seedless raspberry jam

Preparation

Preheat oven to 350 degrees. Line a 12-count cupcake tin with paper liners.

In a small bowl, combine flour, baking powder, and salt; set aside.

In a mixer fitted with the paddle attachment, cream together the butter and sugar until very well-blended. Add eggs, vanilla extract, and almond extract and beat until combined; scrape down the sides of your bowl a few times during this step.

Add flour and milk alternatively in two batches, beginning and ending with the flour and beating until completely combined.

Using a 2-inch cookie scoop, scoop batter into cupcake wells, dividing evenly and filling about 2/3 to 3/4 full.

Bake for 18-22 minutes, until a cake tester comes out clean. Remove from oven and remove cupcakes from the tin; cool completely on a wire rack before filling and frosting.

While the cupcakes bake, make your filling. Stir together raspberries, powdered sugar, cornstarch, and water in a medium saucepan. Cook over medium heat until the mixture boils, then allow it to boil for 1-2 minutes, stirring well, until the mixture thickens.

Remove from heat and press through a fine sieve to filter out the seeds. Allow to cool before using; makes about 1/2 cup.

Once both the filling and cupcakes are cool, use a melon baller to scoop out a small amount of cake from the center and pipe or spoon filling into each.

For the frosting, place butter in a mixer fitted with the paddle attachment and beat on medium speed for 1-2 minutes.

Scrape down the bowl and add powdered sugar all at once, beating on low speed until the sugar is completely incorporated into the butter; this will take a few minutes. Continue beating on medium-high speed for 2 minutes.

Add vanilla extract and almond extract, then beat on medium-high for another 2-3 minutes. Add a few drops of red food coloring to tint a light pink.

Fit a large piping bag with a Wilton 1M tip and pipe frosting in swirls on the tops of each cupcake.

Stir raspberry jam to make it smooth, then fit a small piping bag with a small plain tip and twist the bottom of the bag near the tip so the jam won’t run out when you pour it in. Untwist the bag and pipe jam over the tops of the cupcakes.

Store in an airtight container in the refrigerator but bring to room temperature before serving.

Patriotic Cupcakes

Happy Independence Day, Americans! I haven’t done a lot of red, white, and blue baking, so this year I thought I’d whip up some patriotic cupcakes and practice my frosting tinting and piping skills while I was at it. I also experimented with a new buttercream, based on a Wilton recipe that uses both butter and shortening. I’m pleased to say it turned out very well!

Tint-wise, I wanted to make “colonial” colors – darker blue and red than what you’d get with your standard gel food coloring. To make a color darker, you need a hint of black, and let me stress the word “hint” here – it’s really a teeny, tiny amount. While my colonial blue turned out very well, my colonial red turned out more like raspberry. I’ll use it on something else, but I was glad to have plenty of white frosting for a second batch of red – this red is just your standard red gel food coloring, though in a very generous amount. Design-wise, the flag cupcakes are my favorites; alas, my fireworks cupcakes (the ones on the center ends in the photo above) look far too much like something that contains genetic material for my liking. Oh well…we pipe, and we learn.

Ingredients

For the vanilla cupcakes

  • 1 cup flour
  • 1 teaspoon baking powder
  • dash of salt
  • 8 tablespoons butter, softened
  • 3/4 cup sugar
  • 2 eggs
  • 1 teaspoon vanilla extract
  • 1/4 cup plus 2 tablespoons milk

For the Wilton-inspired buttercream

  • 6 tablespoons butter, at room temperature
  • 6 tablespoons vegetable shortening
  • 3 1/2 cups powdered sugar
  • 1 tablespoon vanilla extract
  • 1 –  1 1/2 tablespoons heavy cream or milk
  • Royal blue gel food coloring
  • Red gel food coloring
  • Black gel food coloring

Preparation

Preheat oven to 350 degrees. Line a 12-count cupcake tin with paper liners.

In a small bowl, combine flour, baking powder, and salt; set aside.

In a mixer fitted with the paddle attachment, cream together the butter and sugar until very well-blended. Add eggs and vanilla and beat until combined; scrape down the sides of your bowl a few times during this step.

Add flour and milk alternatively in two batches, beginning and ending with the flour and beating until completely combined.

Using a 2-inch cookie scoop, scoop batter into cupcake wells, dividing evenly and filling about 2/3 to 3/4 full.

Bake for 18-22 minutes, until a cake tester comes out clean. Remove from oven and remove cupcakes from the tin; cool completely on a wire rack before frosting.

To make the frosting, place butter and shortening in a stand mixer fitted with a paddle attachment and beat for 1-2 minutes, until very well-combined. Add powdered sugar, 1 cup at a time, mixing very well between each addition. Add vanilla and heavy cream, beating for 1-2 minutes on medium-high speed; if your frosting is too thick, add another 1/2 tablespoon of heavy cream.

Divide frosting into three portions. Reserve 1 portion for white; using an offset spatula, frost the tops of each cupcake with a base of white.

Tint one portion colonial blue using royal blue and a very, very small amount of black. Tint the other portion red.

Fit two pastry bags with small star tips and pipe designs as you like. I chose the following:

  • Stars (top left and bottom ends in the photo above) – pipe a ring of blue around the edge of the cupcake, then fill in with red stars
  • Fireworks (center ends) – pipe red and blue stars with tails
  • Waves (top right) – pipe alternating red and blue waves
  • Flags (center) – pipe a patch of blue on the upper left-hand side, then add red stripes
  • Full coverage stars (bottom center) – pipe blue stars to totally cover the top of your cupcake, then add red star accents

Store cupcakes in an airtight container at room temperature for up to 2 days. Makes 12.


Whale Cookies

My beach/aquatic cookie cutter set that yielded last week’s octopus cookies also includes this adorable whale. It’s just such a fun, happy-looking cookie, I feel kind of bad eating them (but only for a second, because this recipe really is delicious).

I chose a light blue frosting for these cookies and frosted them by hand, then piped on the whiles of the eyes and water spouts, then the pupils and mouths. I decided to give these happy little whales smiles, but you could leave them without mouths if you like.

Ingredients

For the cookies

  • 4 cups flour
  • 4 teaspoons baking powder
  • 1 teaspoon salt
  • 1 cup unsalted butter, at room temperature
  • 2 cups sugar
  • 2 eggs
  • 2 teaspoons vanilla extract

For the frosting

  • 6 tablespoons vegetable shortening
  • dash of salt
  • 2 egg whites
  • 4 cups powdered sugar
  • 1 1/2 teaspoons vanilla extract
  • 1 1/2 teaspoons almond extract
  • Blue food coloring
  • Black food coloring

Preparation

Stir together flour, baking powder, and salt in a medium bowl; set aside.

Cream together butter and sugar until fluffy; add eggs and beat well.

Add vanilla and about half the flour mixture, beating until combined; beat in remaining flour.

Note: if your dough is too crumbly, you can add just a bit of water or another ¼ teaspoon of vanilla.

Divide dough in three portions and knead each just slightly until dough sticks together.  Form each portion into a disc and wrap in plastic.

Refrigerate until just barely firm, about 20-30 minutes.

Preheat oven to 375 degrees. Line several baking sheets with foil or parchment.

Roll dough to 1/8 inch thickness and cut with an octopus cookie cutter, placing cookies a few inches apart on your baking sheets; I fit 6 cookies on each sheet.

Bake for 8-10 minutes, until just golden.

Cool on a wire rack before frosting.

To make the frosting:

Combine shortening, egg whites, salt, and one cup powdered sugar in a mixing bowl.  Beat on low speed until combined, then increase speed to medium, then high, and beat for one minute.

Add additional cup powdered sugar and beat on low speed until combined, then on high speed for one minute.

Add vanilla and almond extracts.  Beat on high speed for one or two minutes, until very well combined.

Check the frosting’s texture; it should be like very, very soft peanut butter and very easily spreadable.  If necessary, add one to two teaspoons of water to thin the frosting and beat well to combine.

Reserve a small portion (about 1/2 cup) of white frosting for eyes and water spouts; set aside.

Reserve a very small portion (about 4-5 tablespoons) of frosting for pupils and mouths; tint black and set aside.

Tint the remaining frosting pale blue and frost the bodies of the whales first.

Fit a small piping bag with a small plain tip and fill with white frosting. Pipe on eyes, then switch to a star tip and pipe on water spouts.

Fit a small piping bag with a small plain tip and fill with black frosting. Pipe on pupils, then mouths.

Allow frosting to set before storing; store cookies in an airtight container between sheets of waxed paper at room temperature for up to 3 days. The eyes and suction cups may flatten a bit, but that’s okay.

Makes about 48.

Octopus Cookies

Starbucks has these adorable octopus cut-out sugar cookies right now. I posted a picture of one on Facebook a few weeks back, and a friend of mine commented that I should make them. And so, I did.

I have a set of beach/sea life cookie cutters, and they just happen to include an octopus. The next time I make these, I may pipe their little eyes further down on their heads so they look more like real octopuses (much to my surprise, the plural of octopus is not octopi), but I think these turned out really well. I used a combination of piping/hand frosting for these, as it’s much easier to pipe the frosting onto the tentacles and up onto the body than it is to frost the whole cookie by hand.

Ingredients

For the cookies

  • 4 cups flour
  • 4 teaspoons baking powder
  • 1 teaspoon salt
  • 1 cup unsalted butter, at room temperature
  • 2 cups sugar
  • 2 eggs
  • 2 teaspoons vanilla extract

For the frosting

  • 6 tablespoons vegetable shortening
  • dash of salt
  • 2 egg whites
  • 4 cups powdered sugar
  • 1 1/2 teaspoons vanilla extract
  • 1 1/2 teaspoons almond extract
  • Blue food coloring
  • Green food coloring
  • Black food coloring


Preparation

Stir together flour, baking powder, and salt in a medium bowl; set aside.

Cream together butter and sugar until fluffy; add eggs and beat well.

Add vanilla and about half the flour mixture, beating until combined; beat in remaining flour.

Note: if your dough is too crumbly, you can add just a bit of water or another ¼ teaspoon of vanilla.

Divide dough in three portions and knead each just slightly until dough sticks together.  Form each portion into a disc and wrap in plastic.

Refrigerate until just barely firm, about 20-30 minutes.

Preheat oven to 375 degrees. Line several baking sheets with foil or parchment.

Roll dough to 1/8 inch thickness and cut with an octopus cookie cutter, placing cookies a few inches apart on your baking sheets; I fit 6 cookies on each sheet.

Bake for 8-10 minutes, until just golden.

Cool on a wire rack before frosting.

To make the frosting:

Combine shortening, egg whites, salt, and one cup powdered sugar in a mixing bowl.  Beat on low speed until combined, then increase speed to medium, then high, and beat for one minute.

Add additional cup powdered sugar and beat on low speed until combined, then on high speed for one minute.

Add vanilla and almond extracts.  Beat on high speed for one or two minutes, until very well combined.

Check the frosting’s texture; it should be like very, very soft peanut butter and very easily spreadable.  If necessary, add one to two teaspoons of water to thin the frosting and beat well to combine.

Reserve a small portion (about 1/4 cup) of white frosting for eyes and suction cups; set aside.

Reserve a very small portion (just a few tablespoons) of frosting for pupils; tint black and set aside.

Tint remaining frosting using blue and green food coloring for a blue/green shade. Fit a large piping bag with a large plain tip and pipe frosting onto each cookie, filling in the tentacles first and piping up onto the rest of the body; use a small offset spatula to spread the frosting.

Fit a small piping bag with a small plain tip and fill with white frosting. Pipe on eyes, then pipe suction cups on tentacles.

Fit a small piping bag with a small plain tip and fill with black frosting. Pipe on pupils.

Allow frosting to set before storing; store cookies in an airtight container between sheets of waxed paper at room temperature for up to 3 days. The eyes and suction cups may flatten a bit, but that’s okay.

Makes about 36.

Dark Chocolate Crumb Bars

Sometimes recipes work out exactly how you plan. Sometimes…not so much. Such was the experience with these dark chocolate crumb bars, a recipe I got from the back of a bag of dark chocolate chips. I expected the middle layer, a combination of dark chocolate chips and sweetened condensed milk, to bubble up and allow the top layer to bake into it, securing the crumbs, dark chocolate chips, and chopped almonds. Alas.

Much of the crumb topping fell off when I cut the bars, so if I make them again, I’ll either add a bit more crumb mixture to the bottom crust or press the top layer into the chocolate layer with the back of a spoon to help it hold. I adapted the recipe to include unsalted almonds instead of walnuts, but I suspect walnuts or pecans would be good as well.

Ingredients

  • 12 tablespoons unsalted butter, softened
  • 1 3/4 cups flour
  • 1/3 cup sugar
  • 1/4 teaspoon salt
  • 10 ounces dark chocolate chips, divided
  • 14-ounce can sweetened condensed milk
  • 1 teaspoon vanilla
  • 1 cup whole almonds, chopped

Preparation

Preheat oven to 350 degrees. Lightly grease a 9 x 13 baking pan.

In a mixing bowl fitted with the paddle attachment, beat butter for 1-2 minutes, until creamy. Add flour, sugar, and salt and beat until crumbly. With floured fingers, press 2 cups of the crumb mixture into the bottom of the pan.

Bake for 10-12 minutes, or until edges are golden brown.

While the crust is baking, prepare chocolate layer. In a medium saucepan, combine 1 cup chocolate chips and sweetened condensed milk. Cook over low heat, stirring frequently, until the chocolate chips melt and the mixture is smooth. Remove from heat and stir in vanilla; pour over hot crust.

Stir remaining chocolate chips and chopped almonds into remaining crust mixture and sprinkle over chocolate layer. Bake for 25-30 minutes; remove from oven and cool completely. Cut into bars and store in an airtight container at room temperature for up to 3 days.

Makes 24 bars.