Chocolate Strawberry Cupcakes

chocolatestrawberrycupcakePeople can go all out on Valentine’s Day, buying expensive chocolates, sparkling jewelry, and dozens of roses. But some of my favorite Valentine gifts have been hand-drawn or fashioned from construction paper by my nieces and nephews, requiring only creativity and some art supplies.

I’m also a fan of home-baked gifts for any occasion, and these chocolate strawberry cupcakes are an easy option for a Valentine’s Day treat. You just need cocoa powder for the cupcakes and could substitute strawberry jam for the fresh strawberry puree if that’s what you have on hand. 

Ingredients

For the cupcakes

  • 1 cup plus 2 tablespoons flour
  • 3/4 cup sugar
  • 3 tablespoons Dutch process cocoa powder
  • 3/4 teaspoon baking soda
  • 1/4 teaspoon baking powder
  • 1/2 teaspoon salt
  • 3/4 cup water
  • 1/4 cup plus 2 tablespoons vegetable oil
  • 1 teaspoon vanilla extract

For the frosting

  • 12 tablespoons butter, softened
  • 3 1/2 cups powdered sugar
  • 1/2 teaspoon vanilla extract
  • About 1/3 cup strawberry puree 

Preparation 

Preheat oven to 350 degrees. Line a cupcake tin with paper liners; my batch made 13 cupcakes. 

In a large bowl, combine flour, sugar, cocoa powder, baking soda, baking powder, and salt. Stir together, then add water, oil, and vanilla extract. Whisk until the batter is smooth; it will be thin.

Using a two-inch cookie scoop, scoop batter into prepared cupcake tin, filling wells about 2/3 full. Bake for 18-22 minutes, until a cake tester comes out clean. Remove from cupcake tin and allow to cool on a wire rack completely before frosting.

To make frosting, combine butter and powdered sugar in a mixer fitted with the paddle attachment and beat on low speed until the sugar is fully incorporated into the butter. Add vanilla and strawberry puree to taste, beating to combine. Fit a piping bag with a large star tip (like the Wilton M1) and pipe generous swirls onto each cupcake. Store in an airtight container at room temperature for 1-2 days. Makes 12 or 13, depending on how full your cupcake wells are filled. 

Advertisement

Sparkling Sugar Hearts

sparkingsugarheart
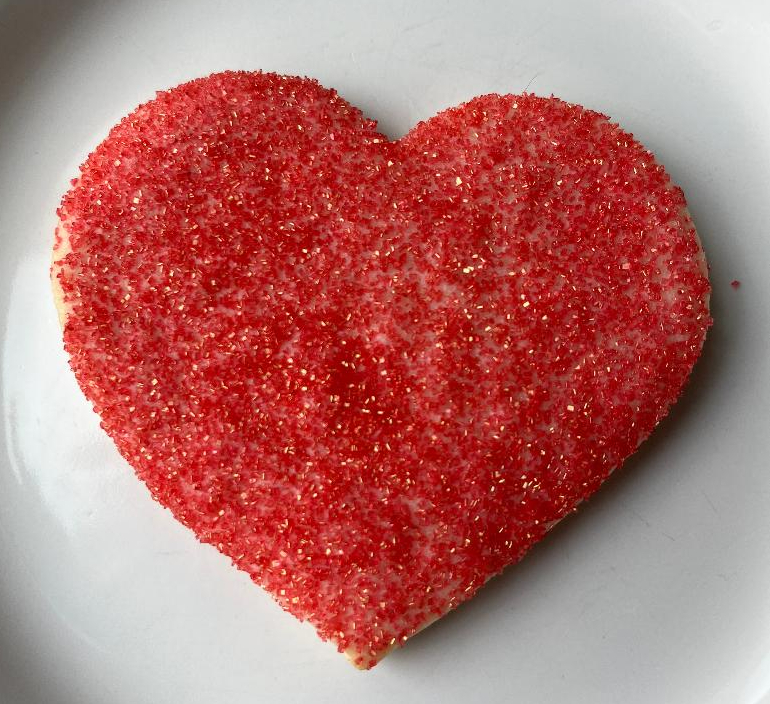
For some, Valentine’s Day brings the opportunity to go all out with romantic gestures and elaborate plans, while others grumble that it’s a made-up holiday meant to sell cards, candy, and flowers. For me, Valentine’s Day usually means baking something heart-themed, and this time it was a simple batch of sugar cut-out cookies coated in sparkling red sugar for my favorite Maryland girls, Maureen and Margaret.

Sugar cookies are one of my favorite things to bake, though they didn’t used to be. I found them a challenge until I came across a good recipe, the one below, and have adapted them for many a holiday using a range of decorations. I usually top sugar cookies that will ship somewhere in sugar, instead of frosting, for durability. I also find that pressing the cookie into the sugar, rather than sprinkling the sugar on top, provides a more even coating and allows the sugar to stick better.

Ingredients

  • 1 cup butter, softened
  • 2 cups sugar
  • 2 eggs
  • 4 cups flour
  • 2 teaspoons baking powder
  • 1 teaspoon salt
  • 3 teaspoons vanilla
  • 1-2 teaspoons water
  • Red sanding sugar

Preparation

Stir together flour, baking powder, and salt in a medium bowl; set aside. Cream together butter and sugar until fluffy. Add eggs and beat well. Add vanilla and about half the flour mixture, beating until combined; beat in remaining flour. If necessary, add 1-2 teaspoons of water for a less crumbly dough; you’ll need a more pliable dough to roll and cut later.

Divide dough in half and knead each just slightly until dough sticks together.  Form each half into a disc and wrap in plastic. Refrigerate until just barely firm, about 20-30 minutes.

Preheat oven to 375 degrees. Line several baking sheets with parchment paper, then place red sanding sugar on a plate or in a shallow dish.

Roll dough to 1/8 inch thickness and cut into heart shapes, then press the tops of each cookie into the sugar to coat. Place on baking sheets about 1-2 inches apart – they don’t spread much when baking, but you don’t want to crowd your baking sheets.

Bake for 8-10 minutes, until just golden. Remove from oven and allow to cool on cookie sheets for 2-3 minutes before carefully transferring to wire racks to cool completely. Store in an airtight container at room temperature for 3-4 days; if shipping, pack between layers of waxed paper. Makes about 4 dozen 3-inch cookies.

Princess Shortbread

Princess shortbread sounds like a character from a children’s story, right? Perhaps she’s a plucky royal who prefers spending her time baking than learning to knit or play the harp and would pacify a dragon by baking him a fancy cake rather than getting some prince to slay him. Then the dragon could help provide the fire for her ovens, and they’d be lifelong friends.

Anyway…this princess shortbread is named because of the princess cake and cookie flavor I used in it, a lovely combination of vanilla and citrus available from King Arthur Flour. I tinted it pink for Valentine’s Day, and it is now on the way to my favorite little Maryland girls along with some other Valentine gifts, including Captain America and Aquaman dolls (because they only have one Ken for their Barbies, and the Ken selection at my local target was quite lacking). I like to think perhaps Princess Shortbread would hang out with Captain America and Aquaman, but that’ll have to be a story for another day.

Ingredients

  • 8 tablespoons unsalted butter, slightly softened
  • 6 tablespoons sugar
  • 1/2 teaspoon salt
  • 1/2 teaspoon princess cake and cookie flavor
  • 5 ounces (1 cup plus 2 tablespoons plus 2 teaspoons) flour
  • Pink gel food coloring

Preparation

Preheat oven to 300 degrees. Lightly grease an 8-inch round cake pan.

In a mixer fitted with the paddle attachment, cream together butter, sugar, salt, and princess cake and cookie flavor. Add flour and beat to combine completely, then add enough food coloring to reach your desired shade of pink. The dough will be ready when it pulls away from the sides of your mixing bowl, but you may need to knead it a bit with your hands to make sure the food coloring gets distributed evenly.

Press the dough into the bottom of the cake pan, using the palm of your hand to create an even surface. Prick all over with a fork.

Bake for 32-35 minutes, until the edges are golden brown. Remove from oven and gently loosen the sides, then allow to cool in the pans for 5 minutes. Gently flip onto a cutting board and slice into 16 wedges, then place wedges on a wire rack to cool completely.

Sweetheart Shortbread Cookies

Shortbread, like the sugar cookie, is incredibly versatile. A classic shortbread recipe can be baked in many ways, easily adapted for different holidays and celebrations. This recipe, based on King Arthur Flour’s Essential Shortbread, is one I’ve adapted many times, always with great results.

Today’s adaptation involves both vanilla and almond extracts, as well as valentine sprinkles. They’re on their way to North Carolina for my nephew Roman, as part of his Valentine’s Day gift.

Ingredients

  • 8 tablespoons unsalted butter
  • 6 tablespoons sugar, divided
  • 1/2 teaspoon salt
  • 1 teaspoon vanilla extract
  • 1 teaspoon almond extract
  • 5 ounces flour (1/2 cup plus 2 tablespoons plus 2 teaspoons)
  • Wilton Micro Hearts Sprinkles

Preparation

Preheat oven to 300 degrees. Line two baking sheets with parchment paper.

In a mixer fitted with the paddle attachment, cream butter, sugar, salt, vanilla extract, and almond extract. Add flour and beat to combine; the dough will pull away from the sides of the bowl when it’s ready.

Using a one-inch cookie scoop, scoop generous portions and roll into balls. Place on baking sheets about 2 inches apart and flatten with the bottom of a drinking glass.

Place sprinkles in a shallow bowl and press the tops of each cookie into the sprinkles to coat. Return to baking sheets, placed about 2 inches apart, and bake for 25 minutes, until edges and bottoms are firm and just starting to turn golden.

Cool on baking sheets for about 10 minutes, then remove to wire racks to cool completely. If shipping, pack between layers of waxed paper.

Strawberry Valentine Cookies

Do experienced bakers bake with cake mix? Sometimes, yes. Especially when they want to create pink Valentine’s Day-themed treats for their favorite little girls in Maryland and are running short on time during a busy weekend.

Baking with cake mix cuts down on prep time, and can also be a nice way to introduce baking to beginners. Just add a few ingredients, follow a few simple steps, and you’ll have fun, tasty treats. These strawberry valentine cookies are on their way to my goddaughter Maureen and her little sister Margo, complete with two kinds of valentine sprinkles.

Ingredients

  • 1 box strawberry cake mix*
  • 1/3 cup vegetable oil
  • 2 eggs
  • 1 teaspoon vanilla extract
  • Valentine sprinkles

*I used Pillsbury Moist Supreme Strawberry cake mix.

Preparation

Preheat oven to 350 degrees. Line several baking sheets with parchment paper.

In a large bowl, combine cake mix, oil, eggs, and vanilla and stir to completely combine.

Using a 1-inch cookie scoop, drop scoops of dough onto cookie sheets. Top with sprinkles.

Bake for 10 minutes; do not let cookies brown. Remove from oven and cool on baking sheets for 3 minutes, then remove to a wire rack to cool completely.

Store in an airtight container for up to 1 week.

Chocolate Hearts

chocolate-heart-cookieI inherited some vintage cookie cutters from my grandma Zella, among them a scallop-edged heart with a red wooden peg handle. With Valentine’s Day right around the corner, it seemed appropriate to make chocolate hearts to send to my nephew Roman, who now lives in North Carolina.

Cookie cutters come in nearly every shape and size, for every occasion and holiday. My cookie cutters, of which there are dozens, live in a wonderful set of stackable drawer containers in one of my kitchen cabinets. I have all the basics, plus cutters for nearly every holiday, with some animals, dinosaurs, and other fun shapes like an umbrella and a teapot mixed in. Zella’s vintage heart is among my favorites, though.

Ingredients

  • 1 1/2 cups flour
  • 3/4 cup cocoa powder
  • 1/8 teaspoon salt
  • 12 tablespoons butter, softened
  • 1 1/3 cup sugar
  • 1 egg
  • 1 teaspoon vanilla extract

Preparation 

In a medium bowl, combine flour, cocoa powder, and salt; set aside.

In a mixing bowl, cream together butter and sugar until fluffy. Add egg and vanilla extract, beating until well-combined.

Slowly add flour mixture, scraping the sides of the bowl often and beating until a very well-combined, soft dough forms.

Gently knead the dough a few times to make sure it comes together; roll dough into a ball and flatten into a disc. Wrap in plastic and chill for 1 hour.

Preheat oven to 375 degrees; line three baking sheets with parchment or foil.

On a lightly floured surface, roll dough to 1/8 inch thickness. Cut with a heart-shaped cookie cutter; if using different sizes of hearts, be sure to bake all of the same size on one cookie sheet. Baking different-sized or differently-shaped cookies on the same sheet can lead to uneven results; some of your cookies might be underdone while others will be overdone.

Bake for 8-10 minutes, until edges are set. Remove from oven and cool on cookie sheets for 1-2 minutes, then remove to wire racks to cool completely.

Makes about 3 dozen, depending on the size of your cookie cutter.

Valentine Cookies

valentine-cookiesLooking for fun Valentine’s Day cookies for the kids in your life? Look no further. These slice-and-bake treats are a cross between shortbread and a sugar cookie, and can be tinted whatever color you wish. My goddaughter Maureen loves pink, and these are for her and her family.

If you don’t usually do slice-and-bake cookies, I have some suggestions to help with the process. Wrap your dough in plastic wrap, then slide it onto a baking sheet to chill. This will help the log from breaking or getting misshapen as you transfer it in and out of the fridge. Make sure your dough chills for at least two hours so it’s easy to slice; you can let it chill overnight if you like. As you slice, turn the log after every few slices. This keeps a flat edge from developing on one side. And, if you’re coating the cookies in sprinkles or nuts, remember that small sprinkles and finely-chopped nuts will coat the log better and be easier to slice through.

Ingredients

  • 2 cups flour
  • 1/4 teaspoon baking powder
  • 1/8 teaspoon salt
  • 3/4 cup butter, softened
  • 3/4 cup sugar
  • 1 egg
  • 1 teaspoon vanilla extract
  • Pink (or red) food coloring
  • About half a 3-ounce bottle Wilton Micro Hearts sprinkles

Preparation

In a medium bowl, combine flour, baking powder, and salt; set aside.

In a mixing bowl, cream butter and sugar until light and fluffy. Add egg and vanilla extract and beat until well-combined, scraping the sides of your bowl frequently.

Add flour in three batches, mixing well after each until a soft dough forms.

Add food coloring and tint to your desired shade.

Turn dough onto a very lightly floured surface and knead it slightly to make sure all of the food coloring is well-distributed and the dough is smooth. Roll into a 12-inch log.

Place sprinkles on a rimmed baking sheet and carefully transfer the log onto the sprinkles, rolling it back and forth to coat.

Wrap log in plastic wrap, slide it onto a baking sheet, and chill for at least 2 hours.

Preheat oven to 350 degrees. Line several baking sheets with foil or parchment.

Remove log from fridge and discard plastic wrap. Slice into 1/2 inch slices and place on baking sheets about 2 inches apart.

Bake for 9-11 minutes, until tops are set. Remove from oven and cool on baking sheet for about 4 minutes, then transfer to a wire rack to cool completely.

Store in an airtight container at room temperature for up to 5 days.

Makes 28

Valentine Cake

Valentine CakeWith Valentine’s Day just around the corner, I wanted to whip up a cake for two, something that would be just enough for dessert for Mike and me this weekend. This recipe, which I adapted from Taste of Home, looks like it’ll be the perfect serving size for a few generous slices each.

To frost this lovely cake, I used a pink to red ombré design for Valentine’s Day. I do wish I’d extended the lightest pink down the sides just slightly, so the next time I make a cake like this I’ll definitely do so. Also, this time, I used a crumb layer when frosting; I don’t usually do that, but it seemed like a good idea for this cake. For more info on the importance of the crumb layer, check out this post from the experts at Wilton.

Ingredients

For the cake

  • 1 cup plus 2 tablespoons cake flour
  • 1 1/2 teaspoons baking powder
  • 1/4 teaspoon salt
  • 4 tablespoons butter, softened
  • 3/4 cup sugar
  • 2 egg whites*
  • 1 teaspoon vanilla extract
  • 1/2 cup milk

*Reserve your egg yolks and whip up some lemon curd, which could make a tasty filling for this cake and would look great with yellow ombré frosting!

For the vanilla almond buttercream

  • 12 tablespoons butter, softened
  • pinch of salt
  • 3 cups powdered sugar
  • 1 tablespoon vanilla extract
  • 1/2 tablespoon almond extract
  • 3-4 teaspoons milk
  • Red liquid and gel food coloring**

**I used red liquid for the light pink layer and red gel for the dark pink and red layers, but you could just use gel for all three.

Preparation

Preheat oven to 350 degrees. Lightly spray two 6-inch round baking pans with baking spray.

In a medium bowl, combine cake flour, baking powder, and salt; set aside.

In a mixing bowl, cream butter and sugar until light and fluffy. Add egg whites, one at a time, beating well after each. Beat in vanilla.

Add flour mixture and milk alternatively, beginning and ending with the flour, until combined. Scrape the sides and bottom of your bowl very well to make sure you get any dry bits.

Pour batter into prepared pans and bake for 18 to 20 minutes, until a cake tester comes out clean; cakes will turn a nice golden brown. Remove from oven and immediately remove from cake pans, cooling completely on a wire rack.

To make the frosting, in a mixing bowl, beat butter for about 1 minute, then add salt and beat another minute.

Add 2 1/2 cups powdered sugar and beat on low speed until all of the sugar is fully incorporated into the butter; this will take a few minutes.

Add vanilla extract and almond extract, beating well to combine. Add milk, 1 teaspoon at a time, to reach a fluffy, spreadable consistency.

Divide frosting into four portions; a small portion of white for the filling and crumb layer (or, you could use pale pink for this – I didn’t think of that until after I was done!) then three equal portions for the light pink, dark pink, and red.

Place a small blob of frosting on your cake stand and place the bottom cake layer on it; this will help your cake stay in place during frosting. Spread the top with an even layer of white frosting, then top with second layer and frost with remaining white frosting, creating a crumb layer.

Tint your remaining frosting; I used two drops of red liquid food coloring for my light pink layer, then used red gel for my dark pink and red layers. Mix your color in a little bit at a time; you can always make it darker, but you can’t make it lighter.

Fit three piping bags with large plain tips and fill each bag with a different color. Beginning with the dark red, pipe bands around the bottom 1 1/2 inches of the cake, then continue with the dark pink and finish with the light pink on the top. Using a small offset spatula, smooth out each color band, starting from the light pink and working your way down. The colors will blend into one another, and that’s exactly what you want.

Store at room temperature for up to 3 days.

Strawberry Chocolate Chip Cookies

strawberry chocolate chip cookies

I don’t usually bake with cake mix. I’m not judging you if you do – seriously, we all have different levels of interest in scratch baking, abilities in the kitchen, and demands on our time. Sometimes my friends bake and say, sheepishly, that they used a boxed cookie mix, or refrigerated dough, or a cake mix-based recipe their mom used back in the day. I’m cool with that. Your outcome is far more important than whether you made something from scratch.

These strawberry chocolate chip cookies, which I found over at Sally’s Baking Addiction, use a boxed strawberry cake mix for their base. While I suppose I could have prowled the internet for one that used butter and flour and strawberry puree, I went with the mix version and ended up with some very tasty treats. The strawberry flavor is subtle, but that’s not a bad thing. These fun treats will soon make their way to my goddaughter Mo and her family in Maryland for Valentine’s Day.

Ingredients

  • 1 box strawberry cake mix*
  • 1 teaspoon baking powder
  • 1/3 cup vegetable oil
  • 2 eggs
  • 1/2 teaspoon vanilla extract
  • 1 1/4 cup semisweet chocolate chips

*I used Pillsbury Moist Supreme Strawberry cake mix.

Preparation

Preheat oven to 350 degrees. Line several baking sheets with parchment paper.

In a large bowl, combine cake mix and baking powder.

In a small bowl, combine oil, eggs, and vanilla; beat to combine, then pour into dry mixture.

Stir very well, until all pockets of dry ingredients are gone, then stir in chocolate chips. I used my hands (messy, but effective) to fully incorporate the chips into the batter.

Using a 2-inch cookie scoop, drop scoops of dough onto prepared baking sheets.

Bake for 10 minutes; do not let cookies brown. Remove from oven and cool on baking sheets for 3 minutes, then remove to a wire rack to cool completely.

Store in an airtight container for up to 1 week.

Heart Sugar Cut-Outs

heartEvery baker needs a simple, tasty sugar cut-out in her arsenal. I think of sugar cookies as a perennial treat, good for any occasion or no occasion at all. Cookie cutters are available in so many shapes and sizes, and you can make them as simple or as elaborate as you like. I find that keeping a range of food colorings, both the gel and liquid kind, is very helpful for sugar cut-out decoration.

The recipe below includes simple ingredients that you probably have in your fridge and pantry. It’s a modification of my earlier sugar cut-out post, because when I baked these yesterday I used a lot more vanilla than my original post included and I liked both the texture and the flavor of this dough better.

For the frosting, you can go as simple or as fancy as you wish. I tinted mine pink and red, to keep it simple, but you can add sprinkles or colored sugar or piped elements – whatever your heart desires.

Sugar Cookies

Ingredients

  • 2 cups flour
  • 2 teaspoons baking powder
  • 1/2 teaspoon salt
  • 8 tablespoons butter, softened
  • 1 cup sugar
  • 1 egg
  • 4 teaspoons vanilla extract
  • 1 recipe Zella’s icing, plus red gel and red liquid food coloring

Preparation

In a small bowl, combine flour, baking powder, and salt; set aside.

In a mixing bowl fitted with the paddle attachment, beat butter on medium speed for about 1 minute. Add sugar and beat until light and fluffy.

Add egg and 2 teaspoons vanilla, then beat until well-combined.

Add flour mixture in two batches, beating well between each addition.

Add remaining vanilla and beat until dough comes together; it may be a bit crumbly, but that’s okay.

Turn out onto a lightly floured counter top and knead very gently to bring the dough together. Divide in half; shape into balls, then flatten into discs. Refrigerate for about 20-30 minutes.

Preheat oven to 375 degrees. Line several baking sheets with foil.

Remove dough from fridge and allow to sit at room temperature for a few minutes.

On a lightly floured counter top, roll dough to about 1/8 inch thickness. Cut into heart shapes and place on prepared baking sheets about 2 inches apart.

Bake for 9 minutes, until edges are just golden. Remove from oven and cool on baking sheets for a few minutes, then remove to a wire rack to cool completely.

When cookies are completely cool, prepare icing.

Divide in half; use a few drops of red liquid food coloring for pink icing and red gel for red icing.

Frost cookies as desired; you can add sprinkles, chocolate chips, or piped elements for decoration if you like, but I just left mine plain.

Allow frosting to set before storing cookies; store between sheets of waxed paper in an airtight container.