Brown Sugar Pecan Toffee Rounds

brown sugar pecan toffee roundsWhy do some cookie recipes call for chilled dough? While it certainly makes your dough easier to handle, there are also some scientific principles at work. When you chill your dough, it gives the butter, shortening, or other fat in your recipe a chance to solidify, so when your cookies bake, the fat will take longer to melt than if it were at room temperature. This means your cookies will stay in shape, rather than spreading into puddles of goo. Chilling dough also dries out the dough a bit, but in a good way, enhancing the flavors of your ingredients. For more in-depth info on chilling dough, check out this great post from the folks at King Arthur Flour.

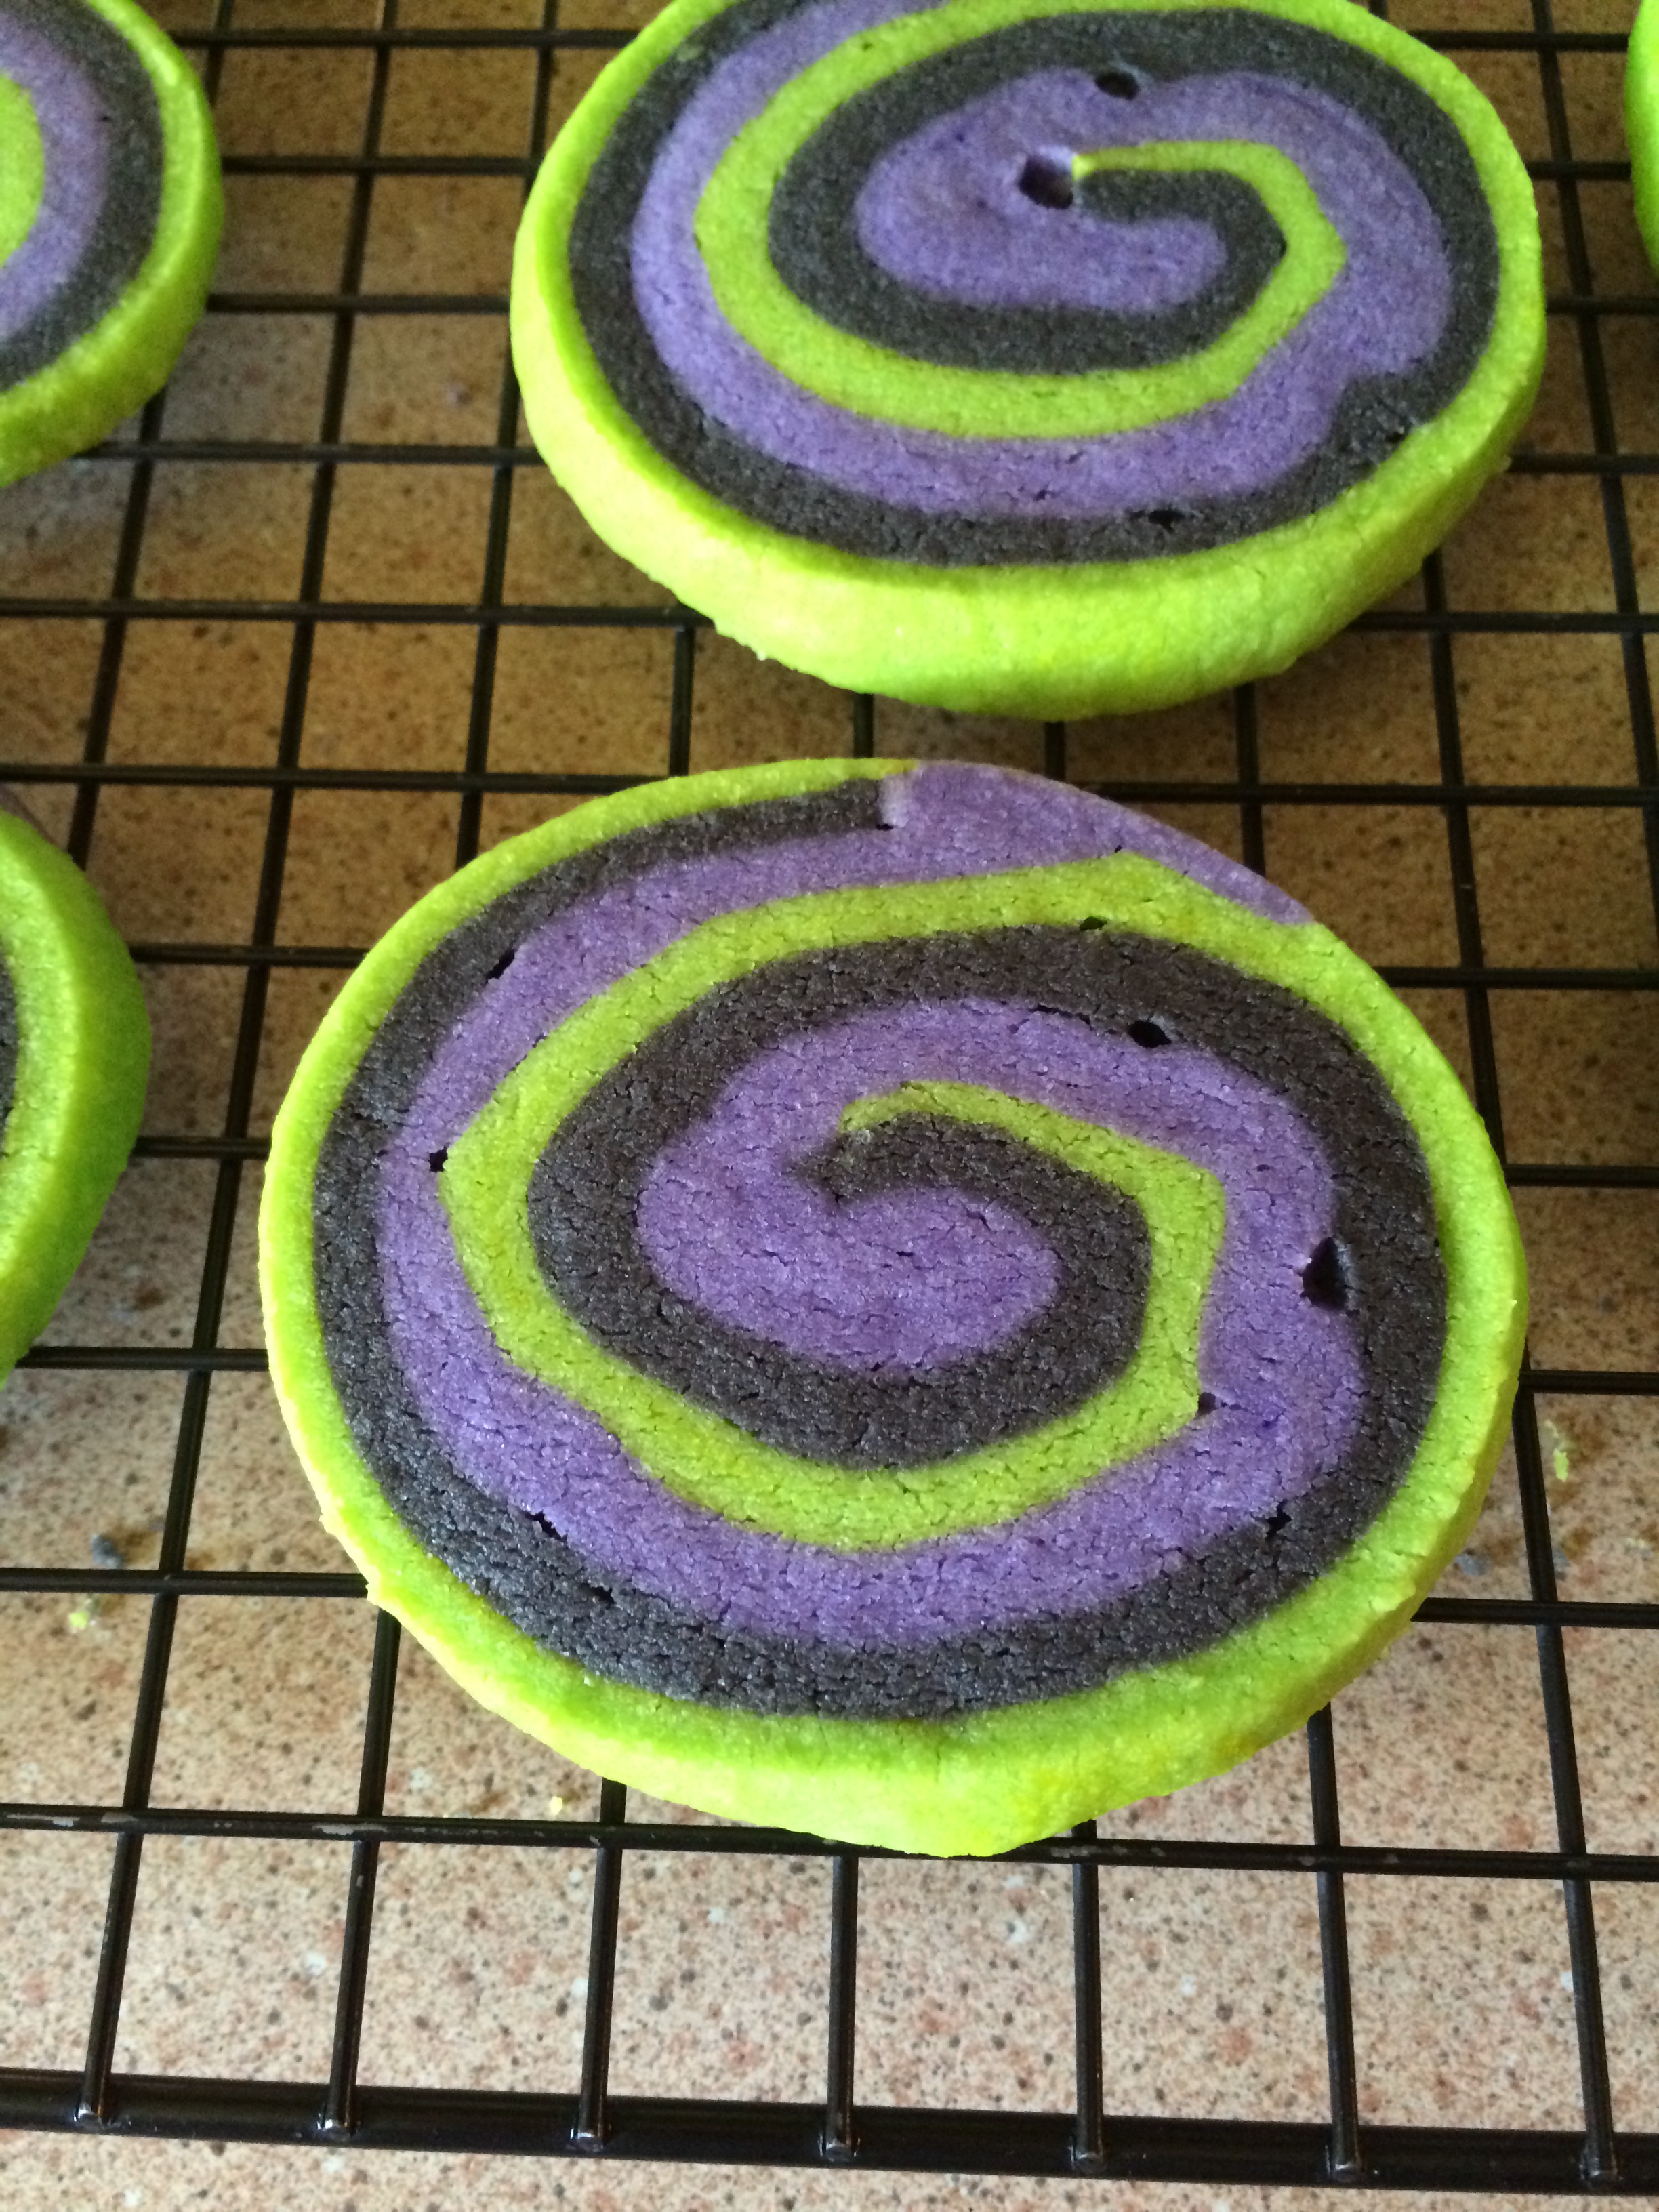
Slice-and-bake cookies, like these brown sugar pecan toffee rounds, must be chilled so you can actually slice them. The recipe below is adapted from one I found in a Better Homes & Gardens holiday cookie magazine, which called for ground almonds instead of pecans. As I only had pecans, I substituted them with great results.

Ingredients

  • 1/2 cup shortening
  • 1/2 cup butter, at room temperature
  • 1 1/4 cups packed light brown sugar
  • 1/2 teaspoon baking soda
  • 1/4 teaspoon salt
  • 1 egg
  • 1 teaspoon vanilla
  • 2 1/2 cups flour
  • 1 cup toffee pieces
  • 1 cup ground toasted pecans

Preparation

In a mixing bowl, beat shortening and butter until combined.

Add brown sugar, baking soda, and salt; beat until combined, scraping the sides of the bowl a few times.

Add egg and vanilla and beat until combined.

Beat in flour about 1/2 cup at a time, scraping the sides of the bowl well, then beat or stir in toffee pieces and ground toasted pecans. You may need to use your hands to fully incorporate the pieces into the dough.

Divide dough in half and shape each half into a 10-inch log. Wrap in plastic wrap and chill for about 5 hours, until the dough is firm enough to slice.

Preheat oven to 375 degrees. Line three baking sheets with parchment paper.

Cut logs into 1/4 inch slices and place about 1 inch apart on your baking sheets. Bake for 8-11 minutes, until edges are light brown and firm.

Cool on cookie sheets for about 3-4 minutes, then remove to wire racks to cool completely.

Store in an airtight container at room temperature.

Peppermint Meltaways

peppermintmeltawaysIt’s peppermint season! With just a few weeks to go until Christmas, peppermint-flavored treats are everywhere…including my kitchen.

Peppermint is my favorite plant in the mint family, and not just because it pairs very well with chocolate. Peppermint calms headaches, soothes sore throats, tames upset stomachs, and can lower anxiety associated with depression. A pretty powerful little plant, when you think about it.

These peppermint meltaways are adapted from Taste of Home, one of my favorite recipe sources. They’re lighter than expected, perhaps due to the cornstarch in the dough. Next time, I think I’ll swirl together white and red frosting for a candy cane look. This makes a relatively small batch of 2 dozen, but they’d be a nice addition to your Christmas cookie platter.

Ingredients

For the cookies

  • 1 1/4 cups flour
  • 1/2 cup cornstarch
  • 1 cup butter, at room temperature
  • 1/2 cup powdered sugar
  • 3/4 teaspoon peppermint extract

For the frosting

  • 2 tablespoons butter, at room temperature
  • About 2 1/2 tablespoons milk
  • 1/4 teaspoon peppermint extract
  • 1 1/2 cups powdered sugar
  • red food coloring, if desired

Preparation

In a small bowl, combine flour and cornstarch; set aside.

In a mixing bowl, beat butter for about 1 minute, then add powdered sugar and beat until light and fluffy.

Add peppermint extract and beat to combine.

Add flour/cornstarch mixture in three batches, beating well and scraping the sides of the bowl after each. Chill dough for about 20 minutes, until easy to handle.

Preheat oven to 350 degrees. Line two baking sheets with parchment paper.

Using a 1-inch cookie scoop, scoop dough and roll into balls. Place on cookie sheets about 2 inches apart.

Bake for 11-12 minutes, until bottoms are golden brown. Be careful when checking – these cookies are very soft and crumbly until they’re cool.

Remove from oven and cool on baking sheets for about 3 minutes, then remove to a wire rack to cool completely before frosting.

To make the frosting, beat butter for 1 minute, then add 2 tablespoons milk, peppermint extract, and 1/4 cup powdered sugar. Beat on medium speed until combined, then add remaining powdered sugar about 1/4 cup at a time, beating well. Check your consistency; you want a spreadable frosting that isn’t too thick or thin, like the consistency of peanut butter. If necessary, thin your frosting with the remaining milk. Add food coloring, if desired.

Frost cookies and store in a single layer in an airtight container at room temperature.


Pumpkin Bars with Browned Butter Frosting

pumpkin barsI refuse to skip right over Thanksgiving to Christmas, regardless of how much society pressures us all to do so. Now, before we have a Starbucks-cup-level riot about Christmas on this blog, let me be clear: I’m Catholic, and I love Christmas and the joyous preparations that go along with it. I’m just not ready to skip straight from carving a pumpkin to decking the halls.

Seriously, folks, why do we want to rush through the wonderful month of November? November has plenty to offer; the last of the season’s leaves hanging brilliantly on trees, warm afternoons and cold evenings, Election Day, Veterans Day, and the tradition of gratitude (and pie) on Thanksgiving. We skip right over this month, rushing toward “the holidays” without really taking a chance to enjoy that last bit of fall. And so, please consider these pumpkin bars, which are sort of like cake and come from my Better Homes & Garden Baking book, my rebellion against the steamrolling of pumpkin season by peppermint season. Live on, pumpkin season! For a few more weeks, at least.

Ingredients

Pumpkin Bars

  • 2 cups flour
  • 1 1/2 cups sugar
  • 2 teaspoons baking powder
  • 2 teaspoons cinnamon
  • 1 teaspoon baking soda
  • 1/2 teaspoon salt
  • 1/4 teaspoon cloves
  • 4 eggs, lightly beaten
  • 15 ounces pumpkin puree
  • 1 cup vegetable oil

Browned Butter Frosting

  • 1/3 cup butter
  • 3 cups powdered sugar
  • 2 1/2 tablespoons milk
  • 1 teaspoon vanilla extract

Preparation

Preheat oven to 350 degrees.

In a large bowl, whisk together flour, sugar, baking powder, cinnamon, baking soda, salt, and cloves until completely combined.

Add eggs, pumpkin puree, and vegetable oil, stirring well to completely combine, with no dry streaks or lumps remaining.

Pour batter into an ungreased 15 x 10 x 1 pan and spread evenly.

Bake for 25-30 minutes, until a cake tester comes out clean. Cool for 2 hours before frosting.

To make the frosting, melt butter in a small saucepan until light golden brown; this will take a few minutes, and you’ll want to swish the butter in the pan every so often, then use a whisk to get the browning bits off of the sides and bottom. Remove from heat.

In a mixing bowl, combine powdered sugar, 2 tablespoons milk, vanilla, and browned butter. Beat on medium speed for 1-2 minutes, then check your consistency; if necessary, add more milk, about 1/2 teaspoon at a time, to reach a spreadable consistency.

Pour frosting over pumpkin bars and spread using an offset spatula. Store in an airtight container in the refrigerator for 2-3 days.

Buckeye Cupcakes

buckeyecupcakesA while ago I made chocolate peanut butter cupcakes, which were inspired by the chocolate-covered peanut. They were delicious, but I always thought they needed more peanut butter filling and a few tweaks to meet my desired chocolate/peanut butter balance. After a bit of thinking, I came up with this: the buckeye cupcake.

These treats use a basic chocolate cupcake recipe from my Better Homes & Gardens baking book, then get hollowed out and stuffed with peanut butter filling and topped with a cocoa frosting. In the future, I might use a chocolate buttercream instead – while they are delicious, they’re still not exactly what I’m after. And this, friends, is the beauty of baking…you can keep adjusting your recipe until you get exactly what you want!

Ingredients

Chocolate Cupcakes

  • 3/4 cup butter
  • 3 eggs
  • 2 cups flour
  • 3/4 cup cocoa powder
  • 1 teaspoon baking soda
  • 3/4 teaspoon baking powder
  • 1/2 teaspoon salt
  • 2 cups sugar
  • 2 teaspoons vanilla
  • 1 1/2 cups milk

Peanut Butter Filling

  • 6 tablespoons butter, softened
  • 1 1/2 cups peanut butter
  • 2 1/2 cups powdered sugar
  • 1/4 teaspoon vanilla
  • About 6 tablespoons milk

Cocoa Frosting

  • 12 tablespoons butter, melted
  • 1 cup cocoa powder, sifted
  • About 6 1/2 cups powdered sugar
  • 1/3 cup plus 2 tablespoons milk
  • 3 teaspoons vanilla extract

Preparation

For the cupcakes, allow butter and eggs to sit at room temperature for 30 minutes.

Preheat oven to 350 degrees. Line two cupcake tins with paper liners; this recipe makes 3 dozen cupcakes, so you’ll need to re-use one tin for your last batch.

In a large bowl, combine flour, cocoa powder, baking soda, baking powder, and salt; set aside.

In a mixing bowl, beat butter on medium speed for 30 seconds. Add sugar, about 1/4 cup at a time, scraping the bowl often. Once all sugar is added, beat on medium speed for 2 minutes.

Add eggs, one at a time, beating well between each addition. Add vanilla extract and beat well.

Add flour mixture and milk alternatively in three batches, beating until just combine between each. Once all ingredients are incorporated, beat on medium speed for 20-30 seconds.

Fill cupcake wells half full and bake for 18-20 minutes, until a cake tester comes out clean. Cool in pans for 1 minute, then remove cupcakes from pans and cool completely on a wire rack before filling and frosting.

Make your filling: in a mixing bowl, beat peanut butter and butter together until smooth.

Add powdered sugar slowly, beating well after each addition.

Add vanilla, then add milk, 1 tablespoon at a time beating until well-combined.

Make your frosting: combine melted butter and cocoa powder, whisking very well until smooth. Place mixture in the bowl of a stand mixer fitted with the paddle attachment and beat on low speed for about 1 minute, then increase speed to medium and beat for 2 minutes more.

Add 1 cup powdered sugar and beat on low speed, then add about half of the milk, continuing to beat on low speed, until combined. Follow with another cup powdered sugar and remainder of milk, beating on low until combined. Add remaining powdered sugar, then vanilla, beating until frosting is creamy and spreadable.

To assemble your cupcakes: core each cupcake and reserve scraps for another use.

Using a one-inch cookie scoop, scoop peanut butter filling into each hole and gently press down with an offset spatula. You’ll have about 1/3 cup of filling left over that you can reserve for another use.

Using a one-inch cookie scoop, scoop drops of frosting onto each cupcake and spread with an offset spatula.

Store in an airtight container at room temperature.

M&M Blondies

M&MblondiesAs far as M&Ms go, I’m a peanut loyalist. The plain kind always just seemed too…well, plain…for me, but they do go very well in a variety of baked goods, though, including these blondies.

Blondies are a good option for bakers who want to feed a crowd, but also save time. Because they’re baked in one 9 x 13 pan, you can get at least three dozen squares (or four dozen, if you’re a bit more frugal with your cuts) in one swoop – which is very convenient for a party or a picnic. My recipe below uses about 3/4 of an 11.4 ounce package of fall-colored plain M&Ms, but you could use the whole package if you like. This would also be a great recipe for Reese’s Pieces, or a mix of candies.

Ingredients

  • 2 1/2 cups flour
  • 1/2 teaspoon salt
  • 1/2 teaspoon baking soda
  • 1 1/2 cups packed light brown sugar
  • 12 tablespoons butter, melted
  • 2 eggs
  • 1 1/2 tablespoons vanilla extract
  • 1 1/4 cups plain M&M candies

Preparation

Preheat oven to 350 degrees. Line a 9 x 13 pan completely with foil and lightly spray with baking spray.

In a large bowl, combine flour, salt, baking soda, and brown sugar; mix well to combine.

Add melted butter and stir to incorporate slightly; add eggs and vanilla extract and stir well to fully combine. The dough will be fairly dry, so you’ll want to use your hands to fully incorporate your ingredients.

Add 1 cup of the M&Ms and mix with your hands to combine well.

Press dough into the prepared pan, then sprinkle the top with the remaining 1/4 cup of candies and press them into the dough.

Bake for 23-25 minutes, until a cake tester inserted in the center comes out clean.

Cool in pan for about 10 minutes, then lift out by the foil and place on a wire rack; peel foil back slightly and allow to cool completely.

Once cool, remove foil entirely and cut into bars. Store in an airtight container.

Pumpkin Patch Cupcakes

pumpkinpatchcupcakesMy friend Erika’s daughter is turning 7 this weekend, and I had the privilege of baking for her party. Erika requested a friendly, happy version of Halloween treats – nothing scary – and these pumpkin patch cupcakes fit the bill.

As a gal with a very low tolerance for scary things, I understand the desire to have a friendly, happy Halloween. I can handle creepy things, but once we get into scary territory, all bets are off. I hope that these friendly pumpkins are a big hit at the party, along with the brownies, M&M blondies, and chocolate sugar cookies I made – stay tuned for those recipes shortly!

Happy Birthday, AJ! You’ve got an awesome mom!

Ingredients

  • 1 1/4 cups cake flour
  • 1 1/4 teaspoons baking powder
  • 1/2 teaspoon baking soda
  • 1/2 teaspoon salt
  • 2 eggs
  • 3/4 cup sugar
  • 2 tablespoons vanilla extract
  • 1/2 cup canola oil
  • 1/2 cup buttermilk
  • 1 recipe vanilla buttercream
  • orange gel food coloring
  • leaf green gel food coloring
  • 4 miniature Tootsie Rolls

Preparation

Preheat oven to 350 degrees. Line cupcake tins with paper liners; this recipe yields 15 cupcakes.

In a medium bowl, whisk together cake flour, baking powder, baking soda, and salt; set aside.

Place eggs in the bowl of a stand mixer fitted with the whisk attachment and beat on medium speed for 30 seconds. Add sugar and continue to beat for another 30 seconds.

Add vanilla and canola oil and beat on medium speed for 1 minute.

Add flour mixture and buttermilk alternatively in three batches, beginning and ending with the flour, scraping the sides of the bowl frequently. Batter will be very thin.

Using a quarter-cup measuring cup, scoop batter into prepared cupcake liners, filling half full.

Bake for 12-13 minutes, until a cake tester comes out clean. Cool on a wire rack before frosting.

To decorate:

Cut Tootsie Rolls in half lengthwise, then cut each half in half lengthwise again. Knead each piece to soften it a bit, then mold it into a stem shape; set aside.

Prepare vanilla buttercream. Remove about 1/4 cup and tint green; tint remaining frosting orange.

Using a 1-inch cookie scoop, drop scoops of orange frosting onto cupcakes, then frost with a small offset spatula.

Fit a piping bag with a leaf tip; place 1 stem into the top of each cupcake, then pipe leaves around the stem.

Store in an airtight container at room temperature; Tootsie Roll stems will soften because of the moisture in the cupcakes, so it’s best to prepare these within a few hours of serving.

Vampire Bite Sandwich Cookies

vampiresandwichesSometimes you find a recipe that goes totally awry. Such was my experience today with a recipe for vampire bite cookies, a sugar cookie stuffed with raspberry jam. Let’s just say we’ll be going back to the drawing board on those, but in the meantime, I turned what could have been a disaster into something quite tasty.

Instead of wasting my dough – because I don’t ever toss dough or batter unless has gone terribly wrong and cannot be fixed – I decided to bake the cookies, then use a dark red-tinted raspberry buttercream filling for little sandwiches. Fair warning: when taking a bite, the filling will absolutely ooze out on all sides, but that sort of adds to the Halloween-themed fun, no?

Ingredients

For the cookies

  • 1 1/2 cups flour
  • 1/4 teaspoon salt
  • 12 tablespoons unsalted butter, softened
  • 1/2 cup sugar
  • 1 egg
  • 1 teaspoon vanilla extract
  • 1/4 teaspoon almond extract

For the blood red buttercream

  • 4 tablespoons unsalted butter, softened
  • 3 heaping tablespoons seedless raspberry jam
  • 1 1/2 cups powdered sugar
  • Red gel food coloring

Preparation

In a small bowl, combine flour and salt; set aside.

In a mixing bowl, cream together butter and sugar until light and fluffy. Add egg and extracts, beating well to combine.

Add flour mixture in two batches, beating well after each.

Divide dough in two portions; wrap in plastic and refrigerate for at least 1 hour.

Preheat oven to 325 degrees. Line three baking sheets with parchment paper.

On a lightly floured surface, roll out dough to 1/8-inch thickness. Using a 2-inch round cutter, cut dough into circles and place about 1 inch apart on prepared sheets.

Bake for 10-11 minutes, until edges are set. Remove from oven and cool on baking sheets for a few minutes, then remove to a wire rack to cool completely before filling.

To make blood red buttercream, in a mixing bowl, beat butter and raspberry jam on medium speed for 2-3 minutes. Mixture will look lumpy; that’s okay. Add powdered sugar and beat until completely combined, scraping the sides of the bowl several times. Add food coloring and beat until fully combined.

Flip cookies over and top half with a generous dollop of filling (about 1/2 tablespoon or so). Top with remaining cookies to make sandwiches. Store in an airtight container at room temperature.


Softened Butter

softenedbutterMany recipes call for softened, or room temperature, butter. The easiest way to bring butter to room temperature is to let it sit at room temperature for about a half-hour to an hour, but I usually quick-soften my butter by cutting it into cubes, then letting it sit out for about 15-30 minutes.

Softened butter should look like the photo here – you should be able to indent it with your finger, but not press all the way through. Think of the consistency of ice cream, rather than the consistency of whipped cream, when judging whether your butter is soft enough, but not too soft.

In many cases, butter must be softened so that it can blend more easily with certain ingredients, like sugar, for example. In other cases, your butter will need to remain cold – like if you’re working with pastry dough – so be sure to check your recipe before you start. If you’re incredibly short of time, cut your butter into very small cubes, then place it in your mixing bowl. Beat it on high speed for about 3-4 minutes, scraping the bowl every minute or so, to soften it.

Chocolate Orange Cookies

chocolateorangecookiesSometimes I wonder who first looked at a piece of citrus fruit and thought, “hmm, I’m going to scrape off the outer layer of that skin and bake with it.” Regardless, it was a great idea.

Proper zesting of oranges, lemons, and limes can best be achieved by using a microplane grater, like this one. When zesting, wash your fruit, dry it with a paper towel, and stick to the colored outer layer of your rind, leaving the white pith alone. I usually zest my fruit first, then slice it and juice it; you can always reserve the juice for another time.

This recipe is adapted from Boys Ahoy.

Ingredients

  • 1 1/2 cups flour
  • 1/3 cup cocoa powder
  • 1/2 teaspoon salt
  • 1/2 teaspoon baking soda
  • 1/2 teaspoon baking powder
  • Zest of one large orange
  • 10 2/3 tablespoons butter, softened
  • 1 1/3 cup granulated sugar (reserve 1/3 cup for rolling)
  • 1 egg
  • 1 teaspoon vanilla
  • 1 1/2 tablespoons freshly squeezed orange juice

Preparation

Preheat oven to 350 degrees. Line several baking sheets with parchment paper.

In a medium bowl, combine flour, cocoa powder, salt, baking soda, and baking powder.

In a small bowl, combine 1/3 cup sugar with 1 teaspoon orange zest and mix together very well.

In a mixing bowl, beat butter, sugar, and remaining orange zest until light and fluffy, about 2-3 minutes.

Add egg, vanilla, and 1 tablespoon orange juice and beat until combined.

Add flour mixture in two batches, beating well and scraping the sides of the bowl a few times. Add remaining 1/2 tablespoon orange juice and beat until fully combined.

Using a 1-inch cookie scoop, scoop generous portions of dough and roll into balls. Dip in sugar/zest mixture, coating well.

Place on prepared baking sheets about 2 inches apart and flatten with the bottom of a glass to about 1/2 inch thickness.

Bake for 10-11 minutes, until edges are set but centers are still just slightly puffy.

Remove from oven and allow to cool on the baking sheet for about 5 minutes, then remove to wire racks to cool completely.

Witch Brew Cookies

witchbrewcookies

With just a few weeks to go until Halloween, these fun witch brew cookies are on their way to my goddaughter Mo and her little sister Margo, whose birthday also happens to fall on Halloween. Does this cookie look like something from a witch’s cauldron? I certainly hope so.

A word about spiral cookies: it’s very important to press your layers together firmly as you roll your dough log to avoid the small gaps you can see in the cookie here. This dough is very soft when rolled out, so waxed paper helps in handling a great deal. I found the original recipe for these over at Lady Behind the Curtain and chose not to roll the dough log in sprinkles before I sliced them, but that would definitely add an extra spooky kick (and some nice crunch) to these treats.

Ingredients

  • 2 cups plus 6 tablespoons all purpose flour, divided
  • 1/2 teaspoon baking powder
  • 1/4 teaspoon salt
  • 2/3 cup powdered sugar
  • 1/4 cup sugar
  • 1 1/4 cups butter, cut into cubes and softened
  • 1 1/2 teaspoons vanilla extract
  • Leaf green, lemon yellow, violet, and black gel food coloring

Preparation

In a mixing bowl, combine 2 cups flour with the baking powder, salt, powdered sugar, and sugar. Mix to combine.

Add butter a few cubes at a time, mixing until the texture has the consistency of sand.

Add the vanilla and mix just until a ball forms.

Divide dough into thirds; dough will be very soft.

Add food coloring and 2 tablespoons of flour to each ball, kneading with your hands to combine until you have even coloring. For the electric green color, use leaf green and lemon yellow.

Begin with the green ball; tape a sheet of waxed paper to your counter top and roll the dough ball between it and another sheet of waxed paper. Set aside; repeat this process with the black and violet layers.

Place the green layer, still on its waxed paper, on your counter top and remove the top sheet of waxed paper. Carefully remove the black and violet layers from their waxed paper and place them on top of the green layer.

Roll your layers into a log, pressing firmly as you go and using the bottom layer of waxed paper to help with rolling.

Wrap the log tightly and refrigerate for 2 hours.

Preheat oven to 325 degrees. Line 2 baking sheets with foil or parchment.

Remove dough log from the refrigerator and slice into 1/4 inch cookies.

Bake for 15-17 minutes, until cookies are no longer shiny on top.

Remove from oven and allow to cool for a few minutes on cookie sheets, then remove to a wire rack to cool completely.