Seven Layer Bars

sevenlayerbarsTo say that I’m a picky eater is beyond an understatement. I have both flavor and texture issues, and one might imagine that a seven layer bar would send me running for the hills. On the contrary, I think that the seven layers of unbelievable goodness contained in these bars – oatmeal (rather than graham cracker crust), shredded coconut, semisweet chocolate chips, milk chocolate chips, butterscotch chips, sweetened condensed milk, and chopped walnuts – form a divine flavor and texture profile.

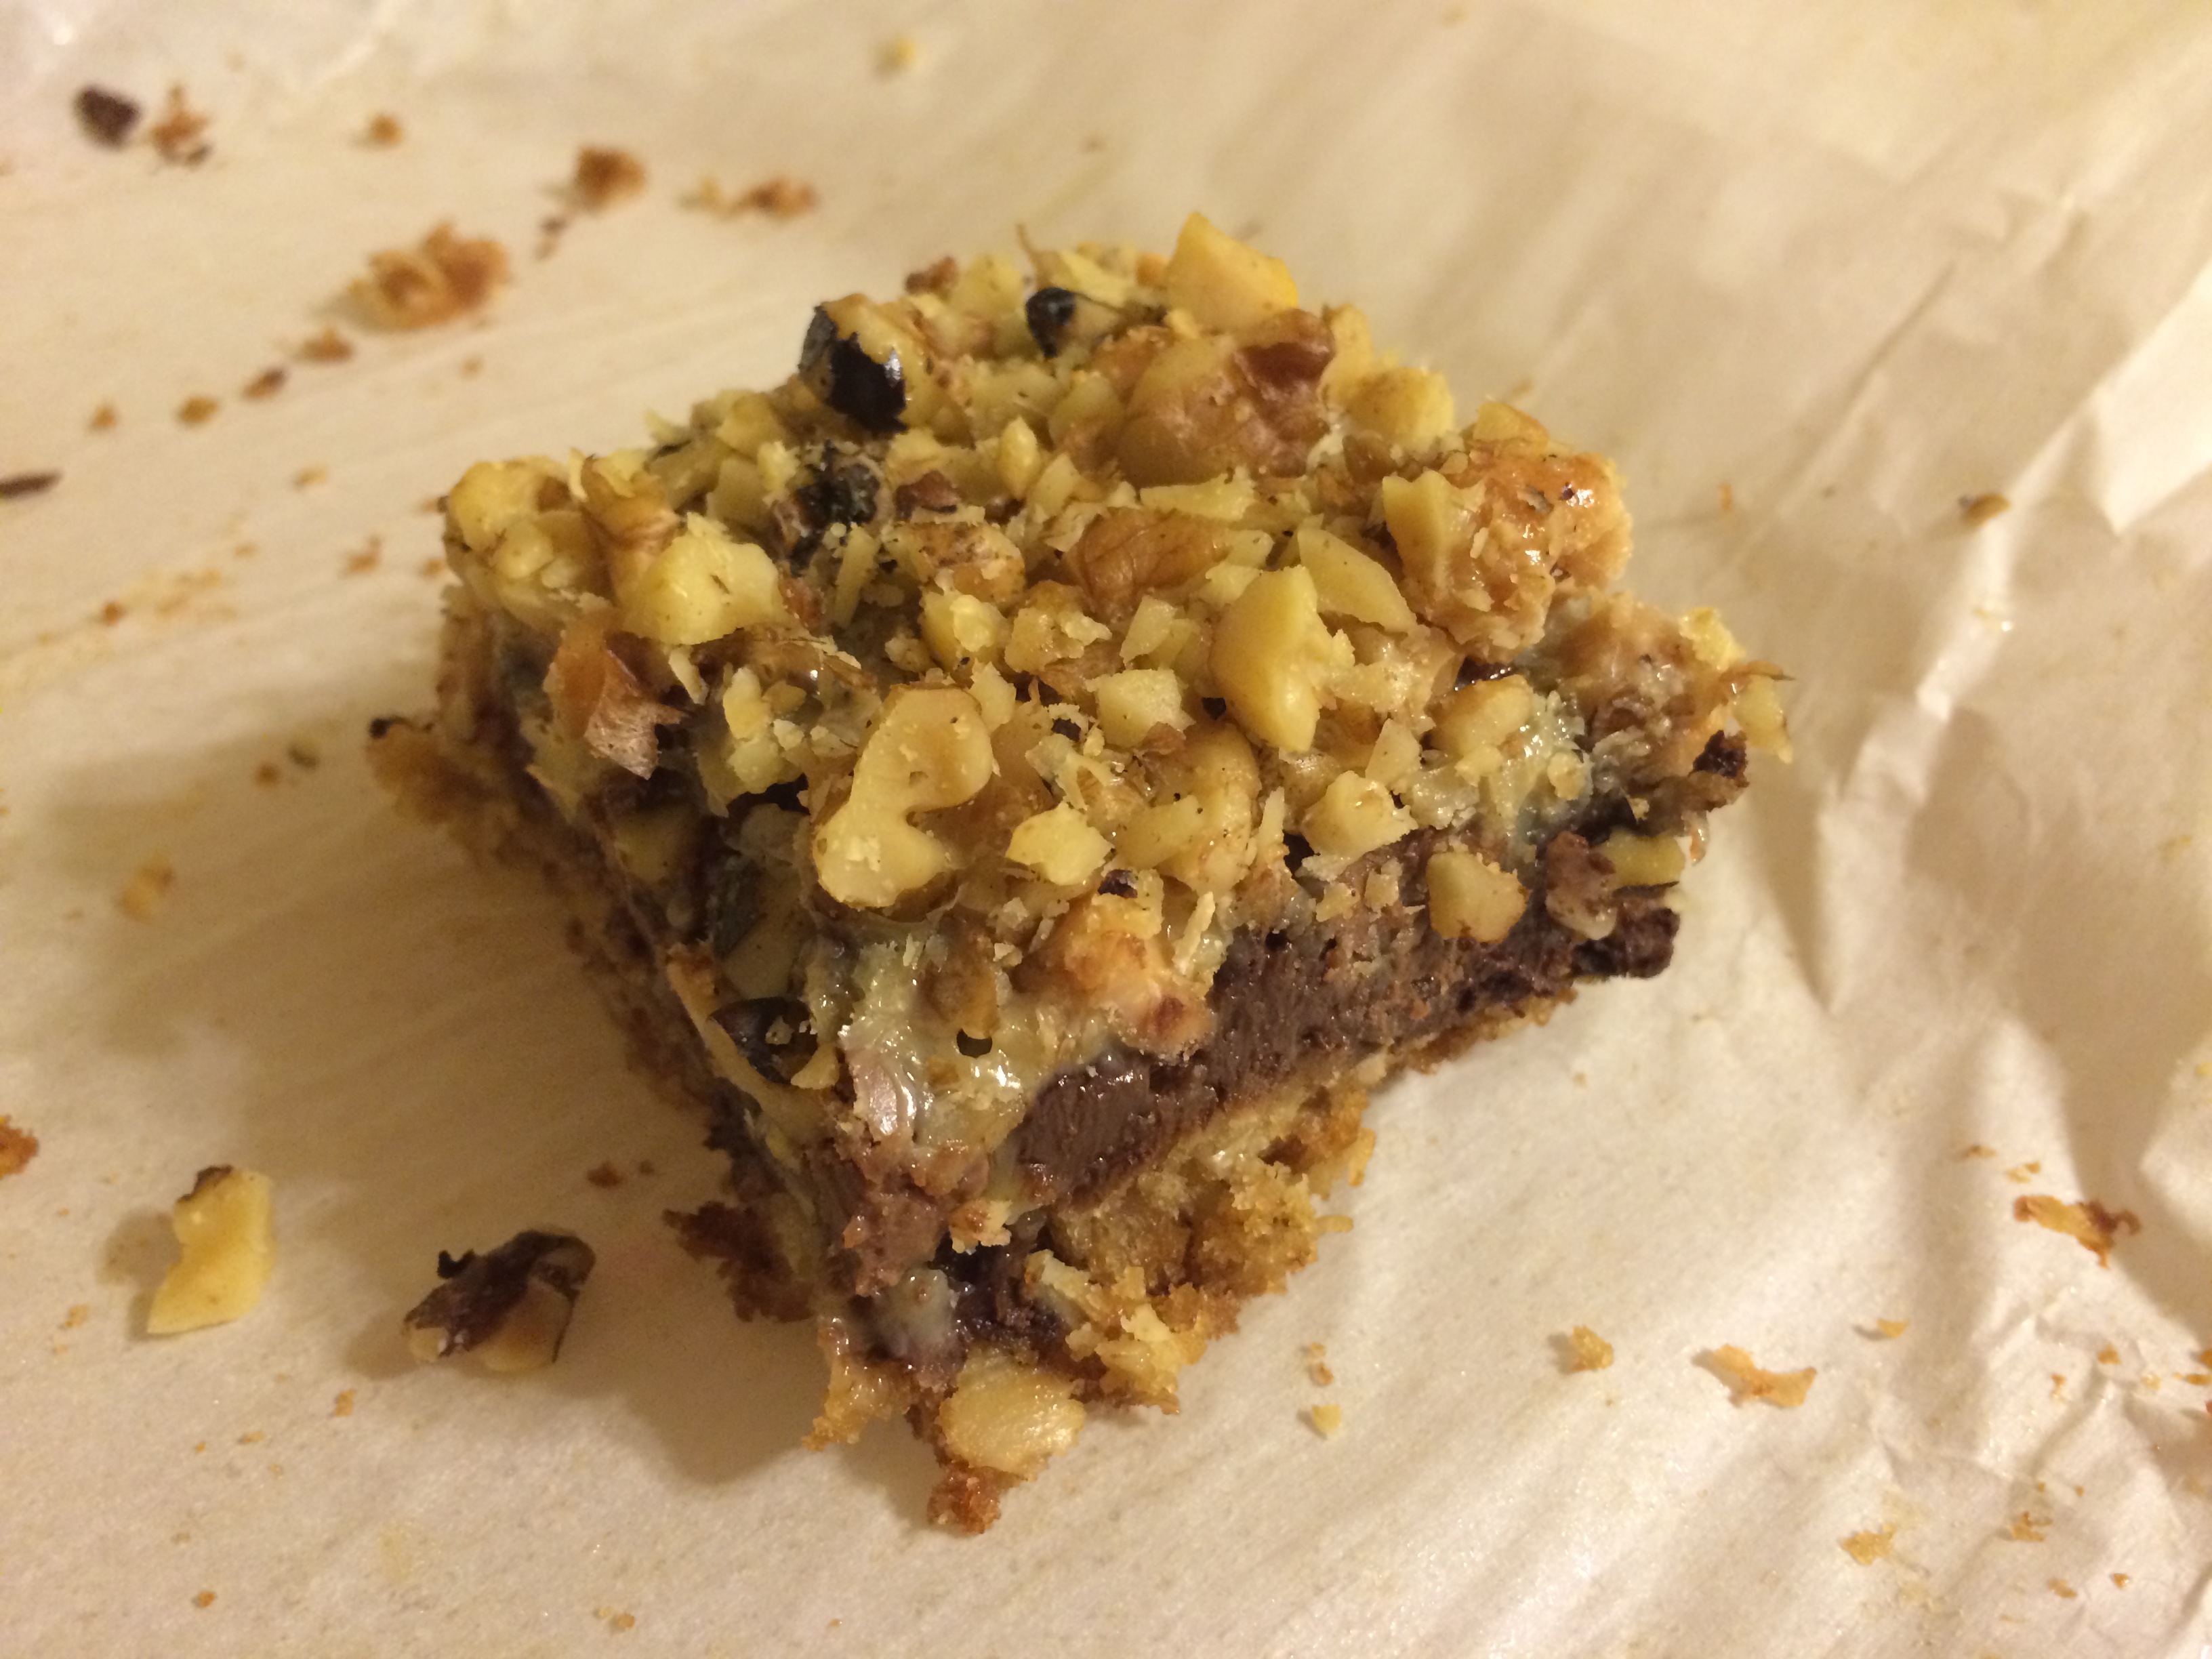
The recipe below is adapted from Half Baked Harvest, and as you can imagine from the list of ingredients, beyond rich. At first I cut them into two-by-two squares, but after I took a bite, I cut each bar into quarters for bite-sized pieces. If you’re serving these at a party, I’d recommend placing each bite into a miniature cupcake liner for easy handling; in addition to being rich, they’re also quite sticky, but completely worth it!

Ingredients

For the oatmeal crust

  • 1 1/4 cups rolled oats
  • 1 cup flour
  • 1/4 cup sugar
  • 1/4 cup packed light brown sugar
  • 1/2 teaspoon baking soda
  • 1/2 teaspoon salt
  • 1/2 cup vegetable oil
  • 1 egg
  • 2 teaspoons vanilla extract
  • 1/2 cup semisweet chocolate chips

For the layers

  • 1 1/3 cups shredded coconut
  • 1/2 cup semisweet chocolate chips
  • 1/2 cup milk chocolate chips
  • 1 cup butterscotch chips
  • 1 14-ounce can sweetened condensed milk
  • 1 cup chopped walnuts

Preparation

Preheat oven to 350 degrees. Line a 9 x 13 Pyrex dish with parchment paper.

In a large bowl, combine oats, flour, brown sugar, sugar, baking soda, and salt, mixing until combined.

Add vegetable oil, egg, and vanilla and mix until dough is completely combined. Stir in chocolate chips.

Press dough into the bottom of the baking dish, making sure that chocolate chips are distributed evenly throughout the dough.

Bake for 5 minutes, then remove from the oven. Sprinkle with shredded coconut, semisweet chocolate chips, milk chocolate chips, and butterscotch chips. Pour sweetened condensed milk evenly over the top, then sprinkle with chopped walnuts.

Bake for 25-28 minutes, until top is golden brown. Remove from oven and cool completely before cutting into bites.

Recipe Basics

spice cupcakesRecipes are the foundation of baking; follow them, and most of the time, you’ll have success. Below are some tips to keep in mind when facing even the most complicated recipes.

Read your recipe.

Before you begin, read your recipe. Read it a few times, in fact. Make sure you have all of the ingredients and equipment you need, and that you have enough time in your day or evening to make what you intend to make.

Fresh ingredients are the best, but you don’t have to buy the most expensive ones. I bake with store-brand flour, sugar, eggs, and butter, McCormick extracts, and a few higher-end spices from Penzey’s or King Arthur Flour. While some bakers believe the highest-grade flours make better treats, I’ve never had any complaints about the cookies, cakes, and pies I’ve created from the store-brand.

And yes, you can substitute…sometimes. Some ingredients can be swapped out for others, but not all are interchangeable. Check out my substitutions page for more info.

Then, follow it.

Much like your chemistry experiments from high school, it takes the right ratios of the right kinds of ingredients to yield certain results. For the best outcomes:

  • Be sure you’re using ingredients at the right temperature. For example, if you need to soften butter or keep it cold, do so. There’s a reason for it, likely relating to texture, and you’ll get the best results if you follow your recipe.
  • Use the right type of measuring cup for the ingredient. Dry and liquid measures are not interchangeable, so if you’re measuring flour, use a dry measuring cup, and if you’re measuring milk, use a liquid measuring cup.
  • When adding wet ingredients – like when adding milk to buttercream frosting – do so in small increments. You can always add more, but you can’t take liquid back out.
  • If your batter or dough seems too runny, you might have to add a bit more flour to stabilize it. This can happen for many reasons; maybe your large eggs were a bit larger than the recipe author’s. If you’re adding more flour, do so slowly, one tablespoon at a time. As with liquid, you can always add more, but you can’t take it back out.

But, don’t be afraid to be creative. 

If your suspect your recipe could use more vanilla, or a different kind of extract, or chopped nuts, go for it. If you think your scones could use a drizzle of powdered sugar glaze, by all means, drizzle away. Disasters rarely result from this manner of creativity, and you never know – you might just invent a new favorite.


Stocking Your Pantry

cocoaI don’t have an actual pantry, but my dream kitchen would have one the size of my current kitchen. I can see it now: shelf upon shelf of jars, containers, bags of chocolate chips, cans of pumpkin, bottles of molasses…well, maybe someday.

In the meantime, I’ve commandeered one cabinet for nearly all of my baking stuff, though I do keep my spices in a separate place. I tend to have everything on the following lists in my pantry cabinet and spice cabinet at any given time.

Pantry Items 

Basics

  • White flour
  • White sugar
  • Light brown sugar
  • Baking soda
  • Baking powder
  • Cream of tartar
  • Cocoa powder
  • Unsweetened baking chocolate
  • Semi-sweet chocolate chips
  • Milk chocolate chips
  • Walnuts
  • Old-fashioned oats
  • Molasses
  • Light corn syrup

What I also usually have

  • Active dry yeast
  • Wheat flour
  • Cake flour
  • Dark brown sugar
  • Bittersweet chocolate chips
  • Toffee pieces
  • Pecans
  • Blanched almonds
  • Canned pumpkin
  • Maple syrup

Spices & Extracts

Basics

  • Vanilla extract
  • Almond extract
  • Cinnamon
  • Ginger
  • Nutmeg
  • Cloves

What I also usually have

  • Vanilla beans
  • Maple flavoring
  • Lemon extract
  • Orange extract
  • Peppermint extract
  • Allspice
  • Mace

Bakeware + Tools

chocolate chip sconesMost people think my kitchen is enormous because I bake all the time, but I promise, it’s very average. On the small side, even. I’ve gotten pretty creative with my storage solutions, because I do have an array of baking pans, prep bowls, and baking tools.

No matter what fancy shops and catalogs will tell you, you really only need a handful of tools for successful baking. In addition to a stand mixer (more on my mixer coming soon!), I recommend the following as a place to start – you can always add in other pans and tools as you go along, and of course you can choose other tools that suit what you bake more often to help you along the way. For example, I do a lot of cookie baking, so I have a few different sizes of cookie scoops.

Bakeware

  • 9 x 13 pan
  • Two 9-inch round pans
  • 10-inch fluted (or Bundt) pan
  • 8-inch (or 9-inch) loaf pan
  • 9-inch pie dish
  • Cookie sheets (I prefer ones without sides)
  • Cooling racks

Baking Tools

  • Dry measuring cups
  • Liquid measuring cups
  • Measuring spoons
  • Rubber spatulas
  • Turner spatula (like a pancake turner)
  • Offset spatula (for frosting cakes)
  • Rolling pin
  • Whisk
  • Cookie scoops
  • Fine-mesh sieve
  • Chef’s knife
  • Pastry bag, coupler, and piping tips
  • Pastry blender
  • Cookie cutters

Fun & Useful Things to Have

  • Microplane grater, for zesting
  • Citrus reamer, for juicing
  • Melon baller, for coring cupcakes
  • Food scale
  • Food processor

Chocolate Raspberry Thumbprints

chocolateraspberrythumbprintLaura, my cube wall-mate, accepted a new job in our company and is moving to a new office. In case you’re not familiar with the cube wall-mate (CWM), this is the person who sits on the other side of the wall that separates one section of office cubes from another, who you can hear but not see, as opposed to your cube mates, who are in the same cube row as you. Laura has been an awesome CWM; she’s very good at selective eavesdropping, always willing to say “hey, I wasn’t trying to listen in but I couldn’t help hearing and you actually need to talk to so-and-so about that,” has a top-notch sense of humor, and shares my fondness of kooky sayings like “those cookies are the bee’s knees.”

Laura and I have talked extensively about baking – she makes a mean chocolate pots de creme – and she requested a chocolate raspberry combo as her celebratory farewell cookies. And so, we have these chocolate raspberry thumbprints. The original recipe from Good Housekeeping neglected one very important note in preparation…you have to melt your 2 ounces of baking chocolate before you incorporate it into the dough. Which makes me wonder…how many people tried to make this recipe without melting their chocolate?

Farewell, Laura! We shall meet again on social media and in outside-work-life!

Ingredients

  • 2 3/4 cups flour
  • 1/4 teaspoon baking soda
  • 1/4 teaspoon salt
  • 1 cup butter, slightly softened
  • 3/4 cup sugar
  • 1 egg
  • 1 teaspoon vanilla extract
  • 2 ounces unsweetened baking chocolate, melted and slightly cooled
  • 1/4 cup cocoa powder
  • About 1/2 cup seedless raspberry jam

Preparation

Preheat oven to 350 degrees. Line three baking sheets with parchment paper.

In a large bowl, combine flour, baking soda, and salt; set aside.

In a mixing bowl, beat butter on medium speed for 1 minute. Scrape down the sides of the bowl and add sugar; beat until well-combined and fluffy, about 2-3 minutes. Add egg, vanilla, chocolate, and cocoa powder mixing well, scraping the sides of the bowl a few times.

Slowly add flour mixture, beating until fully incorporated.

Using a 1-inch cookie scoop, scoop dough and roll into balls. Place about 2 inches apart on baking sheets.

Using your 1/4 teaspoon measuring spoon, press a thumbprint well into the center of each cookie. Fill with 1/4 teaspoon raspberry jam.

Bake for 14 minutes, until jam is bubbly at the edges. Remove from oven and cool for 1-2 minutes on the baking sheets, then remove to a wire rack to cool completely.

Store in an airtight container at room temperature; if stacking, place waxed paper between the layers.

Pumpkin Bundt Cake

pumpkinbundtIt’s October, the time of Pumpkin Spice Everything. Lattes, cheesecakes, scones, breads, raviolis, even Pop Tarts – you name it, at this time of year, you can find it in the pumpkin or pumpkin spice variety.

Canned pumpkin is a staple in my pantry, stocked year-round for a range of recipes. I buy pumpkin puree – not pie filling – in the large, 29-ounce cans, which leaves plenty for multiple recipes at one time. Earlier this week, I used 15 ounces in some pumpkin chocolate chip bread, so I had 14 ounces – about 1 3/4 cups – left over.

Once open, canned pumpkin will last in the fridge for about 5-7 days, so it’s best to use it up soon. If you’re looking for good ideas, you need 1 cup for pumpkin streusel muffins or pumpkin cupcakes, and can use the remaining 3/4 cup for pumpkin biscotti. You can also use 1 1/2 cups for pumpkin donuts and just mix the remainder into some pancake batter or a smoothie. I wanted to use the rest of my pumpkin up all at once, and I found this pumpkin Bundt recipe at Taste of Home; it originally called for 15 ounces of pumpkin, but my 14 ounces did just fine. Topping-wise, you could dust this with powdered sugar or just leave it plain, but I thought the combination of glaze and spice drizzle gave it a nice extra touch.

Ingredients

For the cake

  • 3 cups flour
  • 2 teaspoons baking soda
  • 1 teaspoon cinnamon
  • 1 teaspoon nutmeg
  • 1/4 teaspoon cloves
  • 1/2 teaspoon salt
  • 2 1/2 cups sugar
  • 1 cup vegetable oil
  • 3 eggs
  • 14 ounces pumpkin puree

For the glaze

  • 1 1/2 cups powdered sugar
  • About 2 1/2 tablespoons milk

For the spice drizzle

  • 1 1/2 cups powdered sugar
  • 1/4 teaspoon cinnamon
  • 1/4 teaspoon cloves
  • 3-4 teaspoons milk

Preparation

Preheat oven to 350 degrees. Generously grease a 10-inch Bundt pan.

In a medium bowl, combine flour, baking soda, cinnamon, nutmeg, cloves, and salt; set aside.

In a large mixing bowl, stir together sugar and oil until very well-combined. Add eggs, 1 at a time, mixing very well after each.

Stir in flour mixture and pumpkin alternatively, stirring until well-combined and smooth. Spoon or pour into prepared pan.

Bake for about 45 minutes, then check with a cake tester or toothpick; continue baking for a few minutes at a time, checking frequently, until the cake tester comes out clean. The original recipe called for 60 minutes of baking time, but my cake baked for about 50 minutes.

Remove from oven and cool cake in pan for 10 minutes. Flip out onto a wire rack to cool completely before glazing and drizzling.

To make the glaze, in a small bowl, combine powdered sugar and 1 teaspoon milk. Continue adding additional milk until the glaze reaches a pourable consistency, then pour or drizzle over cake, allowing to drip down the sides. Allow glaze to set for just a few minutes before adding the spice drizzle.

To make the spice drizzle, combine powdered sugar, cinnamon, nutmeg, and cloves in a small bowl. Add milk 1 teaspoon at a time until the drizzle reaches a drizzly consistency, like thick honey. Spoon into a piping bag and pipe over the glaze, allowing drizzle to drip down the sides (or just drizzle with a spoon). Allow drizzle to set before serving.

Store at room temperature.

pumpkinbundt2Here’s an overhead view of the cake  – pretty, eh?

Banana Loaf Cake

bananabreadiiWhat makes this a loaf cake, and not a quick bread? Butter, mostly, and the creaming method of incorporating sugar into the butter. While this recipe was originally billed as banana bread, I’m calling it a loaf cake because of its ingredients and its process.

Most quick breads use vegetable oil as their fat, and a process of mixing the dry ingredients in one bowl, the wet ingredients in another, and then combining them all at once and mixing until they’re just combined. This recipe calls for creaming the butter and sugar – mixing the sugar into the butter until the mixture becomes light and fluffy – and then adding the remaining wet ingredients of eggs and sour cream, followed by the dry ingredients, like you would mix cake batter.

Whatever you call it, this banana loaf cake – which actually makes two 8 x 4 loaves – is a good way to use up overripe bananas. The streusel topping is optional, and of course you could mix in some walnuts or pecans if you prefer. Next time, I might make a chocolate drizzle icing instead of the streusel topping.

Ingredients

For the cake

  • 2 1/4 cups flour
  • 1 1/2 teaspoons baking powder
  • 1/2 teaspoon baking soda
  • 1/2 teaspoon cinnamon
  • 1/2 teaspoon salt
  • 4 tablespoons butter, softened
  • 1 cup sugar
  • 2 eggs
  • 1 cup sour cream
  • 3 very ripe medium bananas, mashed

For the streusel topping

  • 6 tablespoons flour
  • 6 tablespoons packed light brown sugar
  • 1/4 teaspoon cinnamon
  • 4 tablespoons butter, cold, cut into cubes

Preparation

Preheat oven to 350 degrees. Spray two 8 x 4 loaf pans with cooking spray.

Combine flour, baking powder, baking soda, cinnamon, and salt in a medium bowl; set aside.

In a mixer, combine butter and sugar; cream together on medium speed until light and fluffy, about 2-3 minutes.

Add eggs and sour cream and mix well, then add mashed bananas and mix well.

Add flour mixture and beat until combined.

Divide batter evenly between loaf pans.

Make the streusel: in a medium bowl, combine flour, brown sugar, and cinnamon; cut in butter until the mixture looks like coarse crumbs.

Sprinkle streusel over each loaf; you’ll have enough for both, with just a bit left over.

Bake for 40-45 minutes, until a cake tester comes out clean. Cool completely or serve warm.

Pastry Cream II

triplevanillacupcakesAs I mentioned in my last post, there are lots of recipes for pastry cream out there. I made this one as a backup, in case this recipe for pastry cream didn’t work out. Fortunately, they both turned out very well, and this one went into the triple vanilla cupcakes you see at left.

Again, timing is very important with pastry cream, and you’ll be surprised how quickly that foamy mixture thickens, becomes glossy, and teeters on the brink of being overdone. Go with your gut – if you think it’s done, it probably is, so stop stirring for just a second and see if there are large bubbles bursting on the surface – if so, it’s done!

Pastry Cream II

Ingredients

  • 1 1/2 cups heavy cream
  • 1/2 cup sugar
  • 1/4 cup flour
  • 1/4 teaspoon salt
  • 4 egg yolks
  • 1 teaspoon vanilla extract

Preparation

Place a heatproof bowl and fine mesh sieve next to your stove.

In a medium saucepan, heat milk over medium heat until warmed and wisps of steam appear; do not allow to simmer or boil.

In a 4-cup glass measuring cup, combine sugar, flour, and salt. Add egg yolks and mix well; mixture will form a thick paste, and it can be crumbly or smooth – the most important thing is for your ingredients to be well-mixed.

Slowly pour heavy cream into egg mixture, whisking constantly, then return the mixture to the pan and cook over medium heat for 1-2 minutes; mixture will look foamy at first, then will become thick and glossy. Once the mixture becomes thick and glossy, remove it from the heat and whisk in vanilla extract.

Pour the pastry cream through the sieve; you’ll need to stir and press firmly to get it to pass through. Press plastic wrap on the surface and allow to set up overnight.

Pastry Cream I

bostoncreamcupcakesPastry Cream I

Another food blogger referred to pastry cream as “the most delicious pudding you’ll ever eat.” This is quite true, I think.

There are many recipes for pastry cream, and I used this one for the Boston cream cupcakes featured in this photo. It’s very important to pay close attention while making pastry cream, because you can go from done to overdone in a matter of seconds. I find it helpful to set out all of my ingredients beforehand to avoid any delays; you’ll be very grateful that your vanilla extract is already measured out and waiting in a small prep bowl when it comes time to stir it into your pastry cream mixture, believe me.

Ingredients

  • 1 1/3 cups heavy cream
  • 3 egg yolks
  • 1/3 cup sugar
  • Pinch of salt
  • 4 teaspoons cornstarch
  • 2 tablespoons unsalted butter, chilled and cut into 2 pieces
  • 1 1/2 teaspoons vanilla extract

Preparation

In a medium saucepan, heat heavy cream over medium heat until simmering, stirring occasionally.

In a large, 4-cup glass measuring cup, mix egg yolks, sugar, and salt until well-combined. Add cornstarch and mix very well, until mixture is pale yellow and thick, about 15 seconds.

When the cream reaches a full simmer, slowly whisk it into the egg mixture, then return the mixture to the pan and cook over medium heat, whisking constantly, for 1-2 minutes until thick and glossy.

Remove from heat and whisk in butter and vanilla until butter is completely melted; your mixture may look like it’s starting to separate a bit, but it will be fine.

Transfer to a bowl and press plastic wrap on the top, covering completely. Refrigerate until set; I let mine sit overnight.

Chocolate Pudding

chocolate trifleBaking sometimes takes you down a path from one treat to another because you have leftover ingredients. In most cases, you can find another use for your leftovers – those egg yolks left over from your coconut macaroons can be made into lemon curd, and the rest of the evaporated milk from your pumpkin pie can become fudge. These triple vanilla cupcakes left me with a bowl full of cupcake cores, and I immediately thought: trifle, with chocolate pudding and whipped cream.

This chocolate pudding recipe, which came from Hershey’s Kitchens, is incredibly easy to make. I chose to make miniature chocolate trifles and placed them in footed dessert bowls, which were just the perfect serving size.

Ingredients

  • 2/3 cup sugar
  • 1/4 cup cocoa powder
  • 3 tablespoons cornstarch
  • 1/4 teaspoon salt
  • 2 1/4 cups milk
  • 2 tablespoons butter, cut into cubes
  • 1 teaspoon vanilla extract
  • whipped cream and cupcake cores, if making trifles

Preparation

In a medium saucepan, combine sugar, cocoa powder, cornstarch, and salt. Mix well with a fork to combine.

Slowly pour in milk, stirring constantly to combine and taking care to break up any lumps of dry ingredients.

Cook over medium heat, stirring constantly, until the mixture boils. Be sure to scrape the bottom of your pan regularly to prevent scorching – I use a small rubber spatula when stirring mixtures like this to really scrape the bottom well.

Once the mixture comes to a boil, continue boiling and stirring for 1 minute, then remove from heat. Stir in butter and vanilla until butter completely melts.

Pour into a medium-sized heatproof bowl and press plastic wrap against the surface to prevent a skin from forming. Chill until set and completely cold, about 4 hours.

To make the trifles, place cupcake cores in the bottom of your serving dish. Top with chocolate pudding, then whipped cream. If you’re making one large trifle, repeat for several layers to fill your dish; if you’re making single-serving trifles, just use one layer of each.

Serve immediately.