Copycat Hostess Chocolate Cupcakes

As far as snack cakes go, Hostess is pretty much the top of the line. No offense to Little Debbie, which was my grandma Zella’s favorite (and she’s the one who taught me to bake), or to Tastykake, which I never went for much. But Hostess has my heart forever because of these cupcakes. If you’ve never had one, you’re missing out on one of life’s greatest treats. And seriously, were you raised by wolves? Who’s never had a Hostess cupcake?

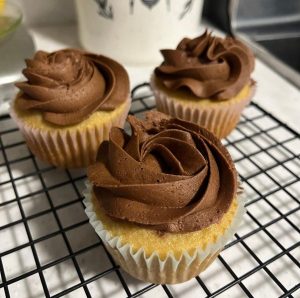
Anyway…these cupcakes are a combination of my standard chocolate cupcake recipe, filled with a vanilla cream filling and topped with a delicious fudge icing; I even piped the little loops on the tops with vanilla buttercream. You’ll have some frosting left over, as well as cupcake cores, so you can make yourself a little trifle if you like – just add some pudding and you’ll be in business.

Ingredients

For the cupcakes

  • 1 1/2 cups flour
  • 3 tablespoons cocoa powder
  • 1 cup sugar
  • 1 teaspoon baking soda
  • 1/2 teaspoon salt
  • 1 tablespoon vinegar
  • 1 teaspoon vanilla
  • 3 tablespoons vegetable oil
  • 1 cup water

For the filling

  • 4 tablespoons butter, softened
  • 1/4 cup shortening
  • 1 3/4 cups powdered sugar
  • 1/2 tablespoon vanilla extract

For the fudge frosting

  • 4 tablespoons melted butter
  • Scant 1/4 cup milk
  • 3 cups powered sugar
  • 1/4 cup unsweetened cocoa powder
  • 1 tablespoon vanilla extract

For the vanilla buttercream loop decoration

  • 2 tablespoons butter, at room temperature
  • 1/2 cup plus 6 tablespoons powdered sugar
  • 1/2 teaspoon vanilla extract
  • 1 1/2 teaspoons milk

Preparation

Preheat oven to 350 degrees. Line cupcake pans with paper liners; my recipe made 16 cupcakes.

In a large mixing bowl, combine flour, cocoa powder, sugar, baking soda, and salt. Mix until well-blended, then make three wells for the wet ingredients.

Place vinegar, vanilla, and vegetable oil into the wells; add water and mix until the batter is smooth. The mixture will bubble up slightly when you add the water, so just keep mixing until you get a smooth consistency in the batter, which will be fairly thin.

Using a 1/4 cup measure, fill cupcake wells about half full. Bake for 18-22 minutes, until a cake tester comes out clean. Cool in pan for a few minutes, then remove from pan and cool completely on wire racks. Cool completely before filling and frosting.

While cupcakes are cooling, make your filling. Beat together butter and shortening, then add powdered sugar in small batches, beating until combined.  Once all sugar is incorporated, beat on medium speed for two minutes. Add vanilla and beat to combine. Place in a piping bag fitted with a 1/4 inch plain tip.

Core your cupcakes: You can do this either with a cupcake corer, or with a paring knife, which is what I do because I’m not into single-use kitchen utensils (no judgement, I just don’t have the room). To use the knife method, cut into the center of each cupcake at a 45-degree angle, about 1/8 to 1/4 inch in from the edge, all the way around. Remove the core and cut away all but the top 1/4 inch, leaving a small disc of cake. Reserve the scraps for a little trifle or other treat. Fill the cupcakes, leaving just a bit of room at the top. Place the cake disc back on top to cover the filling.

To make the fudge frosting, sift together powdered sugar and cocoa powder – this will keep little bits of cocoa from clumping together in your frosting. Add melted butter, milk, and vanilla extract and stir until smooth; you can add additional milk, about 1 tablespoon at a time, for a more spreadable consistency. You’ll have some frosting left over from this recipe, which is great for spreading on graham crackers or mixing with your cored cupcake scraps in a trifle, as I mentioned above. Spread on the cupcakes to make as smooth a surface as you can.

To make the vanilla buttercream for the loop decoration, beat butter on medium speed, until light and fluffy. Add powdered sugar, then beat on low speed until all of the sugar is incorporated into the butter; this will take a few minutes, and you’ll need to scrape the bowl a few times to get all of the sugar to incorporate properly, since you’re working with such a small batch. Once sugar is incorporated, beat on medium speed for 2-3 minutes. Add vanilla extract, and milk, then beat for another 1-2 minutes. Place in a piping bag with a 1/8 inch plain tip and pipe loops onto each cupcake. You’ll have some vanilla buttercream left over too.

Store in an airtight container at room temperature for 1-2 days; these cupcakes are super moist and can get sticky after a day or so. Makes 16.

Orange Pound Cake

This pound cake recipe is my go-to Bundt recipe. I’ve made it as a poppy seed cake (the original, which I found at Taste of Home and apparently won grand champion at the North Dakota state fair, not that I’m surprised), a lemon cake, a lemon poppy seed cake (which somehow I managed not to blog…stay tuned), a creamsicle cake, a vanilla cake with fudge icing, and this, an orange cake, for this year’s Mother’s Day. I’m a wee bit behind on the blog posts.

Anyway, I use cara cara oranges when I bake, which are sweeter, but you can use regular navel oranges if that’s all you can find. And while I think you can find orange extract in most grocery stores, mine comes from Penzeys in Pittsburgh’s Strip District. Also, don’t skip the butter extract in this recipe; it adds amazing flavor to the cake.

Ingredients

For the cake

  • 3 cups flour
  • 2 1/2 cups sugar
  • 1 1/2 teaspoons baking powder
  • 1/2 teaspoon salt
  • 3 eggs, at room temperature
  • 1 1/2 cups whole milk
  • 1 cup vegetable oil
  • 1 teaspoon vanilla extract
  • 1 teaspoon orange extract
  • 1/2 teaspoon butter extract
  • zest of 2 medium oranges

For the icing

  • 2 cups powdered sugar
  • 1 teaspoon vanilla extract
  • 3-4 tablespoons orange juice

Preparation

Preheat oven to 350 degrees. Grease and flour a 10-inch Bundt tin.

In a large bowl, combine flour, sugar, baking powder, and salt; set aside. In a large, 4-cup glass measuring cup, whisk together eggs, milk, vegetable oil, vanilla extract, orange extract, and orange zest. Stir wet ingredients into dry ingredients to completely combine.

Pour batter into prepared tin and bake for 50-60 minutes or until a cake tester comes out clean. Cool in tin for about 15 minutes, then turn out onto a wire rack to cool completely.

To make the icing, combine powdered sugar, vanilla extract, and 2 tablespoons orange juice; add enough additional juice to make a thick but pourable icing. Pour over cake and allow to drip down the sides. Allow icing to set before serving.

Store in an airtight container at room temperature for several days; this cake stays moist for a very long time.

Coconut Cream Pie

Few foods are as polarizing as coconut. People love it, people hate it. Toasted is fine, raw is not. The question of do you like Samoas during Girl Scout Cookie season can start riots. Well, maybe not riots. But people have very strong opinions about these things.

I love coconut, but only under certain circumstances: if it’s toasted and sprinkled onto something, or baked into a treat like in seven-layer bars or Samoas, or just coconut flavored…these are all acceptable things to me. I definitely sampled the custard portion of this coconut cream pie before I stirred in the raw coconut, and it tasted absolutely delicious. Maybe someday I’ll make this without the raw coconut in the filling and see what happens – for now, credit for this recipe goes mostly to Sally’s Baking, one of my favorite recipe sources – but I consulted several different sites for ingredient lists and preparation processes before going with the one below.

Ingredients

For the crust

  • 1 1/4 cups flour
  • 1/2 teaspoon salt
  • 3 tablespoons butter, chilled and cut into cubes
  • 1/3 cup vegetable shortening, chilled and cut into cubes
  • 1/4 cup ice cold water

For the filling

  • 4 egg yolks
  • 1/4 cup cornstarch
  • 14-ounce can full-fat coconut milk (find this in the Asian or Latin American aisle at the grocery store)
  • 1 cup half-and-half
  • 2/3 cup sugar
  • 1/4 teaspoon salt
  • 1 cup sweetened shredded coconut
  • 2 tablespoons butter, softened
  • 1 teaspoon vanilla extract
  • 1/2 teaspoon coconut extract (optional)

For the topping and garnish

  • 1 1/2 cups heavy cream
  • 3 tablespoons powdered sugar
  • 3/4 teaspoon vanilla extract
  • About 4 tablespoons sweetened shredded coconut, toasted*

Preparation

Make your crust: You can do this a day before, as it needs plenty of time to chill. In a large bowl, whisk flour and salt together. Using a pastry cutter, cut in butter and shortening until the mixture looks like coarse crumbs – this means pea-sized pieces, but it doesn’t have to be totally uniform.

Measure out 1/4 cup of water and add ice; stir, then pour out 1/4 cup to use in your dough. Drizzle into flour mixture 1 tablespoon at a time, stirring with a spatula after each addition. Stop adding water when the dough starts to form large clumps. Transfer to a floured work surface and flour your hands, then fold the dough into itself to fully incorporate the butter and shortening into the dry mixture. Be gentle – pastry doesn’t like to be handled too much or it gets tough. Flatten into a disc, cover in plastic wrap, and chill for at least 2 hours.

Once your dough is chilled, it’s time to blind bake the crust. Lightly flour your work surface and roll out your pie dough to a circle about 12 inches wide; this will fit into a 9-inch pie dish. Gently transfer to the pie dish and flute or crimp your edges; chill for 30 minutes.

While your dough is chilling, preheat your oven to 375 degrees. Line the chilled crust with parchment paper and fill with pie weights or dried beans (I’ve been blind-baking crusts with dried beans forever). Bake for 15-16 minutes, until edges are set and starting to brown. Remove the weights/beans and parchment and continue baking for another 14-15 minutes, until bottom is golden brown. My crust shrank a bit during this phase, but it was still perfectly fine. Remove from oven and allow to cool completely before making the filling.

Make your filling: In a large glass measuring cup (like the 4-cup variety), whisk egg yolks and cornstarch; set aside. In a medium saucepan, combine coconut milk, half-and-half, sugar, and salt. Cook over medium heat, whisking regularly, and bring to a boil. Boil for 2 minutes, then reduce the temperature to medium-low heat.

Remove about 1/2 cup of the mixture and, pouring a slow, steady stream, whisk into the egg yolk/cornstarch mixture to temper the eggs – keep your whisk moving so they don’t scramble. Pour this mixture back into the pot (again, slowly and steadily), whisking constantly to combine. The mixture will thicken immediately; keep whisking and cooking for another 90 seconds. Remove from heat and stir in coconut, butter, vanilla extract, and coconut extract; pour into cooled pie crust. Cover the surface of the filling with plastic wrap and refrigerate until set, at least 3 hours or overnight.

*Now is a great time to toast your coconut for the garnish! Place about 4 tablespoons of sweetened shredded coconut into a shallow frying pan over medium-low heat. Stir consistently, keeping a very close eye, until the coconut turns golden brown. Keep your coconut moving so it doesn’t burn! You can also do this in a 350-degree oven, stirring every few minutes. Remove from pan and allow to cool completely.

Once the pie is set, make your whipped cream and garnish. Place heavy cream, powdered sugar, and vanilla extract into the bowl of a stand mixer fitted with the whisk attachment. Whisk on low, then medium speed, until medium peaks for – this takes about 3-4 minutes. Transfer whipped cream to a piping bag fitted with a large star tip.

Remove pie from the fridge and remove the plastic wrap; pipe stars all over the pie surface to fully cover it, then sprinkle with toasted coconut. Keep the pie in the refrigerator until you’re ready to serve it; makes about 8 servings.

Cadbury Mini Egg Brownies

There are so many chocolate brands available in the United States. Hershey (my favorite), Cadbury, Ghirardelli, Nestle, Lindt…the list goes on. Pittsburgh has its own chocolate maker, Sarris, whose shop is a Willy Wonka-style paradise complete with an ice cream parlor.

Cadbury’s mini eggs are solid chocolate, covered in a crunchy candy shell, and they’re an Easter delicacy. I found this recipe at Savor the Spoonful, and added more vanilla, as I do to nearly every recipe I bake. The end result is an ultra-chocolate treat; my mom, who is retired but still substitute teaches and sometimes works at the aftercare program at The Ellis School (my alma mater and where she taught and served as director of athletics for many years), told me that she “didn’t even get past the library” with these last week. High praise, indeed.

Ingredients

  • 1 cup butter, melted
  • 3 eggs, at room temperature
  • 2 teaspoons vanilla extract
  • 3/4 cup granulated sugar
  • 1 cup light brown sugar, packed
  • 1 cup flour
  • 3/4 cup cocoa powder
  • 1/2 teaspoon salt
  • 9-ounce bag Cadbury Mini Eggs, divided (1 cup crushed, remainder whole)

Preparation

Preheat oven to 350 degrees. Line an 8 x 8 or 9 x 9 pan with parchment paper, allowing the paper to hang over the sides, and spray with nonstick spray.

Divide your eggs; take 1 cup and crush them using a meat mallet or rolling pin; leave the rest whole. You don’t have to crush the eggs completely; you want a mixture of small bits and larger chunks.

In a large bowl, whisk together melted butter, eggs, and vanilla extract. Add sugars and stir until combined, then stir in flour, cocoa powder, and salt until just combined. Stir in crushed Cadbury eggs.

Pour batter into pan and smooth to make an even surface; top with remaining whole Cadbury eggs. Bake for 40-50 minutes, until a cake tester comes out with a few moist crumbs. Remove from oven and cool completely in the pan before serving. Makes 16.

Speckled Egg Cookies

It’s finally spring – though in Pittsburgh, spring can mean 70 degrees or 30 degrees from day to day. Despite this, birds are chirping and trees and flowers are blooming, so even the colder days are more bearable. And the days are getting longer, so I’ll take it.

These speckled egg cookies are a cute springtime treat, and there are a few different options for speckling material. They’re a basic sugar cookie, frosted and dusted with chopped up chocolate chips, but you could easily use Oreo crumbs (and I will the next time I make anything speckled).

Ingredients

For the cookies

  • 8 tablespoons butter, softened
  • 1 cup sugar
  • 1 egg
  • 2 cups flour
  • 2 teaspoons baking powder
  • ½ teaspoon salt
  • 1 teaspoon vanilla

For the frosting and decoration

  • 3 tablespoons shortening
  • dash of salt
  • 1 egg white
  • 2 cups powdered sugar
  • 1 teaspoon vanilla extract
  • 1 teaspoon almond extract, optional (you can make this frosting with just vanilla)
  • 1 – 2 teaspoons water, if necessary
  • Blue liquid food coloring*
  • Semi-sweet chocolate chips, very finely chopped so they are almost like dust

*Gel food coloring, even when used in only one drop, yields a very intense color. Liquid food coloring will give you better pastel shades. 

Preparation

Stir together flour, baking powder, and salt in a medium bowl; set aside.

Cream together butter and sugar until fluffy. Add egg and beat well. Add vanilla and about half the flour mixture, beating until combined; beat in remaining flour.

Note: if your dough is too crumbly, you can add just a bit of water or another 1/4 teaspoon of vanilla.

Divide dough in half and knead each just slightly.  Form each half into a disc and place on plastic wrap; cover with another piece of plastic wrap and roll out to flatten into about 1/4 inch thickness. This helps later on, so you don’t have to work your dough as much when rolling and re-rolling after cutting, making your cookies more tender. Refrigerate until just barely firm, about 20-30 minutes. If you refrigerate overnight, let your dough stand at room temperature for about 15 minutes before you roll it out.

Preheat oven to 375 degrees. Line several baking sheets with parchment paper. Remove dough from fridge and roll to about 1/8 inch thickness. Cut into egg shapes and place on baking sheets about 2 inches apart.

Bake for 8-10 minutes, until just golden at the edges.  Cool on a wire rack completely before frosting.

To make the frosting, combine shortening, egg white, salt, and one cup powdered sugar in a mixing bowl.  Beat on low speed until combined, then increase speed to medium, then high, and beat for 1 minute. Add remaining powdered sugar, beating for about 1 minute. Add extracts and beat; if your frosting is too thick, add 1-2 teaspoons of water. You want a smooth consistency that’s easy to spread.

Tint your frosting light blue (go easy and use liquid food coloring, as noted above) and frost each cookie. Sprinkle with chocolate chip dust; allow frosting to set before storing between layers of waxed paper in an airtight container. Makes about 3 dozen, depending on the size of your cookie cutter.

Chocolate Mint Cupcakes

Controversial statement: Of all the ice creams in the world, mint chocolate chip is an occasional choice of mine, not a go-to. And if I’m having it, it’s the Breyer’s version that isn’t tinted green, buy rather just white ice cream with flecks of dark chocolate throughout.

I know, I know, some people are mint chocolate chip loyalists, eating nothing but it whenever they go near a scoop and preferring the green kind. It’s tasty, sure, but I’m more of a vanilla ice cream with a caramel swirl or peanut butter cups in it kind of woman (or both), or just a vanilla ice cream over a brownie kind of woman. In any case, these treats have a very subtle flavor, more like an Andes candy than the classic parlor treat. Mint extract is pretty strong, so use it sparingly and add a smaller amount at first, then taste as you go to make sure it’s not overpowering.

Ingredients

For the cupcakes

  • 1 1/2 cups flour
  • 3 tablespoons cocoa powder
  • 1 cup sugar
  • 1 teaspoon baking soda
  • 1/2 teaspoon salt
  • 1 tablespoon vinegar
  • 1 teaspoon vanilla
  • 1/4 teaspoon mint extract
  • 3 tablespoons vegetable oil
  • 1 cup water

For the frosting

  • 12 tablespoons butter, at room temperature
  • 3 cups powdered sugar
  • 1 teaspoon vanilla extract
  • About 1/8 to 1/4 mint extract, to taste
  • 1 teaspoon milk
  • Miniature chocolate chips, for garnish

Preparation

Preheat oven to 350 degrees. Line cupcake pans with paper liners; this recipe makes 14-15 cupcakes depending on how full the wells are.

In a large mixing bowl, combine flour, cocoa powder, sugar, baking soda, and salt. Mix until well-blended, then make three wells for the wet ingredients.

Place vinegar, vanilla, mint extract, and vegetable oil into the wells; add water and mix until the batter is smooth. The mixture will bubble up slightly when you add the water, so just keep mixing until you get a smooth consistency in the batter, which will be fairly thin.

Using a 1/4 cup measure, fill cupcake wells about half full. Bake for 18-22 minutes, until a cake tester comes out clean. Cool in pan for a few minutes, then remove from pan and cool completely on wire racks. Cool completely before frosting.

To make the frosting, place butter and powdered sugar in a mixing bowl with the paddle attachment and beat on low until all the sugar is incorporated into the butter. Add vanilla extract, 1/8 teaspoon mint extract, and milk and beat to combine. Taste and add more mint extract if you like – I added a few more drops to mine, but not a full 1/8 teaspoon more because I wanted to keep it subtle. Fit a piping bag with a large star tip (I use the Wilton 1M) and pipe frosting onto cupcakes; sprinkle mini chocolate chips on the top. Store in an airtight container at room temperature for 2-3 days.

Caramel Cupcakes with Chocolate Buttercream

This cupcake recipe is actually one of my favorites, and I think I need to start making it more often and experimenting with different flavors of frosting. It’s an easy combo requiring basic ingredients, two bowls, and a whisk, so it takes very little time to prepare – another thing I really like.

I originally made these as butterscotch cupcakes, and they were delicious, but they pair well with chocolate buttercream too. I feel like you could embellish them with a Rolo or other caramel-filled chocolate candy if you wanted to, but they’re great just as they are. These were a huge hit in my office last week.

Ingredients

Caramel Cupcakes

  • 1 2/3 cups flour
  • 1/2 teaspoon baking powder
  • 1/4 teaspoon baking soda
  • 1/2 teaspoon salt
  • 8 tablespoons butter, melted
  • 1 cup light brown sugar
  • 1 egg, at room temperature
  • 1/4 cup sour cream
  • 3/4 cup milk
  • 1 tablespoon vanilla extract

Chocolate Buttercream

  • 12 tablespoons butter, at room temperature
  • 3 cups powdered sugar
  • 1/4 cup plus 2 tablespoons cocoa powder
  • 2 teaspoons vanilla extract
  • 1-2 tablespoons milk

Preparation

Preheat oven to 350 degrees. Line two cupcake tins with paper liners; this recipe made 21 cupcakes for me.

In a medium bowl, whisk together flour, baking powder, baking soda, and salt; set aside.

In a large bowl, combine brown sugar and melted butter, whisking until no lumps remain. Whisk in egg, sour cream, milk, and vanilla until smooth. Slowly whisk in flour mixture until batter is completely smooth; it will be fairly thick.

Using a two-inch cookie scoop, drop scoops of batter into prepared cupcake pans. Bake for 15-20 minutes, until a cake tester comes out clean. Remove from oven and remove from pans immediately; cool completely before frosting.

To make chocolate buttercream, place butter in a mixing bowl and beat for a few minutes using the paddle attachment. Add powdered sugar and cocoa powder and beat on low speed until the sugar and cocoa are fully incorporated into the butter. Add vanilla extract and beat; add milk 1 tablespoon at a time; you may not need both tablespoons.

Fit a large piping bag with a large open star tip (I use the Wilton 1M) pipe swirls of frosting onto cupcakes; you’ll have some frosting left over that you can use for other treats.

Dark Chocolate Mint Brownies

Peppermint patties are one of my favorite things, though I hardly ever have them. I feel like I used to see the full-sized version in the candy displays at supermarket checkouts, but it’s been a long time since I’ve found one there.

This recipe, which is actually inspired by the Girl Scouts Thin Mint cookie, uses miniature ones – though you could chop up some full-sized ones if you can find them. Alternatively, you could use actual Thin Mints in these, but I feel like the peppermint patty is a better option, not just for how they look when they’re cut but also because you get a bit more peppermint this way.

Ingredients

  • 12 tablespoons butter
  • 2 cups sugar
  • 1 cup Dutch process cocoa powder
  • 1 teaspoon salt
  • 1/2 teaspoon baking powder
  • 1 tablespoon vanilla extract
  • 3 eggs
  • 1 cup flour
  • 16 Miniature Peppermint Patties

Preparation

Preheat oven to 325. Lightly grease a 9 x 13 tin with baking spray.

In a large pot, melt butter over medium-low heat. Stir in sugar, allowing the mixture to become just hot, but not bubbly – this yields the shiny, crackly top. Remove from heat and stir in cocoa powder, salt, baking powder, and vanilla. Whisk in eggs, then stir in flour.

Pour about half the batter into the pan and top with peppermint patties, spacing evenly in rows. Pour the remaining batter over top and smooth with a spatula. Bake for 29-32 minutes, until a cake tester inserted in the center comes out clean or with just a few moist crumbs. Remove from oven and allow to cool completely in the pan before cutting. Makes 24.

Pineapple Sugar Cut-Outs

Here we are, in the dead of winter. By many accounts Pittsburgh has had it easy winter-wise these last few years, but Mother Nature seems to be making up for lost time. This winter reminds me of those from my childhood, snowy and very cold. And while I’m not a winter hater, I’m definitely ready for some warm weather.

Pineapples grow in tropical climates, of course, and I would love to be in one of those right now. These treats would be fun for a summer party, especially because pineapples are a symbol of hospitality. I’ll definitely make these again, maybe along with some watermelon cut-outs for a bright, fun cookie tray.

Ingredients

For the cookies

  • 8 tablespoons butter, softened
  • 1 cup sugar
  • 1 egg
  • 2 cups flour
  • 2 teaspoons baking powder
  • ½ teaspoon salt
  • 1 teaspoon vanilla

For the frosting

  • 6 tablespoons shortening
  • dash of salt
  • 2 egg whites
  • 4 cups powdered sugar
  • 2 teaspoons vanilla extract
  • 2 teaspoons almond extract
  • 1 – 2 teaspoons water, if necessary
  • Yellow and green food coloring

Preparation

Stir together flour, baking powder, and salt in a medium bowl; set aside.

Cream together butter and sugar until fluffy. Add egg and beat well. Add vanilla and about half the flour mixture, beating until combined; beat in remaining flour.

Note: if your dough is too crumbly, you can add just a bit of water or another 1/4 teaspoon of vanilla.

Divide dough in half and knead each just slightly.  Form each half into a disc and place on plastic wrap; cover with another piece of plastic wrap and roll out to flatten into about 1/4 inch thickness. This helps later on, so you don’t have to work your dough as much when rolling and re-rolling after cutting, making your cookies more tender. Refrigerate until just barely firm, about 20-30 minutes. If you refrigerate overnight, let your dough stand at room temperature for about 15 minutes before you roll it out.

Preheat oven to 375 degrees. Line several baking sheets with parchment paper. Remove dough from fridge and roll to about 1/8 inch thickness. Cut into shapes and place on baking sheets about 2 inches apart; I baked 6 pineapples per sheet, and my cutter is 4 inches tall.

Bake for 8-10 minutes, until just golden at the edges.  Cool on a wire rack completely before frosting.

To make the frosting, combine shortening, egg whites, salt, and one cup powdered sugar in a mixing bowl.  Beat on low speed until combined, then increase speed to medium, then high, and beat for 1 minute. Add remaining powdered sugar, one cup at a time, beating for about 1 minute each time. Add extracts and beat; if your frosting is too thick, add 1-2 teaspoons of water. You want a smooth consistency that’s easy to pipe.

Take about 1/4 of your frosting and place it in a small bowl. Tint green for pineapple leaves. Tint remaining frosting yellow.

Fit a piping bag with a small star tip (or a leaf tip, if you prefer) and fill with green frosting; fit another bag with a medium star tip and fill with yellow frosting. Pipe the yellow stars in even lines across each pineapple, then pipe on leaves. Allow frosting to harden before storing; store between sheets of parchment or waxed paper so the cookies don’t stick together. Makes about 22 cookies.

Oreo Brownies

Oreos and brownies are delicious enough on their own, no? And yet when combined, they are even more amazing, albeit laden with calories. Everything in moderation, I suppose.

This recipe is adapted from Sugar Spun Run, and I admit that I over-baked mine by at least a few minutes. The middle pieces are fudgy, just like I intended, but the edges are crispier than I’d like. My recipe adaptation was to just use Oreos in the brownies themselves and not sprinkle extra crushed-up ones over the top, but you could certainly do that if you like. I also used regular chocolate chips, rather than mini chips, in the batter and I feel like minis would have been better. Live and learn. 

Ingredients

  • 10 tablespoons butter
  • 1 cup semisweet chocolate chips, divided
  • 1/2 cup Dutch process cocoa
  • 1 1/2 cups sugar
  • 2 eggs
  • 1 teaspoon vanilla
  • 2/3 cup flour
  • 1/2 teaspoon salt
  • 16 Oreo cookies (I used Double Stuf)

Preparation

Preheat oven to 350 degrees. Lightly grease a 9 x 9 baking tin.

In a medium saucepan, melt butter and 1/2 cup chocolate chips; stir in cocoa powder and set aside. In a large bowl, whisk together sugar and eggs, then pour in chocolate mixture and whisk to combine. Stir in vanilla, then add flour and salt and mix to combine completely. Add remaining 1/2 cup chocolate chips.

Pour half the batter into the tin and top with Oreos, arranging evenly in four lines of four. Top with remaining batter and spread to cover the Oreos as best you can. Bake for 25-30 minutes, until a cake tester comes out with a few fudgy crumbs, not wet batter. Cool completely before cutting. Makes 16.