Triple Vanilla Cupcakes

triplevanillacupcakesMy grandma Zella made filled cupcakes years before they became trendy. Perhaps she was a baker ahead of her time – or perhaps she saw a recipe in Woman’s Day magazine and thought, like their food editors, that two desserts combined into one was just a great idea. Usually, her cupcakes used Duncan Hines cake mix and packaged pudding mix; not from scratch, but very tasty nonetheless. I remember a particularly tasty yellow cupcake that was filled with lemon pudding, then dusted with powdered sugar. Simple, yet delicious.

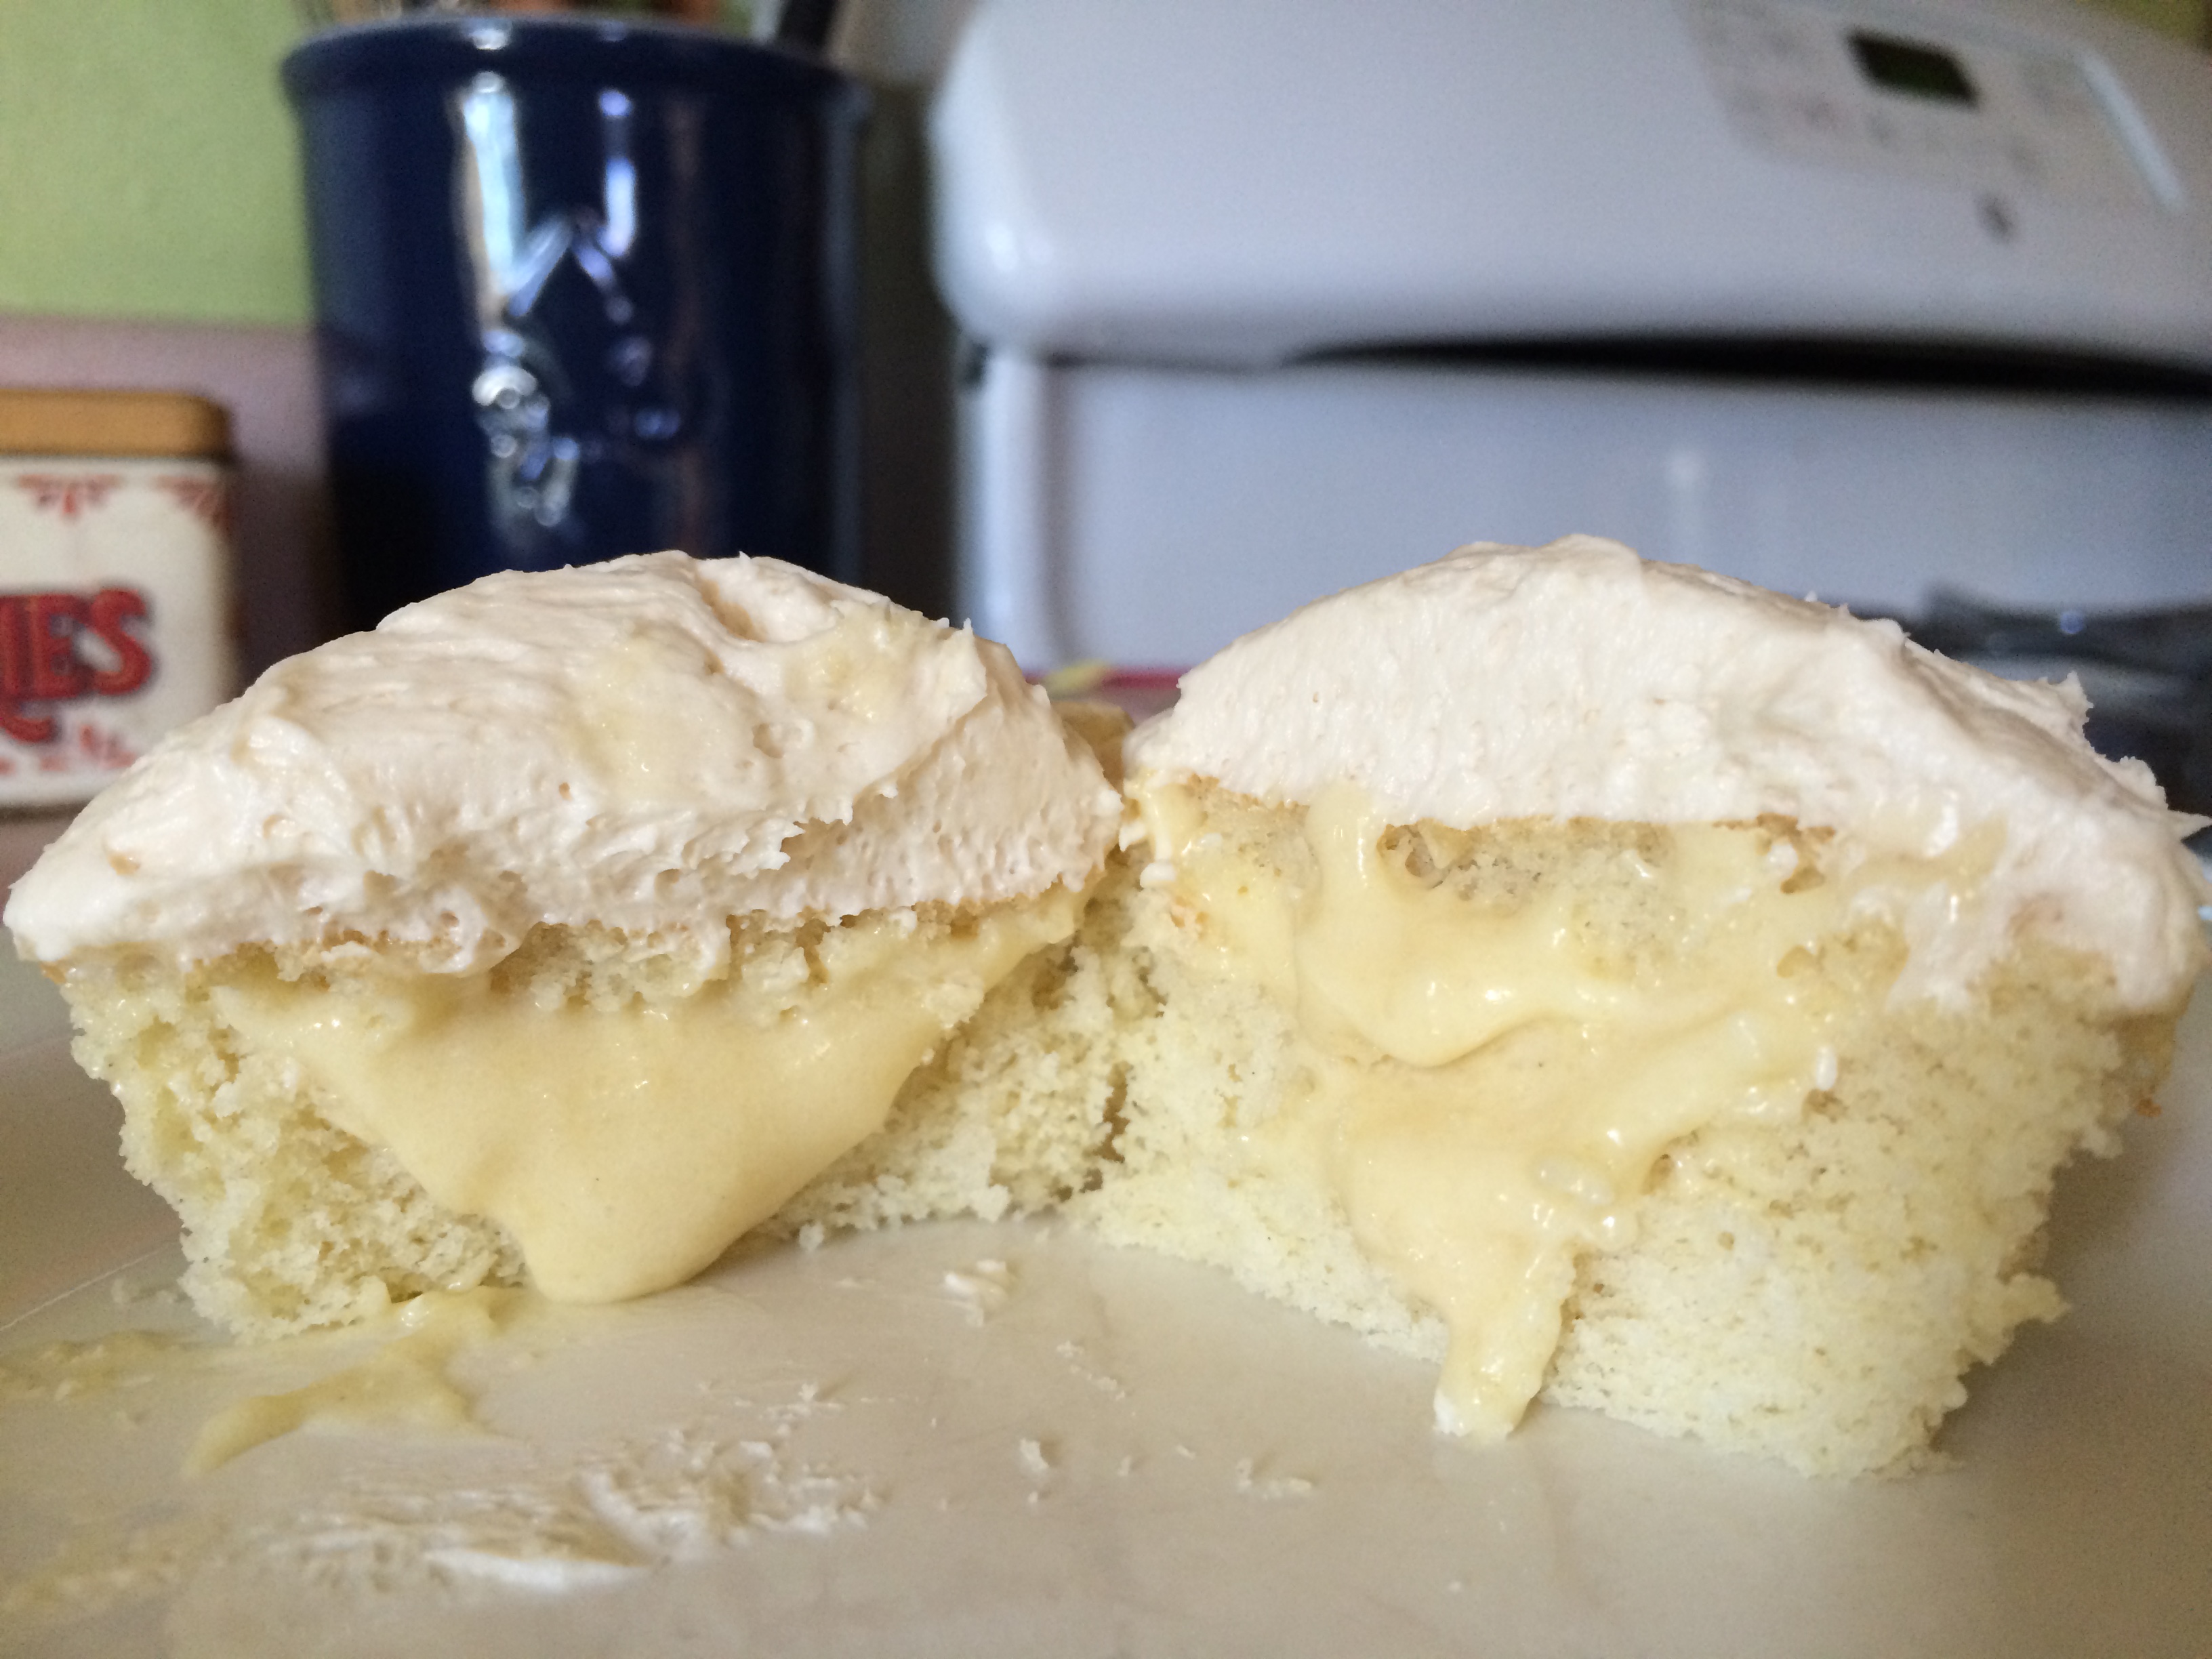
Last week’s Boston Cream Cupcakes left me with a back-up batch of pastry cream that used a slightly different recipe, so today I tossed together these triple vanilla cupcakes – a vanilla cupcake with vanilla pastry cream, topped with vanilla buttercream frosting. If you’re a vanilla fan, you’ll love these cupcakes.

Pastry Cream II

Ingredients

  • 1 1/2 cups heavy cream
  • 1/2 cup sugar
  • 1/4 cup flour
  • 1/4 teaspoon salt
  • 4 egg yolks
  • 1 teaspoon vanilla extract

Preparation

Place a heatproof bowl and fine mesh sieve next to your stove.

In a medium saucepan, heat milk over medium heat until warmed and wisps of steam appear; do not allow to simmer or boil.

In a 4-cup glass measuring cup, combine sugar, flour, and salt. Add egg yolks and mix well; mixture will form a thick paste, and it can be crumbly or smooth – the most important thing is for your ingredients to be well-mixed.

Slowly pour heavy cream into egg mixture, whisking constantly, then return the mixture to the pan and cook over medium heat for 1-2 minutes; mixture will look foamy at first, then will become thick and glossy. Once the mixture becomes thick and glossy, remove it from the heat and whisk in vanilla extract.

Pour the pastry cream through the sieve; you’ll need to stir and press firmly to get it to pass through. Press plastic wrap on the surface and allow to set up overnight.

Old-Fashioned Vanilla Cupcakes

Ingredients

  • 1/2 cup whole milk
  • 1 teaspoon vanilla extract
  • 1/2 cup plus 6 tablespoons cake flour
  • 1/2 cup plus 2 tablespoons flour
  • 1 cup sugar
  • 1 1/2 teaspoons baking powder
  • Scant 1/2 teaspoon salt
  • 8 tablespoons butter, cut into cubes, at room temperature
  • 2 eggs, at room temperature

Preparation

Preheat oven to 350. Line cupcake pans with paper liners; my batch made 20 cupcakes.

Combine milk and vanilla extract; set aside.

In a mixing bowl, combine cake flour, flour, sugar, baking powder, and salt. Beat on medium speed for 2 minutes, then reduce mixer speed to low and add butter a few cubes at a time. Continue to beat for about 2 minutes, until the mixture looks like coarse sand.

Add eggs, one at a time, beating well between each. With the mixer running on low, slowly pour in the vanilla milk mixture.

Return to medium speed and continue to beat for 2 minutes. Scrape down the sides and bottom of the bowl well.

Using a 2-inch cookie scoop, drop scoops of batter into prepared cupcake pans, filling about 1/2 to 2/3 full.

Bake for 20-25 minutes, until a cake tester comes out clean. Remove from pans immediately and cool completely on a wire rack.

Very Vanilla Buttercream

Ingredients

  • 12 tablespoons butter, at room temperature
  • Pinch of salt
  • 2 1/2 cups powdered sugar
  • 2 tablespoons vanilla extract

Preparation

In a mixing bowl, beat butter and salt on medium speed for about 2 minutes.

Scrape down the sides of the bowl, then add powdered sugar and beat on low speed until fully incorporated, about 3-4 minutes. Add vanilla extract and beat on medium speed for 2-3 minutes, until fluffy.

To assemble the cupcakes:

In a mixer fitted with the whisk attachment, whip pastry cream for 2-3 minutes to lighten.

Using a small knife, cut into the center of each cupcake at a 45-degree angle, about 1/8 inch from the edge, all the way around. Remove the core and cut away all but the top 1/4 inch, leaving a small disc of cake. Reserve the scraps for a trifle or other treat.

Fill the inside with pastry cream and top with the disc of cake.

Using a 1-inch cookie scoop, drop scoops of frosting onto each cupcake and spread with an offset spatula.

Store in the refrigerator; bring to room temperature before serving.


Boston Cream Cupcakes

bostoncreamcupcakesBoston cream pie is no longer my nemesis. Okay, technically, these are cupcakes, but that still counts, right?

I’ve tried several recipes before without success; if the cake turned out well, the filling would curdle; if the filling turned out well, the ganache would be too thick. My awesome friend and fellow baker Carla recommended combining different aspects from different recipes, and I suspect that might be how the Brown Eyed Baker arrived at this successful recipe.

My process involved making the pastry cream the night before, followed by the cupcakes and ganache the next day. I recommend making your ganache just after you get your first batch of cupcakes in the oven, so it’ll be cool and thickened by the time you’re ready to assemble your cupcakes. I also altered the process slightly by whipping the pastry cream in my mixer before I filled the cupcakes. You’ll have some leftover cupcake scraps and some leftover ganache, and if you buy the quart container of heavy cream like I did, you’ll also have some heavy cream left over that can be turned into whipped cream for a fun trifle.

Pastry Cream

Ingredients

  • 1 1/3 cups heavy cream
  • 3 egg yolks
  • 1/3 cup sugar
  • Pinch of salt
  • 4 teaspoons cornstarch
  • 2 tablespoons unsalted butter, chilled and cut into 2 pieces
  • 1 1/2 teaspoons vanilla extract

Preparation

In a medium saucepan, heat heavy cream over medium heat until simmering, stirring occasionally.

In a large, 4-cup glass measuring cup, mix egg yolks, sugar, and salt until well-combined. Add cornstarch and mix very well, until mixture is pale yellow and thick, about 15 seconds.

When the cream reaches a full simmer, slowly whisk it into the egg mixture, then return the mixture to the pan and cook over medium heat, whisking constantly, for 1-2 minutes until thick and glossy.

Remove from heat and whisk in butter and vanilla until butter is completely melted; your mixture may look like it’s starting to separate a bit, but it will be fine.

Transfer to a bowl and press plastic wrap on the top, covering completely. Refrigerate until set; I let mine sit overnight.

Cupcakes

Ingredients

  • 1 3/4 cups flour
  • 1 cup sugar
  • 1 1/2 teaspoons baking powder
  • 3/4 teaspoons salt
  • 12 tablespoons butter, softened but still cool, cut into 12 slices
  • 3 eggs
  • 3/4 cup whole milk
  • 1 1/2 teaspoons vanilla extract

Preparation

Preheat oven to 350 degrees. Line cupcake pans with paper liners; my batch made 18 cupcakes.

In the bowl of a stand mixer, combine flour, sugar, baking powder, and salt and mix for about 30 seconds. With the mixer running on low, add butter 1 pat at a time, until the mixture looks like coarse sand.

Add eggs, 1 at a time, scraping the sides and bottom of the bowl very well. Add milk and vanilla extract, then increase the mixer speed to medium and mix for 3 minutes, scraping the sides and bottom of the bowl about halfway through, until batter is light and no lumps remain.

Fill cupcake wells between 1/2 and 3/4 full and bake for 18-20 minutes, until a cake tester comes out clean.

Immediately remove from pans and cool completely on a wire rack before filling and glazing.

Chocolate Ganache

Ingredients

  • 3/4 cup heavy cream
  • 1/4 cup light corn syrup
  • 8 ounces bittersweet chocolate, finely chopped
  • 1/2 teaspoon vanilla extract

Preparation

In a medium saucepan, combine heavy cream, corn syrup, chocolate, and vanilla over medium heat, stirring constantly until the chocolate melts and the mixture is smooth. Remove from heat and allow to cool, stirring occasionally, until the mixture reaches room temperature; mixture will thicken and become glossy.

To assemble the cupcakes:

Place your pastry cream in a mixing bowl fitted with a whisk attachment and whisk on medium speed for 2-3 minutes to lighten slightly.

Using a small knife, cut into the center of each cupcake at a 45-degree angle, about 1/8 inch from the edge, all the way around. Remove the core and cut away all but the top 1/4 inch, leaving a small disc of cake. Reserve the scraps for a trifle or other treat.

Fill the inside with pastry cream and top with the disc of cake.

Spoon chocolate ganache over cupcake tops and spread with a small offset spatula; it is very rich, so you don’t need much.

Store cupcakes in an airtight container in the refrigerator for up to 2 days; bring to room temperature before serving.


Caramel Apple Cookies

caramelapplecookiesShanah tovah, friends! Tonight at sundown, Rosh Hashannah begins, and we celebrate the Jewish New Year. We don’t have big plans here in the Kozusko-Marcus interfaith household, but naturally, all holidays must be marked with baked goods.

These caramel apple cookies are a great choice for fall, and for Rosh Hashannah, when one gives blessings for a sweet new year. I found the original recipe at Cooking Classy and adapted it slightly, altering the amount of grated apple in the cookies and adding several more teaspoons of apple juice concentrate to the frosting in order to make it spreadable. The frosting sets up very, very quickly – almost immediately – and the additional concentrate is absolutely necessary unless you’re going for something like caramel apple fudge (which would be delicious, but not really useful as frosting).

Tonight, whether you celebrate Rosh Hashannah or not, perhaps you’ll reflect on the coming year and what you hope to accomplish…I know I will, and that many recipes will be involved!

Ingredients

For the apple cookies

  • 2 1/2 cups flour
  • 1 teaspoon baking powder
  • 1/2 teaspoon baking soda
  • 1/2 teaspoon salt
  • 3/4 teaspoon cinnamon
  • 1/4 teaspoon nutmeg
  • 1 medium Granny Smith apple, peeled and grated (about 3/4 cup)
  • Juice of 1/2 lemon
  • 8 tablespoons butter, softened
  • 1 cup packed light brown sugar
  • 1 egg
  • 1 teaspoon vanilla extract
  • scant* 1/2 cup frozen apple juice concentrate, thawed but cold

*Note: “scant” = less 1 tablespoon

For the caramel apple frosting

  • 1/2 cup packed light brown sugar
  • 4 tablespoons butter
  • 2 1/2 tablespoons apple juice concentrate, plus about 3-4 teaspoons more for thinning (see below)
  • 1/8 teaspoon salt
  • 2 1/2 cups powdered sugar
  • 1/4 cup chopped pecans

Preparation

Preheat oven to 350 degrees. Line several baking sheets with parchment paper.

In a medium bowl, combine flour, baking powder, baking soda, salt, cinnamon, and nutmeg; set aside.

Place grated apple and lemon juice in a small bowl and toss to combine; set aside.

In a mixing bowl, cream butter and brown sugar until fluffy. Add egg and vanilla and beat well to combine.

Add about half of the flour mixture and beat until just combined; with the mixer running on low, slowly pour in apple juice concentrate. Add remaining flour and beat until combined. Stir in grated apple.

Using a 2-inch cookie scoop, drop scoops of dough onto prepared sheets, spacing about 2 inches apart.

Bake for 12-13 minutes, until cookies are set. Remove from oven and cool on baking sheets for a few minutes before transferring to a wire rack to cool completely.

For the frosting: in a medium saucepan, combine butter, brown sugar, and 2 1/2 tablespoons apple juice concentrate. Cook over medium heat, whisking constantly, until the sugar melts.

Add powdered sugar, about 1/2 cup at a time, stirring constantly and scraping the pan well. Continue adding powdered sugar, alternating with 1 teaspoon of concentrate at a time; I used about 4 additional teaspoons of concentrate to reach a spreadable consistency.

Very quickly spread frosting on cookies and immediately top with pecans; it helps if you have an assistant to sprinkle on the pecans as you continue frosting.

Store in an airtight container at room temperature.

Blackberry Pie Bars

blackberry pie barsA few years ago, Mike and I saw two spindly, seemingly forgotten blackberry plants for $15 (total, not each) at our local nursery.  We brought them home, gave them prime real estate in some of the best soil our rocky Pittsburgh property has to offer, and hoped for the best.

From these two blackberry plants, about 10 more have grown. We cut them back each fall, because berries will only grow on new canes. This summer’s crop has yielded about 5 cups of berries so far, with tons more ripening as I write this. We pick new berries daily; those not fit to eat get pulled and tossed into the thicket, or left for the birds.

Because fresh berries have a limited shelf life, sometimes it’s best to bake with them – hence these blackberry pie bars, which I found over at The Novice Chef. I suspect that a lemon drizzle might make a good addition to these bars, or perhaps a scoop of vanilla ice cream. Mike declared them delicious without any additional accouterments, though.

Ingredients

For the crust

  • 3 cups flour
  • 1 cup sugar
  • 1 teaspoon baking powder
  • 1 teaspoon cinnamon
  • zest of 1 medium lemon
  • 1 cup butter, cold and cut into 1-inch pats
  • 1 egg
  • 1 teaspoon vanilla extract

For the blackberries

  • 1/2 cup sugar
  • 4 teaspoons cornstarch
  • juice from 1 medium lemon
  • 4 cups fresh blackberries

Preparation

Preheat oven to 375 degrees. Grease a 9 x 13 baking pan; set aside.

In a food processor, combine flour, sugar, baking powder, cinnamon, and lemon zest and pulse several times to combine. Add butter, egg, and vanilla and pulse until the mixture forms coarse crumbs. If using a smaller food processor (like I did), break up the mixture with a fork a bit every few pulses.

Press half of the mixture into the bottom of the baking pan; reserve remaining crust to crumble over the top.

In a large bowl, combine sugar, cornstarch, and lemon juice, mixing until smooth. Add berries and gently stir to coat; spoon berries over crust. Crumble the remaining crust mixture over the berries.

Bake for 40-45 minutes, until the top is lightly browned, being careful not to burn the bottom. Remove from oven and cool completely before serving, or spoon out while warm and serve like a cobbler.

Cherry Cola Cake

cherry cola cakeBakers and artists have a lot in common. We share creativity, a dedication to our craft, and the desire to share the results of our talent and a set of carefully honed skills with others. While one artist might use paint, another might choose clay. Bakers are like this, specializing in bread, or pastries, or cookies.

When people ask me what I bake, I usually tell them that I bake classic comfort treats – the kind of cookies and cupcakes and pies their favorite aunt used to make, or that you’d find at a bake sale. Treats like oatmeal cookies and chocolate cupcakes and banana bread and apple pie. Nothing fancy, more focused on flavor than on decoration.

Cherry cola cake seems like a classic comfort treat to me; I imagine it being served as church picnics and family reunions and at the homes of aunts to welcome visitors on Sunday afternoons.  The cherry cola flavor is rather faint, and the end result is more of a super-moist chocolate cake than what I was expecting…but it’s still definitely delicious.

Ingredients

Cherry Cola Cake

  • 1 1/2 cups miniature marshmallows
  • 2 cups flour
  • 2 cups sugar
  • 1 teaspoon baking soda
  • 1/2 cup buttermilk
  • 2 eggs
  • 1 teaspoon vanilla
  • 1 cup butter, cut into cubes
  • 1 cup cherry cola
  • 3 tablespoons cocoa powder

Marshmallow Creme Frosting

  • 12 tablespoons butter, softened
  • 1 cup powdered sugar
  • 1 7-ounce jar marshmallow creme
  • Red liquid food coloring, if desired

Note: this frosts the tops of each layer only; if you want to frost the sides as well, double the ingredients. 

Preparation

Preheat oven to 350 degrees. Grease two 9-inch round cake pans, line the bottom of each with a circle of parchment paper, and grease the parchment.

Place 3/4 cup miniature marshmallows in the bottom of each cake pan; set aside.

In a large bowl, combine flour, sugar, and baking soda; set aside.

In a large glass measuring cup, combine buttermilk, eggs, and vanilla; whisk together, then set aside.

In a medium saucepan, combine butter, cherry cola, and cocoa powder. Stir occasionally until mixture boils.

Remove cherry cola mixture from heat and pour into flour mixture. Stir just to combine, then whisk in buttermilk mixture until batter is completely smooth.

Pour into prepared pans, dividing evenly. Marshmallows will float to the top.

Bake for 25-30 minutes, until a cake tester inserted in the center comes out clean. Remove from oven and cool in pans for 10 minutes, then remove to wire racks, peel off paper, and cool completely.

For the frosting, beat butter and powdered sugar until completely combined. Add marshmallow creme and beat until well-combined. Add food coloring for a pink tint if desired.

Place one layer of cake on a cake plate and top with 1 cup frosting. Place second layer on top and use the remaining frosting to frost the top only.

Store at room temperature.


Almond Glazed Brownies

almond glazed browniesMilton Hershey was the first American to develop a formula for making milk chocolate, and for that, I feel that we should honor him with some kind of national holiday. Where would we be without the Hershey bar and its individual rectangles of delight, waiting to be eaten brick by brick, or stuffed into a s’more, or dipped into a spoonful of peanut butter? What peanut butter blossom cookie would be the same without a Hershey’s Kiss? What glass of milk would be complete, when you were eight, without a squirt of Hershey’s syrup?

Ahh, Hershey’s syrup. As a person who doesn’t really like milk, this saved me many times as a child, making the required glass with dinner much more bearable. Hershey’s syrup isn’t just for milk and ice cream, though – it plays a starring role in these brownies, yielding a tender, almost cake-like texture. When baked, the tops of these brownies are a bit sticky, so they need some type of frosting or glaze; I chose to use a simple almond glaze, as chocolate and almond are among my favorite flavor combinations. You could certainly frost them with chocolate, though – I bet Mr. Hershey would like that.

Ingredients

Hershey’s Syrup Brownies

  • 8 tablespoons butter, softened
  • 1 cup sugar
  • 4 eggs, beaten
  • 1 16-ounce can chocolate syrup
  • 1 teaspoon vanilla
  • 1 cup flour

Almond Glaze

  • 3 cups powdered sugar
  • About 3 teaspoons almond extract
  • About 3 tablespoons water

Preparation

Preheat oven to 350 degrees. Grease a 9 x 13 baking pan or spray with baking spray.

In a mixing bowl, cream butter and sugar together until fluffy. Add eggs, chocolate syrup, and vanilla and beat on low, then medium speed, until combined. Add flour and beat until combined. Batter will be quite thin. Pour into prepared pan.

Bake for 30 minutes; the top will look shiny and wet, but a cake tester should come out clean.

Cool brownies completely in the pan before adding the almond glaze.

Once brownies are cool, in a medium bowl or large glass measuring cup, combine powdered sugar with 2 teaspoons almond extract and 1 tablespoon water. Stir to combine, adding additional extract and water to reach a moderately thick glaze that is still pourable. Pour over brownies and spread with an offset spatula. Allow to harden before serving.

Pumpkin Sugar Cookies

pumpkin sugar cookiesAt any given time, I have at least one can of pumpkin puree in my pantry cabinet. You never know when the pumpkin mood will strike, whether it’s the middle of October, the middle of March, or the middle of August.

Mike recently tagged me in a Facebook post about these cookies, and of course, they had been on my Pinterest board for some time. The original recipe comes from another blog, Lauren’s Latest, and the end result is a delicious combination of a soft sugar cookie and a pumpkin cookie.  I adapted the recipe slightly in preparation, and because I don’t keep pumpkin pie spice on hand, I made my own – my recipe appears below.

Next time, I’ll use a full teaspoon of pumpkin pie spice in the cookie dough to kick up the flavor a bit. Also, I increased the quantities in the glaze recipe, because the original recipe didn’t produce enough glaze for my batch of 39 cookies.

Ingredients

Pumpkin Pie Spice

  • 1/2 teaspoon cinnamon
  • 1/4 teaspoon ginger
  • 1/4 teaspoon allspice
  • 1/8 teaspoon nutmeg

Pumpkin Sugar Cookies

  • 4 cups flour
  • 1/4 teaspoon baking soda
  • 1/4 teaspoon cream of tartar
  • 1/2 teaspoon salt
  • 1/2 teaspoon pumpkin pie spice
  • 1/2 cup unsalted butter, softened
  • 1/2 cup vegetable oil
  • 1/2 cup pumpkin puree
  • 1 cup granulated sugar
  • 1/2 cup powdered sugar
  • 1/2 teaspoon vanilla
  • 2 large eggs

Pumpkin Spice Glaze

  • 6 cups powdered sugar
  • About 5 1/2 tablespoons water
  • 1/2 teaspoon pumpkin pie spice

Preparation

Preheat oven to 350 degrees. Line several baking sheets with parchment paper.

Make pumpkin pie spice: in a small bowl combine cinnamon, ginger, allspice, and nutmeg. Stir together until very well-combined.

Make cookie dough: in a large bowl, combine flour, baking soda, cream of tartar, salt, and pumpkin pie spice; set aside.

In a mixing bowl, beat butter, vegetable oil, pumpkin puree, granulated sugar, powdered sugar, vanilla, and eggs until smooth; some small lumps of butter will remain, and that’s fine.

Gradually add flour mixture, about 1 cup at a time, beating well between each addition and scraping the sides of your bowl frequently.

Using a 2-inch cookie scoop, scoop dough onto baking sheets. Spray the bottom of a glass with cookie spray, dip bottom into sugar, and flatten cookies to about 1/2 inch thickness. You’ll need to re-coat your glass with sugar between each cookie.

Bake for 9 minutes, until edges are set and tops are just beginning to turn golden. Cool on baking sheets for 3 minutes, then remove to a wire rack to glaze.

Make your glaze while your first batch is baking: in a large bowl, combine powdered sugar and pumpkin pie spice, mixing well to combine. Add water, 1 tablespoon at a time, until your mixture reaches a thick glaze consistency.

Using a teaspoon from your measuring spoons, scoop glaze onto each cookie, allowing to drip over edges. Allow to cool completely before serving.

Store cookies at room temperature in an airtight container between sheets of waxed paper.

Apple Crumb Pie

applecrumbpie1Confession: as much as I love to bake apple pie, I don’t eat it. I’m not a fan of cooked fruit, except for my Aunt Liz’s skillet apples, which are kind of like apple pie filling. But when it comes to this traditional, all-American dessert, I always pass.

I’ve never made a crumb-topped pie before, but they’re a great solution if you don’t want to get fancy with your crust. This pie went into my office, and it was a big hit, especially around 2:30 p.m., when the post-lunch need for sugar kicked in.

Ingredients

For the crust

For the filling

  • 6 medium-sized apples, preferably a mix of green and red, peeled and thinly sliced
  • 3/4 cup sugar
  • 2 tablespoons flour
  • 1/2 teaspoon cinnamon
  • 1/2 teaspoon nutmeg
  • About 1 tablespoon honey

For the crumb topping

  • 1/2 cup flour
  • 1/4 cup sugar
  • 1/8 cup brown sugar
  • 1 teaspoon cinnamon
  • Dash of nutmeg
  • Pinch of salt
  • 4 tablespoons unsalted butter, cold and cut into small cubes

Preparation

Preheat oven to 425 degrees.

Prepare pie crust; line a 9-inch pie plate with crust. I left my edge plain, but you could flute yours if you like.

Prepare the filling; in a large bowl, combine flour, sugar, cinnamon, and nutmeg. Add sliced apples and toss to coat.

Pour filling into pie shell and drizzle with honey.

Prepare the crumb topping; combine flour, sugar, brown sugar, cinnamon, nutmeg, and salt. Rub in the butter (or cut in with a pastry blender) until the mixture appears as small crumbs. Cover filling with crumb topping.

Place a pie guard (or aluminum foil) around the edge of your crust to prevent over-browning; bake for 20 minutes, then remove guard and reduce temperature to 375. Bake for another 40 minutes, until apples are tender.

Cool completely, or serve warm.

Below, the pie is being divided up for my coworkers (next to some expense forms). 

applecrumbpie2

Chocolate Chip Pecan Blondies

ccpecanblondiesBetter Homes & Gardens must have the most awesome test kitchens ever, because their recipes always work. Every. Single. Time.

Every now and then, even those of us with semi-pro-level baking skills can have a disaster in the kitchen, and I usually attribute this to the recipe, rather than to the baker. Some recipes are unclear, or perhaps not as well-tested as they should be; sometimes the ratios are off, or the volume is wrong for the pan, or the flavor profile leaves a lot to be desired.

Not with BH&G, my friends. These folks know their stuff, and this recipe is yet another example. It is a “make it mine” blondie recipe from Better Homes & Gardens Baking, which Mike gave me for Christmas last year (along with some snazzy new spatulas and mini loaf pans). You can add whatever you like to the base, and I chose toasted pecans and chocolate chips. Next time, I might add a chocolate drizzle to the top, or mix in some toffee pieces as well.

Ingredients

  • 10 2/3 tablespoons butter
  • 2 cups packed light brown sugar
  • 2 teaspoons vanilla
  • 2 eggs
  • 2 cups flour
  • 1 teaspoon baking powder
  • 1/4 teaspoon baking soda
  • 1 cup toasted pecans, chopped
  • 1/2 cup milk chocolate chips

Preparation

Preheat oven to 350 degrees. Line a 13 x 9 baking pan with foil, extending foil over the sides. Lightly grease foil.

In a medium saucepan, combine butter and brown sugar. Stir constantly over medium heat until mixture melts and becomes smooth.

Pour mixture into a large mixing bowl and allow to cool about 10 minutes, stirring occasionally.

Meanwhile, in a medium bowl, combine flour, baking powder, and baking soda; set aside.

Once butter/sugar mixture has cooled slightly, add vanilla and eggs and mix well.

Add flour mixture and stir well to combine; batter will become fairly thick.

Add toasted pecans and chocolate chips and stir to combine.

Spoon batter into prepared pan and spread out into an even layer.

Bake for 25-30 minutes, until top is a very light golden brown and a cake tester comes out clean.

Cut into bars while still warm; when completely cool, remove from pan and store in an airtight container.

Cherry Pie

cherry pie with plaid latticeSome time ago, I mastered my mom’s pie crust recipe. While I can make a nice, flaky crust, my crust decoration skills – like latticework and fluted edges – leave a lot to be desired. Today I chose to practice latticework, based on a plaid lattice design I saw from King Arthur Flour. And because I wanted to focus my attention on the crust and not the filling, I used canned pie filling.

That’s right. Canned pie filling. Go ahead and gasp in shock, because you know how I’m a huge proponent of scratch baking and I’ve even blogged about how I couldn’t consider myself a “real” pie baker without being able to make crust from scratch.

Here’s the thing, though…sometimes, in the interest of practicing your lattice work, you want to focus on the crust and not the filling. Or, you really want a pie but your fruit of choice is out of season. Or you simply just don’t have time to peel apples or pit cherries or slice peaches. Most of us use canned pumpkin for our pumpkin pies, don’t we? We’re not roasting pumpkins and scraping out the flesh and spicing it up with cinnamon. Nope, we’re popping open a can and mixing that puree with various sugars and spices.

So, this made me wonder…when did canned pie filling come on the scene in American baking? Probably about the same time that Rosie left her kitchen to become a riveter but was still expected to run a household, pie baking included. Whatever you choose to do, I salute you, fellow pie bakers. If you have any good tips on mastering latticework, please let me know!

Ingredients

Preparation

Preheat oven to 425 degrees.

Prepare pie crusts; line an 8-inch pie plate with one crust and reserve the second crust for the lattice top.

Roll out your second crust, then cut into strips for the lattice. I cut mine into four 2-inch strips and four 1-inch strips.

To make the lattice, place two 2-inch strips and two 1-inch strips onto your filling, alternating two-inch, then one-inch, then two-inch, then one-inch. Fold back half of the strips and lay another 2-inch strip on your filling so that it is perpendicular to the other strips. Fold the other set of strips back so they cover the new strip, then repeat with the remaining strips (again, using the two-inch, then one-inch pattern) to form the lattice. This diagram at King Arthur Flour works very well as a guide for latticework.

Fold the edges of your lattice strips over the edge of your bottom crust and crimp the edges as desired.

Place a pie guard or foil around the edge of your crust and bake for 20 minutes.

Remove the pie guard or foil and reduce oven temperature to 375, then bake for another 30-35 minutes. You may need to place your pie guard back on again for the last 10 minutes of baking.

Remove from the oven and allow to cool before serving.