Milk Dud Brownies

milk dud browniesDespite my overwhelming appreciation for chocolate and caramel, I rarely eat Milk Duds. This year, one of our Halloween candy mixes included miniature boxes of them, and because it rained on Halloween we had plenty left over. What’s one to do with leftover Milk Duds? Turn them into brownies, of course.

This recipe comes from Bakeaholic Mama and reminds me of a flourless chocolate cake – the finished product is very dense, very chewy, and quite delicious. My only challenge was cutting them – once they were cool, I was able to score them well, but actually removing them from the pan without having them crumble was next to impossible. Next time, I might add one additional teaspoon of flour to stabilize them a bit.

Ingredients

  • 5 1/2 teaspoons butter, melted
  • 3/4 cup sugar
  • 1/8 teaspoon salt
  • 1/2 teaspoon vanilla extract
  • 1 egg
  • 3 tablespoons flour
  • 1/2 cup cocoa powder
  • 1/2 cup Milk Duds, chopped

Preparation

Preheat oven to 350 degrees. Spray the bottom of an 8 x 8 pan with baking spray.

In a medium bowl, mix butter, sugar, salt, vanilla, and egg until well-combined.

Add flour and cocoa powder and stir to combine; fold in Milk Duds.

Spread batter in pan and bake for 15-20 minutes, until a cake tester comes out clean.

Cool in pan before cutting.

Chocolate Sour Cream Cake

sour cream chocolate cakeI love recipes that employ old-fashioned methods in preparation; melting chocolate on a low flame, beating an egg with a fork, actually mixing batter by hand. This is one such recipe, put to use because I had a container of sour cream staring at me from next to the buttermilk I’d been baking with all last week. Somewhere along the line, I began keeping sour cream on hand in the same way that I always have various baking chocolates, canned pumpkin, and molasses in my pantry. I never know when inspiration will strike and require a cultured dairy product.

This recipe comes from one of my favorite books, Miriam’s Kitchen, an exploration of the connections between food, family, and cultural identity. I read Miriam’s Kitchen at least once a year, usually in the fall, and I’ve been wanting to try this recipe for some time. The end result has great chocolate flavor, but is slightly drier than I’d like it to be – such can be the case with chocolate cakes, and is perhaps why they’re often paired with fudgy icing. This icing is a thick version of a chocolate drizzle; if I make this cake again, I might use a chocolate buttercream or a fudge frosting instead to add a bit of moisture.

Ingredients

For the cake

  • 8 tablespoons unsalted butter
  • 2 1/2 ounces unsweetened baking chocolate
  • 1 egg, beaten
  • 1 cup sugar
  • 1 cup sour cream
  • 1/4 teaspoon baking soda
  • 1 1/4 cup cake flour

For the icing

  • 3 tablespoons butter
  • 2 tablespoons unsweetened cocoa powder
  • 2 cups powdered sugar
  • 1 teaspoon vanilla
  • 2 tablespoons milk

Preparation

Preheat oven to 350 degrees. Grease a bundt pan very well and flour lightly.

In a small saucepan, melt butter and chocolate on very low heat, stirring frequently to combine.

In a large mixing bowl, combine egg and sugar; beat with a fork to combine, then add sour cream and beat again to combine. Scrape the sides of the bowl with a spatula as necessary.

Place a sieve over the mixing bowl and sift in cake flour and baking soda, then mix with a wooden spoon until combined.

Add melted chocolate and butter, mixing with the wooden spoon until combined.

Pour batter into prepared bundt pan; bake for 35-40 minutes, until a cake tester comes out clean. Cool completely in the pan, then turn out onto a wire rack.

Prepare the icing: in a medium saucepan, melt butter. Add cocoa powder and stir until smooth. Remove from heat; add 1 cup powdered sugar and stir until smooth; add vanilla, milk, and remaining powdered sugar to reach a thick drizzling consistency. Pour over cake and spread with an offset spatula; icing will set fairly quickly.


Buttermilk Biscuits

buttermilk biscuitsIt’s buttermilk baking week here at our house, because about a week ago I purchased a quart of buttermilk and promptly forgot what I meant to bake with it. This happens sometimes – I come home from the grocery store with some key ingredient, fully intending to bake something I saw on Pinterest or in a Better Homes & Gardens Facebook post or in a Woman’s Day magazine.

A few days later, I find the ingredient in question and wonder what I meant to make with it…which means I then have to search online, seeking out recipes that put it to use. Which, if I’m honest, usually leads me down into the rabbit hole of recipes one can find on the internet, creating the need for more ingredients that I’ll someday buy and wonder what I meant to bake with them. Anyway…because I had some buttermilk left from this weekend’s pound cake, I decided to whip up some buttermilk biscuits with last night’s chicken-and-mashed-potatoes dinner.

The key to biscuit preparation is to handle the dough as little as possible. Easy handling creates those highly desirable flaky layers that good biscuits always have; a heavy hand will yield hockey pucks. I did have to knead my dough just slightly before i patted it down, and I’m happy to say that I still had some pretty flaky layers. Note: you may also need just a bit more buttermilk if your dough is too dry, but add sparingly. It’s easy to add more liquid, but impossible to take it away.

Ingredients

  • 2 cups flour
  • 1/4 teaspoon baking soda
  • 1 tablespoon baking powder
  • 1 teaspoon salt
  • 6 tablespoons cold butter, cut into small cubes
  • 1 cup buttermilk

Preparation

Preheat oven to 450 degrees. Line a baking sheet with parchment paper.

In a large mixing bowl, stir together flour, baking soda, baking powder, and salt. Cut in butter using a pastry cutter or two knives until mixture resembles coarse crumbs. Add buttermilk and mix until just combined.

Turn dough onto a lightly floured surface and very gently pat it to 1/2 inch thickness – do not use a rolling pin. Fold over 5 times, then pat down again to 1 inch thickness. Using a round cutter, cut biscuits and place about 1 inch apart on the baking sheet. Re-form the scraps and cut remaining dough, noting that these biscuits will likely be a bit tougher than the first ones.

Bake for 10-12 minutes, until tops are golden brown. Remove from oven and serve warm.

Buttermilk Pound Cake

buttermilk pound cake“There’s a hole in this cake,” says Maria Portocalos in My Big Fat Greek Wedding, when presented with a Bundt from her soon-to-be-in-laws. So what exactly is a Bundt cake? According to Wikipedia, the Bundt is based on a European fruit cake called Gugelhupf or, in the north of Germany, Bundkuchen. The Nordic Ware company began making Bundt pans in the U.S. in the 1950s and, with the help of some publicity from Pillsbury, the pans became popular.

When you look at the photo below, you’ll have a new appreciation for the need to a) properly grease and flour your Bundt pan and b) allow your cake to cool completely before attempting to remove it from said pan. I thought my baking spray, which includes a combination of cooking spray and flour, would be enough to release the Bundt…but I was wrong. Also, I removed the cake when it was still slightly warm, which could have been another problem.

Moral of the story: grease your pan with shortening, flour your pan, and wait until your cake cools completely before you remove it from the pan so you can avoid the torn Bundt situation that I experienced in the photo below. Despite its less-than-perfect appearance, the cake itself is quite delicious.

Ingredients

Buttermilk Pound Cake

  • 3 cups flour
  • 1/4 teaspoon baking soda
  • 1 cup butter, softened
  • 2 1/2 cups sugar
  • 4 eggs
  • 1 cup buttermilk
  • 2 teaspoons vanilla

Almond Drizzle

  • 1 1/2 cups powdered sugar
  • 1 teaspoon almond extract
  • About 1 tablespoon water

Preparation

Preheat oven to 325 degrees. Grease and flour a 10-cup capacity Bundt pan.

In a small bowl, combine flour and baking soda; set aside.

In a mixing bowl, cream together butter and sugar until light and fluffy. Add eggs, one at a time, mixing well after each addition.

Add buttermilk and flour mixture alternatively, beating until just combined. Pour batter into prepared pan and bake for 70 minutes, until a cake tester comes out clean.

Allow cake to cool completely in pan; remove and invert on a cake plate before drizzling.

For the drizzle: in a large glass measuring cup combine powdered sugar and almond extract. Add water slowly, about 1 teaspoon at a time, to reach a thick drizzling consistency. Pour over top of cake and allow to drip down the sides.

Below, the evidence of my faulty pan-greasing and haste of removal is clearly observed. At least it tastes good.

bundtmishap

Chocolate Bats

chocolate batsIt’s Halloween Eve, also known as Devil’s Night. As a big fan of the city of Detroit, I was disheartened to learn that this term is primarily associated with major vandalism and arson in the Motor City. I’m hoping that Detroit is peaceful tonight, for many reasons.

Anyway…it’s also National Bat Week, and I dig bats. I’ve been wanting to make bat-themed sugar cookies for a while, and I found this very easy recipe on Betty Crocker’s website. As usual, Betty knows her stuff.

This dough is incredibly easy to work with, not too soft and not too firm, just the right texture for rolling and cutting. I usually don’t enjoy making sugar cookies because they’re quite labor-intensive, but this recipe was really simple. I used two different bat cutters and intended to pipe on some icing eyes and fangs, but once these treats were done I decided I liked them better just as they were. Happy Halloween!

Ingredients

  • 1 1/2 cups flour
  • 3/4 cup cocoa powder
  • 1/8 teaspoon salt
  • 12 tablespoons butter, softened
  • 1 1/3 cup sugar
  • 1 egg
  • 1 teaspoon vanilla extract

Preparation 

In a medium bowl, combine flour, cocoa powder, and salt; set aside.

In a mixing bowl, cream together butter and sugar until fluffy. Add egg and vanilla extract, beating until well-combined.

Slowly add flour mixture, scraping the sides of the bowl often and beating until a very well-combined, soft dough forms.

Gently knead the dough a few times to make sure it comes together; roll dough into a ball and flatten into a disc. Wrap in plastic and chill for 1 hour.

Preheat oven to 375 degrees; line three baking sheets with parchment or foil.

On a lightly floured surface, roll dough to 1/8 inch thickness. Cut with a bat-shaped cookie cutter; if using different shapes, be sure to bake the same shape on one cookie sheet. Baking different-sized or differently-shaped cookies on the same sheet can lead to uneven results; some of your cookies might be underdone while others will be overdone.

Bake for 8-10 minutes, until edges are set. Remove from oven and cool on cookie sheets for 1-2 minutes, then remove to wire racks to cool completely.


Peanut Butter Fudge

IMG_3598There’s a scene in Julie & Julia where Simone Beck, flipping through an American cookbook, asks in her awesome French accent: “what eez marshmallow fluff?” 

“Fluff” is actually the brand of marshmallow creme made by Durkee-Mower, Inc., one of three North American companies to manufacture this confectionery concoction of corn syrup, sugar syrup, vanilla flavoring, and egg whites. Often employed in the fluffernutter sandwich alongside peanut butter, marshmallow creme is also used in baking and candy making and is a frequently-found ingredient in fudge.

This recipe is very simple, requiring just 6 ingredients that you’re likely to have on hand (except perhaps for the evaporated milk). As a Jif loyalist, I highly recommend using Jif peanut butter in this fudge; the end result is a smooth, very sweet and peanut buttery treat.

Ingredients

  • 8 tablespoons butter, cut into small cubes
  • 2/3 cup evaporated milk
  • 3 cups sugar
  • 1 2/3 cup peanut butter
  • 1 7-ounce jar marshmallow creme
  • 1 teaspoon vanilla extract

Preparation

Line a 13 x 9 baking pan with foil and spray lightly with cooking spray. Set aside, close to your stove top, for easy access once fudge is ready to be poured.

In a large pot, combine butter, evaporated milk, and sugar and cook over medium heat, stirring constantly, until the mixture boils. Reduce heat to a simmer and continue to cook for 5 minutes, stirring constantly.

Remove from heat and add peanut butter, stirring very well to combine. Add marshmallow creme and vanilla, stirring vigorously to combine ingredients completely.

Pour into prepared pan and allow to cool completely at room temperature. Cut into small squares (trust me, this fudge is very sweet and you don’t need large pieces) and store in an airtight container at room temperature. Note: refrigerating fudge can dry it out, so refrigeration is not recommended.

Chocolate-Dipped Orange Shortbread

orange shortbreadOrange and chocolate is one of my all-time flavor combinations, ranking up there with chocolate and peppermint, chocolate and peanut butter, and lemon and raspberry. The orange Milano cookie is among my favorite commercially-produced cookies, and I’m surprised to say that these cookies taste very much like an orange Milano.

This is the first time I’ve used cane sugar in a recipe, rather than as a topping on my baked goods. I wasn’t so sure about it, given that it sounded like broken glass in my mixing bowl, but it turned out quite well.

If you don’t like orange and chocolate together, you can certainly leave these plain, but I believe the chocolate, particularly semi-sweet, gives these cookies a great dimension of flavor that you won’t achieve otherwise.

Ingredients

  • 4 tablespoons unsalted butter, softened
  • 1/3 cup cane sugar
  • 1/2 teaspoon salt
  • 1 tablespoon orange zest
  • 1/4 teaspoon orange extract
  • 1 cup plus 2 tablespoons flour
  • 1/2 cup semisweet chocolate chips
  • 1 tablespoon shortening

Preparation

Preheat oven to 300 degrees. Line an 8 x 8 baking dish with parchment paper.

In a mixing bowl, combine butter and cane sugar; mix on medium speed until combined, scraping the sides of the bowl frequently. Add salt, orange zest, and orange extract and beat until well-combined, about 2 minutes.

Add flour about 1/4 cup at a time, beating until a soft dough forms. Press dough into the prepared pan and smooth the top with a small offset spatula. Prick with a fork to make designs, if desired.

Bake for 30-35 minutes, until the top is just golden brown. Remove from oven and let cool in pan for about 10 minutes; gently lift out parchment and place on a heatproof cutting board. Cut into squares and place on a wire rack to cool completely before dipping.

In a small saucepan, slowly melt chocolate chips and shortening, stirring frequently until smooth. Dip half of each cookie into chocolate and place on parchment or waxed paper to harden; store in an airtight container.

Lemon Loaf

lemon loafHave you thought of putting a crumb topping on lemon bread? I hadn’t until I found this recipe over at Stephie Cooks, and I have to say it is quite a brilliant idea.

I’m crazy about lemons, particularly in quick breads. This recipe yields a drier treat than I was expecting – it’s almost like a pound cake – and has great texture from both the crumb topping and lemon drizzle. I added more lemon zest and drizzle than the original recipe called for, because I believe you can never have too much lemon flavor in a bread like this.

Many quick breads call for vegetable oil and milk, but this recipe employs evaporated milk instead of the regular kind, and that was something new for me. The remaining 7 ounces of evaporated milk are currently waiting in my fridge and are destined to be made into fudge later this week, since I bought a 12-ounce can instead of the 5-ounce variety in the original recipe. And that’s okay – stay tuned for (hopefully) peanut butter fudge later this week.

Ingredients

Crumb Topping

  • 1/4 cup plus 2 tablespoons flour
  • 1/4 cup sugar
  • pinch of salt
  • 2 tablespoons melted butter

Lemon Bread

  • 1 1/2 cups flour
  • 1 cup granulated sugar
  • 1 teaspoon baking powder
  • 1/2 teaspoon salt
  • 5-oz evaporated milk
  • 1/3 cup vegetable oil
  • zest of 1 large lemon
  • 2 eggs

Lemon Drizzle

  • 1 1/4 cups powdered sugar
  • 4 teaspoons lemon juice

Preparation

Preheat oven to 350 degrees. Lightly grease and flour an 8 1/2 x 4 1/2 loaf pan.

Prepare the crumb topping: in a small bowl, combine flour, sugar, salt, and melted butter. Stir with a fork until crumbs form; set aside.

Prepare the bread batter: In a medium bowl combine flour, sugar, baking powder, and salt. In a small bowl combine evaporated milk, vegetable oil, lemon zest, and eggs. Stir well to combine, then add all at once to the flour mixture. Stir to combine.

Pour batter into prepared loaf pan and top with crumbs. Bake for 50-75 minutes, until a cake tester comes out clean (mine baked for about 55 minutes). Cool completely in pan; carefully remove and place on a wire rack above parchment or waxed paper for drizzling.

Prepare the drizzle: in a large measuring cup, combine powdered sugar and lemon juice. Stir well, until consistency is drizzly and easily pourable but not too thin (add a small amount of additional powdered sugar if necessary). Pour over top of loaf; allow to set before serving.


Pumpkin Cupcakes with Maple Cream Cheese Frosting

pumpkin cupcakePumpkin baking continues! This weekend I made some pumpkin chocolate chip bread and I had a little more than a cup of pumpkin left over, so I wanted to try something new. I found this recipe online and first thought it was more muffin-like than cupcake-like, but the end results are definitely in the cupcake family. They have an excellent texture, likely due to the combination of pumpkin puree and vegetable oil, and just enough spice from the cinnamon and nutmeg.

These cupcakes pair well with maple cream cheese frosting, which is one of my favorites ever. Just make sure you use real maple syrup – the pure stuff – rather than maple flavoring for this frosting; while you could probably use maple flavoring, I doubt it would be the same. If you’re lacking in pure maple syrup, you could certainly frost these with plain cream cheese frosting or cinnamon cream cheese frosting.

Pumpkin Cupcakes

Ingredients

  • 1 cup flour
  • 1 teaspoon baking powder
  • 1/2 teaspoon baking soda
  • 1/2 teaspoon salt
  • 1 teaspoon cinnamon
  • 1/2 teaspoon nutmeg
  • 1 cup pumpkin puree
  • 1/2 cup vegetable oil
  • 2 eggs
  • 1 cup sugar
  • 2 teaspoons vanilla extract

Preparation

Preheat oven to 350 degrees. Line cupcake tins with paper liners; my recipe yielded 14 cupcakes.

In a large bowl, combine flour, baking powder, baking soda, salt, cinnamon, and nutmeg.

In a large glass measuring cup, combine pumpkin puree, vegetable oil, eggs, sugar, and vanilla extract. Mix well, then add all at once to the flour mixture. Stir until well-combined and smooth.

Using a two-inch cookie scoop, fill cupcake wells about 3/4 full.

Bake for 25 minutes or until a cake tester comes out clean. Remove from oven; immediately remove from tins and place on a wire rack to cool completely before frosting.

Maple Cream Cheese Frosting

Ingredients

  • 4 tablespoons butter, at room temperature
  • 2 ounces cream cheese, at room temperature
  • 2 cups powdered sugar
  • 2 tablespoons pure maple syrup

Preparation

In a mixing bowl fitted with the paddle attachment, cream together butter and cream cheese for 2-3 minutes, until very fluffy.

Add 1 cup powdered sugar and beat until well-combined; add 1 tablespoon of maple syrup and beat until well-combined. Add remaining powdered sugar and maple syrup, beating until very well-combined.

Frost cupcakes using an offset spatula. Store in an airtight container in the fridge.

Coffee Cake Muffins

coffee cake muffin
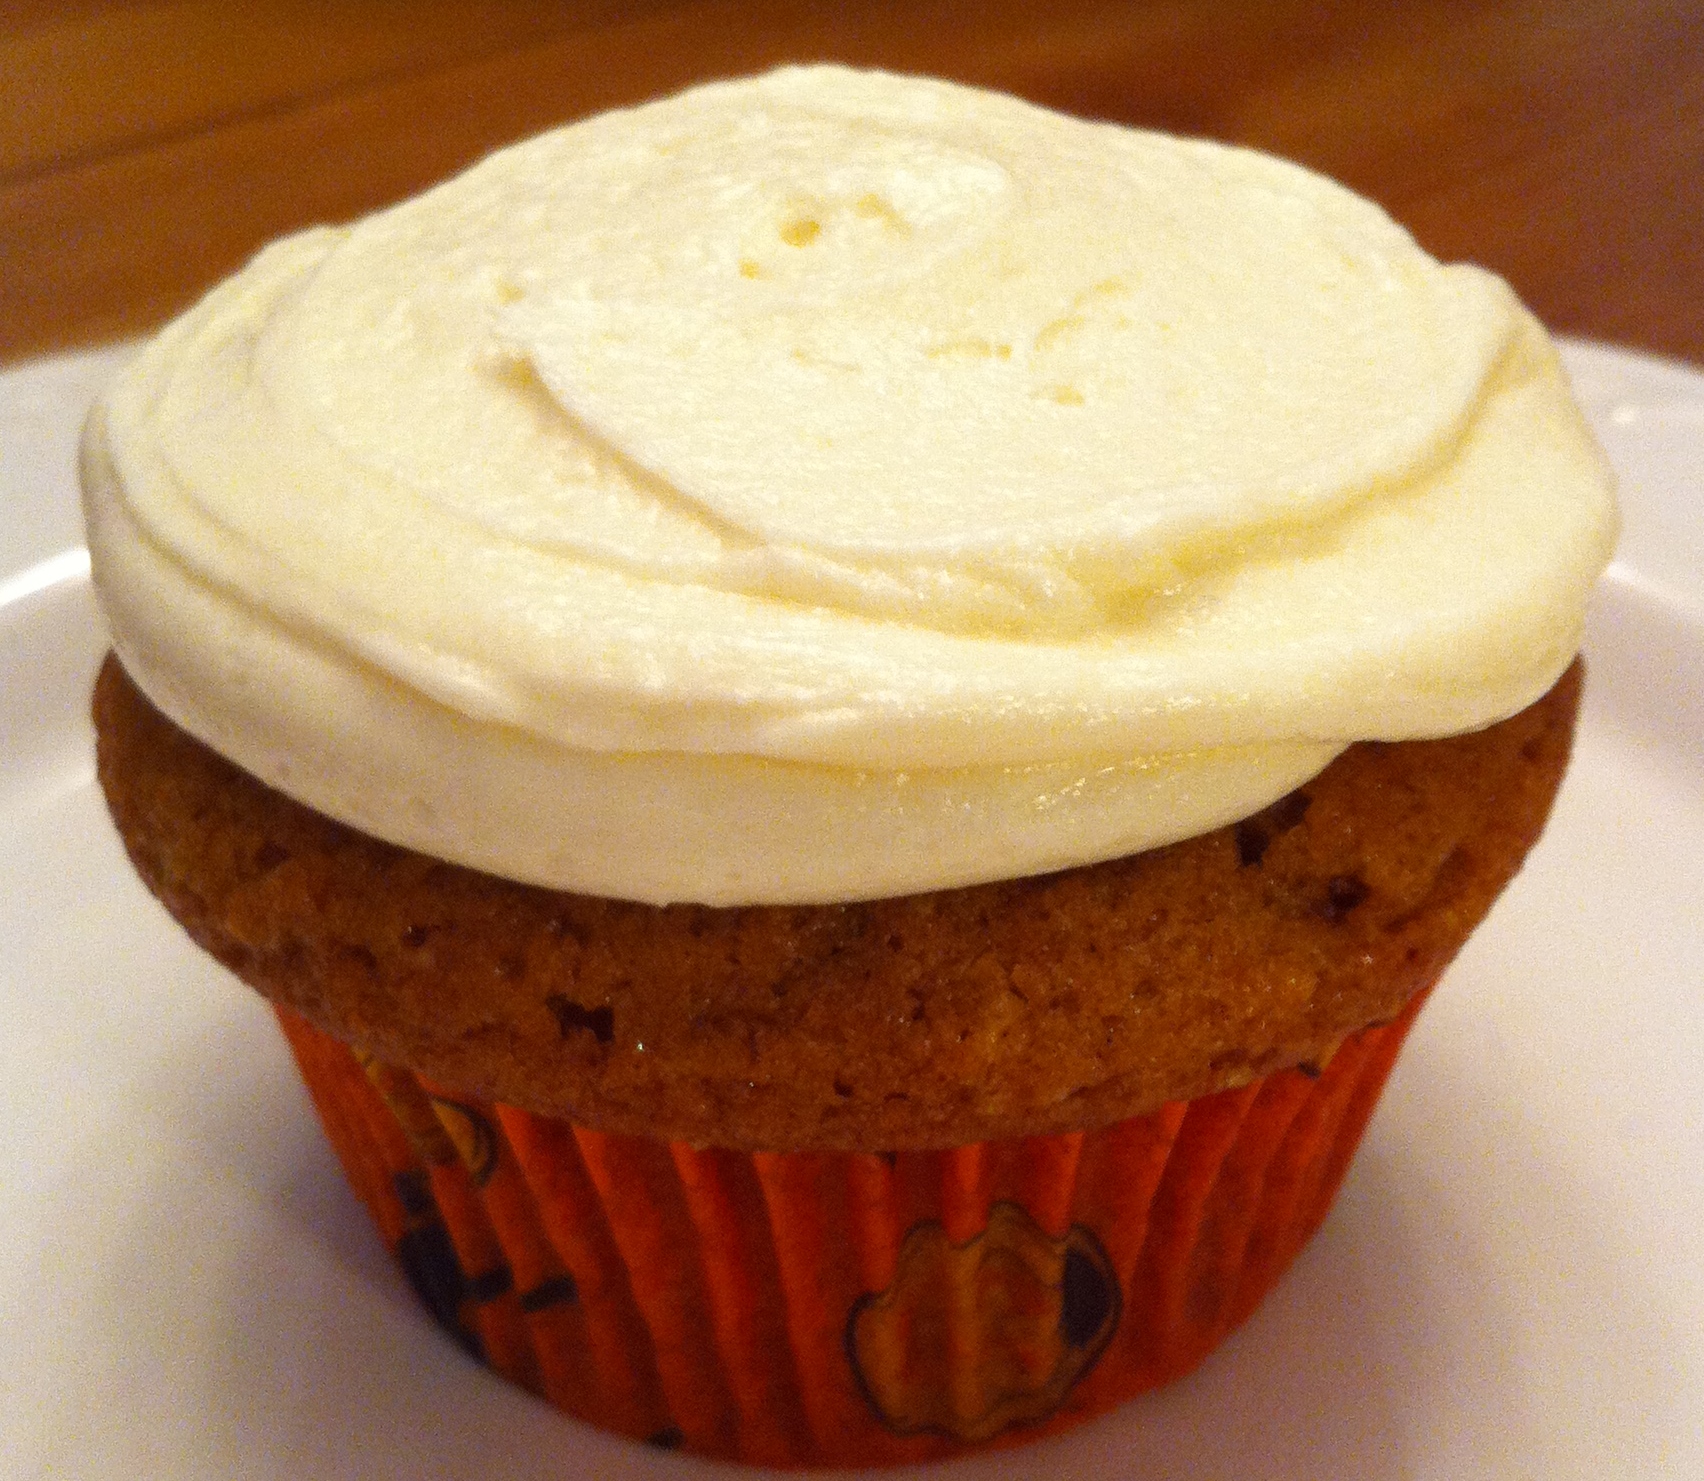
As I’ve mentioned before, any time cake is considered a breakfast food, I’m on board. These coffee cake muffins are a great alternative to the full cake version, especially if you’re baking for a smaller crowd. Today, my small office team welcomed a new colleague, and I wasn’t in need of a whole coffee cake–so this 12-muffin recipe worked out very well. (That’s my desk in the photo to the left, and yes, my mouse pad looks a bit like the Wonder Bread logo.)

I adapted this recipe slightly from a recipe in my trusty Better Homes & Gardens 25th Anniversary Cookbook and have just a few suggestions for further adaptations in the future. Next time I’d like to use pecans instead of walnuts, and I’ll probably use vanilla extract in the drizzle instead of water. The drizzle wasn’t part of the original recipe, but I think it adds a nice hint of sweetness to these otherwise spicy muffins.

Ingredients

For the streusel filling and topping:

  • 3 tablespoons flour
  • 3 tablespoons light brown sugar
  • 1/2 teaspoon cinnamon
  • 2 tablespoons butter, cut into small cubes
  • 4 tablespoons finely chopped walnuts

For the muffins:

  • 1 1/2 cups flour
  • 1/2 cup sugar
  • 1 1/4 teaspoons baking powder
  • 1/4 teaspoon baking soda
  • 1/2 teaspoon cinnamon
  • 1/4 teaspoon ginger
  • 1/4 teaspoon salt
  • 4 tablespoons butter, cut into small cubes
  • 1 beaten egg
  • 1/2 cup buttermilk or sour milk*

For the drizzle:

  • 1/2 cup powdered sugar
  • About 1 teaspoon water

*If you don’t have buttermilk on hand, you can make sour milk by placing 1/2 tablespoon of white vinegar or lemon juice into a glass measuring cup, then pouring in enough milk to make a full 1/2 cup. Let stand for 5 minutes before using. 

Preparation

Preheat oven to 400 degrees. Line a 12-cup muffin tin with paper liners.

Make the streusel: in a small bowl, stir together flour, brown sugar, and cinnamon. Add butter and rub in until the mixture looks like coarse crumbs. Stir in chopped walnuts; set aside.

In a medium bowl, combine flour, sugar, baking powder, baking soda, cinnamon, ginger, and salt. Add butter and rub in until the mixture looks like coarse crumbs. Combine beaten egg and buttermilk or sour milk, then add all at once to the crumb mixture, stirring until just combined. Batter will be lumpy.

Using a one-inch cookie scoop, drop scoops of batter into prepared muffin tin, filling about 1/3 full. Top with half the streusel mixture, then layer the remaining batter and the remaining streusel mixture.

Bake for 15-18 minutes, until a cake tester inserted into the center comes out clean. Allow to cool completely before drizzling.

Make the drizzle: in a small bowl combine powdered sugar and about 1/2 teaspoon water. Stir, adding more water as necessary to reach a drizzle consistency. Place drizzle into a piping bag fitted with a small plain tip and pipe in whatever pattern you like. Store at room temperature in an airtight container.